
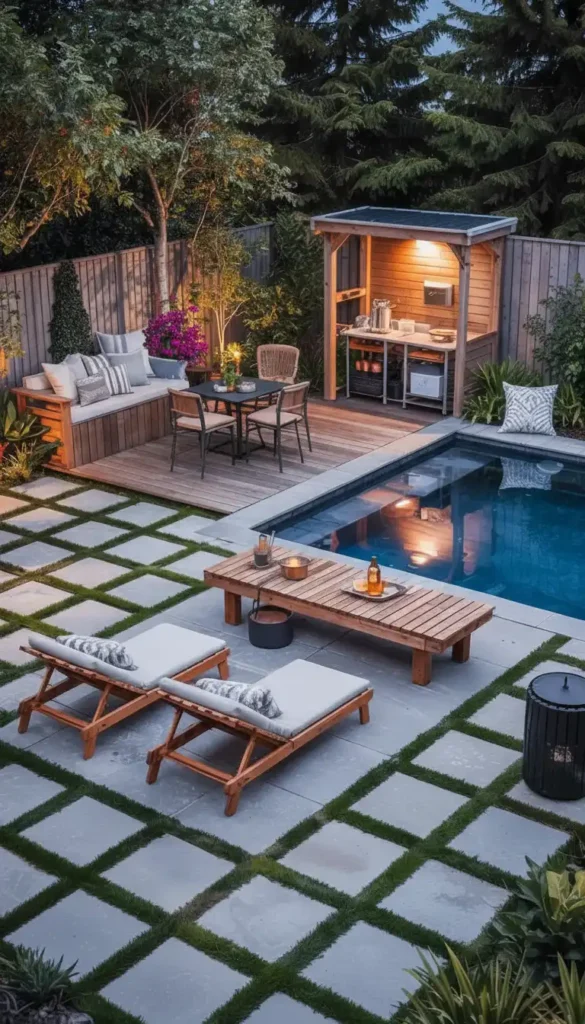
You’ve scrolled through countless backyard pool photos that look like resorts, wondering how they achieve that expensive, magazine-worthy look—and whether it’s even possible on a real-world budget. The truth is, most of us want a pool area that feels special and inviting, not just functional, but we get stuck thinking luxury means spending a fortune on elaborate features. The gap between dreaming about a beautiful pool space and actually creating one comes down to understanding which design moves deliver visual impact without draining your savings.
In 2026, the smartest pool designs prioritize clean lines, intentional layouts, and a few strategic upgrades over complex construction and expensive materials. Whether you’re working with an in-ground pool, planning an above-ground setup, or just trying to make your existing pool area feel more polished, the same principles apply: start with clarity, add comfort thoughtfully, and let restraint work in your favor. This guide walks through five distinct approaches to outdoor pool design that solve real challenges—from tight budgets to weekend timelines—with practical steps that actually work in backyards of all sizes.
Outdoor Pool Ideas 2026: Budget Friendly Backyard Designs That Look Luxury
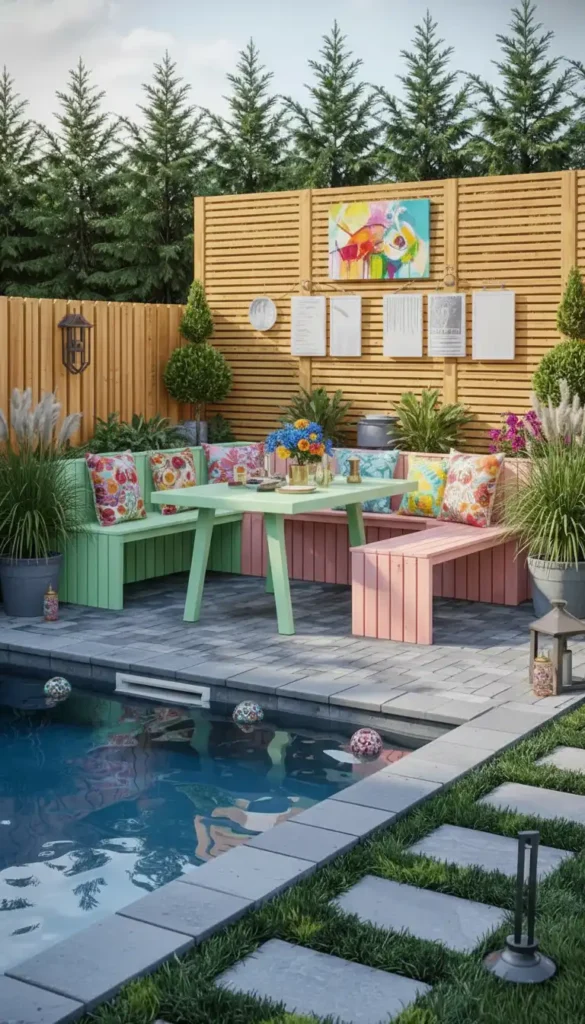
Creating a pool area that reads as luxurious without the luxury price tag means understanding that high-end design is about clarity and consistency, not expensive features. The key is making intentional choices that create a cohesive, resort-like feeling even on a modest budget.
Start With Clean Geometry
The shape and outline of your pool area control everything else about how the space feels.
- Choose simple rectangles or squares that look more sophisticated than complex curves
- Create one strong focal wall using fencing, screening, or a planted backdrop
- Use pale decking against darker boundaries for instant visual contrast
- Keep the perimeter consistent so the pool looks intentionally framed
Clean geometry costs nothing extra but transforms how professional the space appears.
Build An Outdoor Living Room Zone
Dedicated gathering areas make pool spaces feel intentionally designed rather than random.
- Position 2-4 loungers near the shallow end where people naturally gather
- Add a low outdoor coffee table that anchors the seating arrangement
- Include one shaded element like a cantilever umbrella or light pergola
- Place a slim console nearby for towel and drink storage
This living room approach prevents the empty deck look that makes spaces feel unfinished.
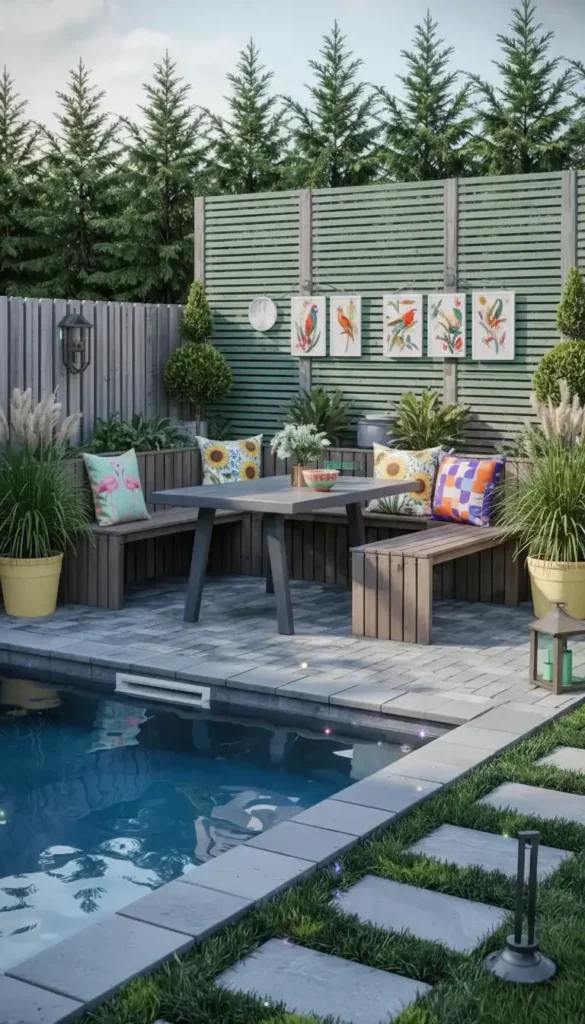
Use Large Planters As Architecture
Strategic planting softens hard edges and adds structure without construction costs.
- Frame pool corners with oversized planters that define boundaries
- Choose simple evergreens or grasses for year-round modern appeal
- Keep the planting palette limited to 2-3 plant types maximum
- Use matching planter finishes to create visual cohesion
These vertical elements add warmth and make the deck feel less like a parking pad.
Pin this budget luxury pool layout! 📌
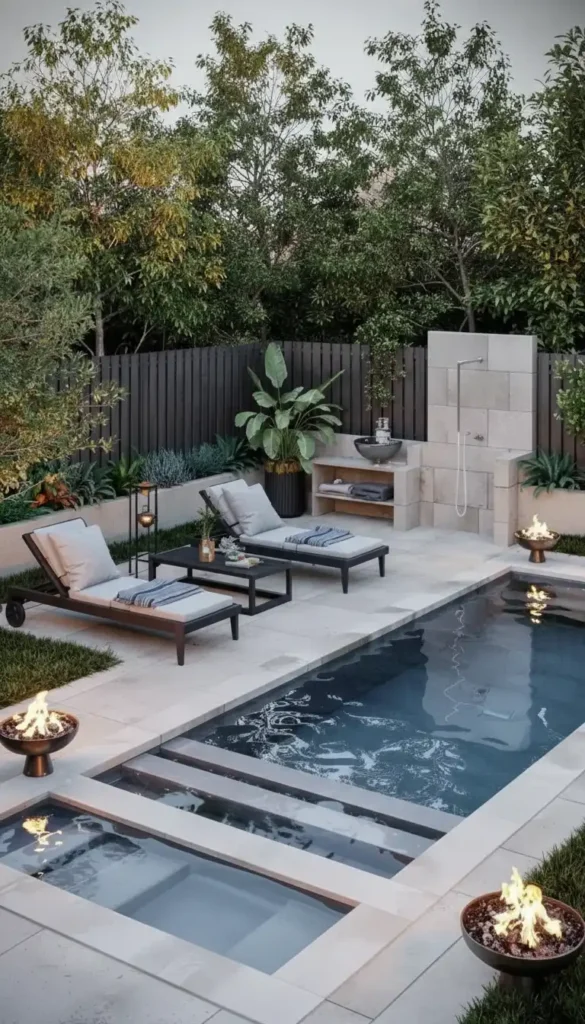
Pay Attention To Waterline Details
The edge where water meets the pool structure is what your eye reads first up close.
- Upgrade waterline tile or coping even if other elements stay basic
- Choose consistent edge treatment all the way around the pool
- Select light-colored coping that stays cool underfoot and looks crisp
- Ensure clean grout lines and proper sealing for a finished appearance
This detail-level attention is what separates budget pools from ones that look expensive.
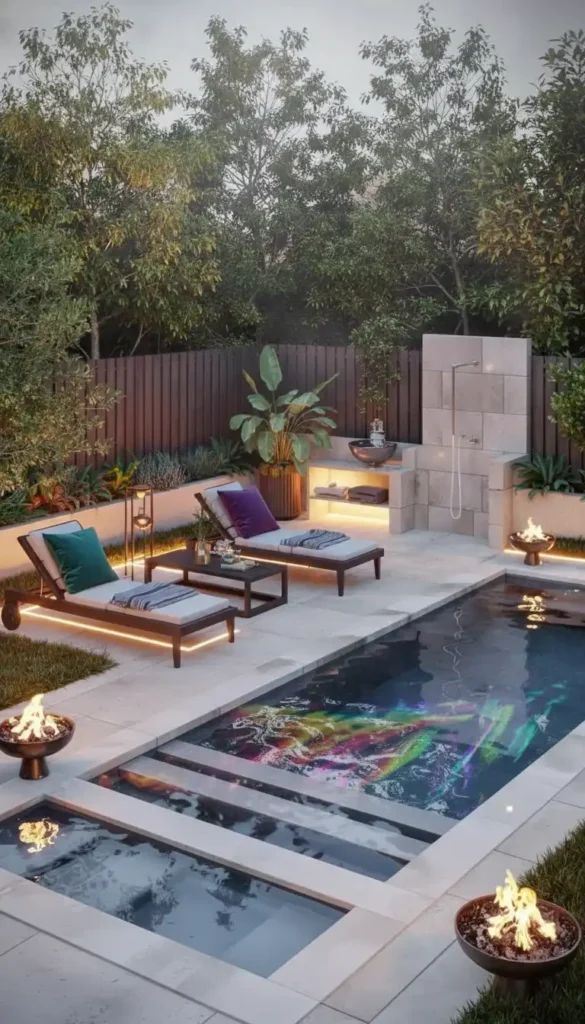
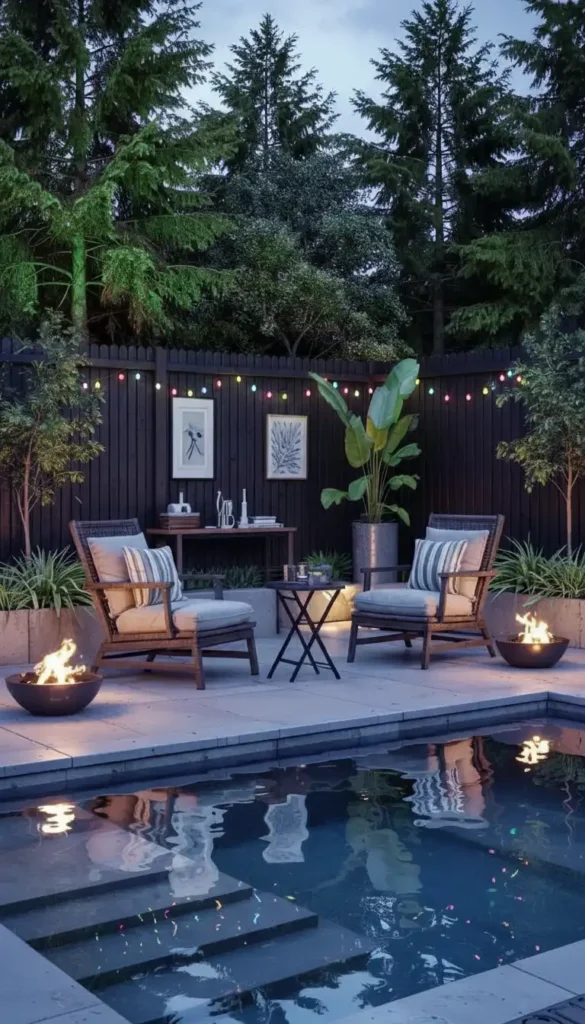
Add Fire Elements For Evening Drama
Fire features act like jewelry for outdoor spaces, especially after dark.
- Place fire bowls symmetrically at the far edge of the pool deck
- Choose linear fire features for a more contemporary look
- Position flame elements at safe distances from traffic and seating
- Use warm lighting that glows rather than harsh spotlights
Fire creates focal points that make the entire space feel more luxurious and complete.
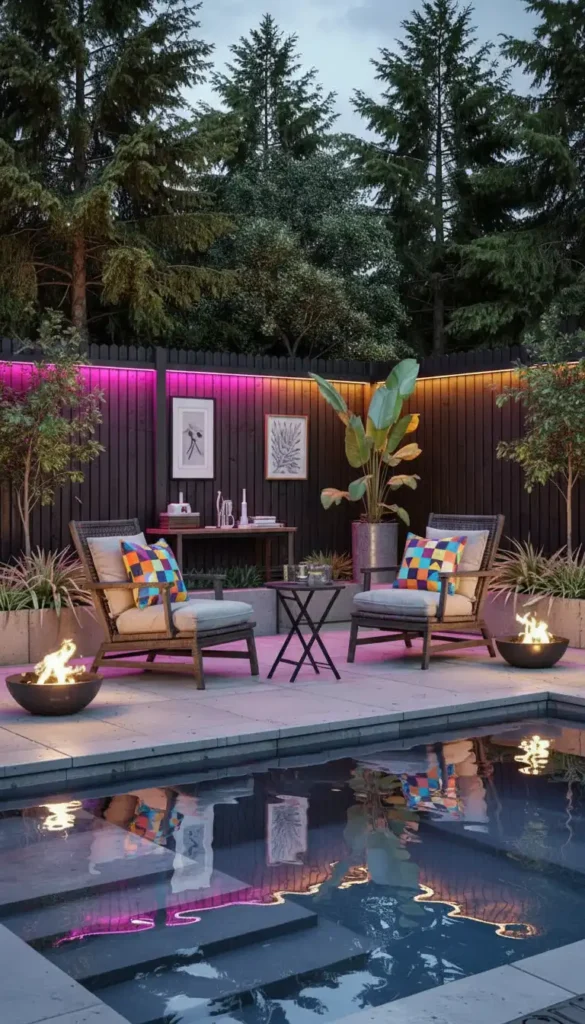
Layer Lighting Thoughtfully
Nighttime illumination transforms budget spaces into high-end experiences.
- Install low pathway lights that guide movement without glare
- Add wall sconces on privacy screens or fencing
- Include warm string lights under covered areas or pergolas
- Use underwater pool lights to make water shimmer after sunset
Layered lighting is one of the highest-impact, lowest-cost luxury upgrades available.
Repeat One Material Throughout
Visual unity comes from consistent finishes rather than expensive individual pieces.
- Use the same wood tone on decking, screens, and benches
- Match metal finishes across furniture, lighting, and hardware
- Coordinate textile colors in cushions, umbrellas, and towels
- Keep planter materials uniform rather than mixing terracotta, metal, and plastic
This repetition makes the space feel professionally designed even when pieces come from different sources.
Include An Outdoor Shower Station
Even a simple rinse area elevates the functionality and resort feeling.
- Install a basic enclosed shower with proper drainage
- Choose matching finishes that tie into the overall design palette
- Position it away from main seating but convenient to the pool entry
- Add hooks and a bench for towels and clothing
This practical element signals that the pool area is a complete, thoughtfully planned zone.
Save this luxury-on-a-budget strategy! 📌
Create Symmetry In Small Ways
Balance and repetition make spaces feel intentional and higher-end.
- Place matching planters on both sides of pool steps or entry points
- Use paired loungers rather than random individual chairs
- Position lights symmetrically along pathways or walls
- Add identical side tables flanking a seating grouping
Even modest symmetry creates a designed feeling that reads as more expensive.
Outdoor Pool Ideas On A Budget: Smart Materials And Simple Layout Tricks
Budget pool design succeeds when you focus on materials that age well and create clean lines, rather than simply choosing the cheapest options available. Smart material selection and thoughtful layout planning deliver professional results without professional prices.
Choose Intentional Hardscape Materials
The foundation materials determine both the look and long-term maintenance burden.
- Select modular pavers that create clean lines and allow easy replacement
- Consider composite deck tiles that install quickly and resist weathering
- Use straightforward poured concrete with a smooth finish for modern simplicity
- Avoid mixing too many textures which makes small areas feel busy
These materials look purposeful and maintain their appearance with minimal effort.
Limit Your Finish Count
Visual coherence comes from restraint in material selection.
- Pick one main hardscape material like concrete or pavers as your base
- Add one accent material like wood screening or metal edging
- Repeat these exact finishes throughout rather than introducing variations
- Keep colors within a tight palette of 2-3 tones maximum
This discipline prevents the chaotic look that happens when every zone uses different materials.
Prioritize Circulation First
Layout planning should always start with how people move through the space.
- Identify clear paths from the house to the pool and around the perimeter
- Keep walkways 36-48 inches wide for comfortable two-way traffic
- Avoid placing furniture where it blocks natural flow patterns
- Create pause points at logical spots like near steps or the shallow end
When circulation works well, every other design element falls into place more easily.
Pin this material selection approach! 📌
Add A Built-In Bench For Multiple Functions
One well-placed bench solves both seating and visual boundary needs.
- Build a narrow bench along one edge that defines the pool perimeter
- Use the same material as your main decking for cohesion
- Make it 16-18 inches deep for comfortable sitting without bulk
- Include hidden storage underneath if construction allows
This single element provides function and helps frame the pool area visually.
Use Vertical Screens For Room-Like Boundaries
Privacy elements create the feeling of an outdoor room without expanding the footprint.
- Install slatted screens that provide privacy while allowing air flow
- Choose simple vertical designs that look contemporary and clean
- Match wood or metal finishes to other elements in the space
- Position screens to block sightlines from neighbors while framing views
These vertical planes transform open decks into defined, intimate spaces.
Keep Furniture Compact And Slim
In tight spaces, furniture scale determines whether the layout feels spacious or cramped.
- Select slim-legged chairs and tables that look lighter visually
- Choose one compact dining set rather than oversized sectionals
- Use stackable loungers that store efficiently when not in use
- Keep furniture minimal with just essential pieces for actual use
Right-sized furniture makes budget spaces feel larger and more thoughtfully designed.
Add Storage That Matches Your Deck
Visible storage ruins clean lines, while integrated storage enhances them.
- Choose a storage box in the same color and material as your decking
- Position it along the perimeter where it doubles as extra seating
- Use it for pool toys, cushions, and maintenance supplies
- Keep the top surface clear or styled minimally
Matching storage disappears into the design while solving practical clutter problems.
Include A Rinse Zone
Preventing grass and dirt from entering the pool keeps everything cleaner and more pleasant.
- Create a simple foot rinse area near the pool entry
- Use pavers or concrete to define this transition zone
- Add a small outdoor shower or hose connection if budget allows
- Keep this area visually connected to the main decking material
This practical element reduces maintenance and makes the pool experience more enjoyable.
Save this budget layout planning! 📌
Plan For Drainage And Slope
Hidden infrastructure makes or breaks outdoor projects and often accounts for budget overruns.
- Ensure proper slope away from the house and pool structure
- Install drainage solutions before finalizing hardscape placement
- Use permeable materials where possible to reduce water management issues
- Consult local codes for required drainage specifications
Getting drainage right from the start prevents expensive fixes and water damage later.
Cheap Outdoor Pool Ideas That Still Feel Modern And High End
Affordable upgrades can create a high-end aesthetic when you focus on simplification and strategic improvements rather than adding more features. Modern luxury is about refinement and restraint, not complexity.
Simplify The Background First
Clean backdrops make everything in front of them look more intentional and expensive.
- Repaint fences in a uniform neutral color like charcoal, white, or soft gray
- Stain decking to one consistent tone rather than leaving it weathered
- Add uniform privacy panels that create visual continuity
- Remove visual clutter like old planters, random hooks, and faded accessories
A neutral, unified backdrop is the fastest way to make affordable furniture look upscale.
Create One Minimal Feature Wall
A single dramatic element draws the eye and establishes a luxury mood.
- Install vertical timber slats in a simple, rhythmic pattern
- Use textured concrete panels for an architectural statement
- Paint one accent wall in a sophisticated dark tone
- Keep the design clean and geometric without decorative details
This focal point creates impact without requiring expensive materials throughout the space.
Upgrade Textiles Over Furniture
Cushions and fabric are what you touch and notice most, making them high-impact upgrades.
- Invest in better outdoor cushions even if the furniture frames are basic
- Choose matching covers across all seating for cohesion
- Select solid colors or subtle textures rather than busy patterns
- Add weather-resistant throw pillows for layered comfort
Quality textiles transform affordable furniture into pieces that look and feel expensive.
Pin this affordable modern pool styling! 📌
Add Strategic Lighting Layers
Thoughtful illumination creates ambiance that feels premium regardless of budget.
- Install low pathway lights that guide movement elegantly
- Add wall sconces on screens or fencing for architectural interest
- String warm white lights under pergolas or along boundaries
- Include dimmable options for adjustable mood control
Lighting is the secret weapon for making budget spaces photograph like luxury ones.
Use Symmetry To Signal Design Intent
Balanced placement makes everything look more deliberately designed.
- Position matching planters on both sides of key areas
- Place paired loungers rather than random single chairs
- Add identical side tables flanking seating zones
- Keep accessories minimal and matched rather than collected and mismatched
Symmetry costs nothing but creates instant visual sophistication.
Choose Modern Color Palettes
Color relationships determine whether spaces feel current or dated.
- Use warm whites and soft grays as base colors
- Add one accent tone like deep charcoal, sage green, or warm terracotta
- Coordinate water tones with surrounding materials—cool grays with blue water, warm tones with green-tinted pools
- Avoid bright primary colors that date quickly and look casual
Sophisticated color choices elevate even the most basic materials.
Hide Pool Equipment Thoughtfully
Visible pumps and filters break the clean aesthetic immediately.
- Build matching panels that conceal equipment while allowing ventilation
- Use the same materials as your screening or fencing
- Position plantings to naturally obscure mechanical elements
- Ensure access panels blend seamlessly with surrounding surfaces
Hiding infrastructure is a low-cost move that dramatically improves the overall appearance.
Add A Narrow Side Table Between Loungers
This single piece creates a hotel-like feeling instantly.
- Choose a simple modern design in weather-resistant materials
- Keep it small and functional—just large enough for drinks and sunscreen
- Match finishes to other furniture for visual cohesion
- Position it within easy reach of both loungers
This detail signals that the space has been thoughtfully planned for actual use.
Save this high-end appearance technique! 📌
Leave Strategic Negative Space
Empty areas make everything else look more premium and intentional.
- Avoid filling every corner with furniture or accessories
- Keep some deck visible rather than covering every surface
- Allow breathing room around seating groupings
- Resist adding decorative items that don’t serve clear functions
Restraint and open space are hallmarks of expensive design that cost nothing to implement.
Easy Outdoor Pool Ideas For Weekend Upgrades And Quick Visual Impact
Weekend transformations focus on changes that don’t require demolition or specialized skills but still deliver immediate, noticeable improvements. Quick upgrades work when they address the most visible elements that shape first impressions.
Focus On The Backdrop, Lighting, And One Furniture Zone
Limiting your scope to three key areas creates cohesive change without overwhelming effort.
- Clean and seal the deck for instant freshness
- Paint or stain fencing to create a uniform background
- Add one complete seating grouping with matching pieces
- Install lighting that makes the space usable after dark
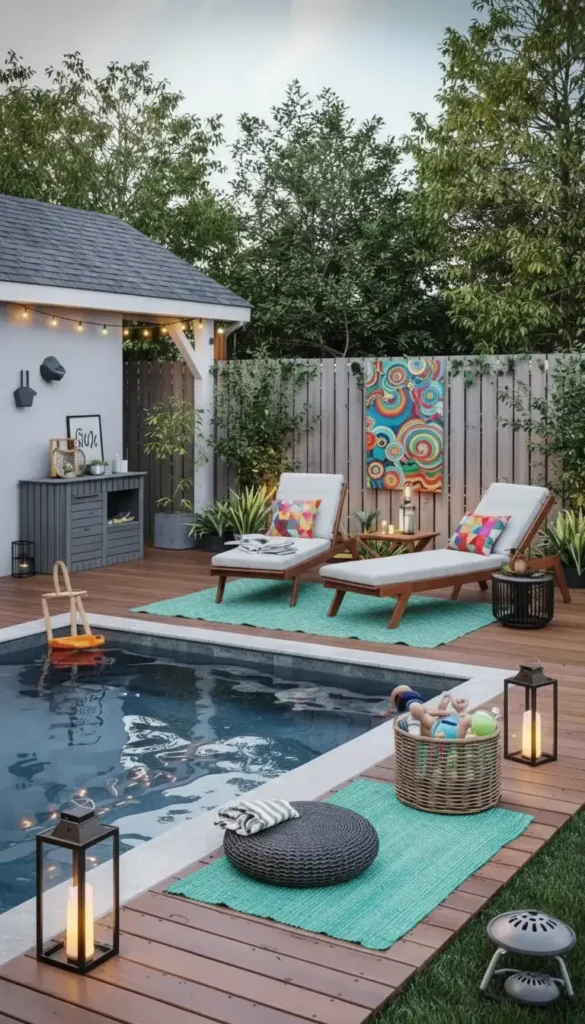
These three categories cover what people see first and how they experience the space functionally.
Add A Storage Solution First
Visible clutter ruins even the best design, so storage should be the first priority.
- Place a deck box or storage bench in a convenient location
- Choose finishes that match your decking or furniture
- Use it for pool toys, cushions, and maintenance supplies
- Keep the top clear or styled with one simple plant or lantern
Storage immediately makes the space look more organized and intentional.
Create A Dedicated Lounge Corner
One well-styled zone transforms the entire pool area’s character.
- Add two matching loungers positioned at a slight angle toward each other
- Include a small side table between them for drinks and books
- Place an outdoor rug underneath if the surface allows
- Add matching cushions in a cohesive color scheme
This furniture grouping creates a destination that makes the pool area feel designed for relaxation.
Pin this weekend transformation plan! 📌
Install A Slim Privacy Screen
Enclosure changes the entire experience of using a pool area.
- Choose pre-made panels that install quickly without specialized tools
- Position them to block sightlines from the most intrusive angles
- Match finishes to existing elements like fencing or furniture
- Keep designs simple and modern with clean lines
Privacy screens create an immediate sense of intimacy and resort-like seclusion.
Add Quick Lighting Solutions
Illumination you can install in hours changes how and when the space gets used.
- Place solar path lights along walkways for instant evening guidance
- Hang string lights from existing structures or poles
- Add battery-operated lanterns on tables and ledges
- Install plug-in wall lights if outlets are available nearby
Quick lighting extends the usable hours and creates ambiance that feels much more expensive.
Include Non-Slip Mats For Safety And Style
Functional elements can also contribute to the overall design.
- Add outdoor rugs in water-resistant materials near the pool entry
- Use textured mats in areas where people stand while dripping
- Choose colors that coordinate with your overall palette
- Keep edges secured to prevent tripping hazards
These practical additions improve safety while defining zones visually.
Upgrade With Large Potted Plants
Quick greenery adds height, softness, and a finished look instantly.
- Choose 2-4 large planters in matching finishes
- Fill with low-maintenance plants like grasses, palms, or evergreens
- Position them at corners and entry points to frame the space
- Use simple modern pot designs rather than ornate traditional styles
Strategic planting is the fastest way to add life and dimension to pool areas.
Create A Toy Storage System
If kids use the pool, visible chaos undermines every design effort.
- Add a dedicated basket or bin specifically for pool toys
- Position it near the pool entry for convenient access
- Choose weather-resistant materials that can stay outside
- Make it easy for kids to use so toys actually get put away
Organized toy storage keeps the space photo-ready even during active family use.
Save this quick-impact upgrade list! 📌

Style One Surface Completely
Fully styling one area creates a reference point for how the whole space could look.
- Complete the coffee table with a tray, candle, and small plant
- Finish one console with rolled towels and a decorative object
- Style the lounge zone with cushions, a throw, and side table accessories
- Photograph this area to see the potential and maintain the standard
One perfectly styled zone motivates completing the rest of the space to the same level.
DIY Outdoor Pool Ideas: Build A Backyard Oasis With Step By Step Planning
DIY pool projects succeed when you approach them as phased builds with clear priorities rather than trying to complete everything at once. Strategic planning prevents the overwhelming scattered approach that leaves projects half-finished.
Define Functional Zones Before Building
Understanding how the space will actually be used prevents layout mistakes that are expensive to fix.
- Identify zones for swimming, lounging, dining, and storage
- Plan circulation paths that connect zones without cutting through activity areas
- Consider sun patterns and position seating accordingly
- Account for water splash zones and where dripping occurs naturally
This functional mapping ensures the finished space actually works for daily use.
Decide On Edge Treatment First
Boundaries and transitions are what make pool areas look complete and intentional.
- Choose coping materials that define the pool perimeter
- Select decking materials that work with your budget and climate
- Plan screening or fencing that provides privacy and wind protection
- Design transitions between different surface materials
Getting edges right prevents the unfinished look that undermines DIY projects.
Use Modular Systems Where Possible
Pre-made components reduce construction complexity while maintaining professional appearance.
- Install deck tiles that snap together without specialized fastening
- Use paver grids that create patterns without custom cutting
- Choose pre-made privacy panels rather than building screens from scratch
- Select modular furniture that ships flat and assembles easily
These systems deliver clean results faster and with less room for error.
Pin this DIY planning framework! 📌
Build Storage Into The Plan From Day One
DIY projects need even more storage than professionally designed spaces due to tool and material management.
- Include a storage bench that hides pool supplies, tools, and cushions
- Build hidden compartments under decking if construction allows
- Add a small shed or cabinet for larger equipment and seasonal items
- Keep cleaning supplies separate from guest-facing storage
Integrated storage prevents the cluttered workshop look that ruins outdoor spaces.
Add Seating In Layers
Phasing furniture additions prevents overspending on pieces you don’t actually use.
- Start with 2-4 loungers as the foundation seating
- Add a small dining set if the space and your habits support it
- Include one or two accent chairs only after living with the layout
- Consider a bar cart zone for entertaining without permanent construction
This layered approach lets you adjust based on how you actually use the space.
Include A Simple Outdoor Shower
DIY shower stations are more achievable than most people realize.
- Plan proper drainage with a gravel bed or connection to existing systems
- Use simple wall-mounted fixtures designed for outdoor use
- Create an enclosed area with matching privacy panels
- Position it conveniently near the pool but away from main seating
Even a basic rinse station elevates the functionality and resort feeling significantly.
Incorporate Fire Elements Carefully
Fire features add drama but require proper planning for safety and code compliance.
- Choose pre-made fire bowls that don’t require gas line installation
- Position them away from traffic paths and at safe distances from structures
- Use stable bases that won’t tip during use
- Check local codes for requirements on outdoor fire features
Thoughtful fire element placement extends pool season into cooler evenings.
Take Time On Alignment And Spacing
DIY looks professional when measurements are precise and elements line up properly.
- Use string lines to ensure straight edges and consistent spacing
- Measure multiple times before cutting or fastening permanently
- Keep joint spacing uniform in paving and decking installations
- Check level and plumb repeatedly throughout construction
This attention to detail is what separates amateur projects from professional-looking results.
Save this phased DIY approach! 📌
Choose A Restrained Material Palette
DIY projects look scattered when they use whatever materials are available or on sale.
- Select 2-3 core materials and stick to them throughout
- Choose one wood tone for all wood elements
- Use one metal finish for all hardware, furniture, and fixtures
- Keep colors limited to a deliberate palette rather than random selections
Material consistency is the single biggest factor in making DIY look designed rather than improvised.
Plan For Professional Help On Critical Elements
Knowing when to hire experts prevents safety issues and code violations.
- Get licensed electricians for any wiring and lighting installation
- Hire plumbers for permanent shower and water feature connections
- Consult structural engineers if adding significant weight or changing drainage
- Verify permit requirements before starting work that might need inspection
Strategic professional help on key elements makes the rest of your DIY work both safer and more successful.
Conclusion
Your backyard pool deserves to be more than just a place to swim—it should be a space that makes you feel like you’re on vacation without leaving home. The difference between a pool area you barely use and one that becomes your favorite summer destination often comes down to a few intentional design choices rather than massive spending. Whether you’re starting from scratch with careful planning, upgrading on a weekend timeline, or maximizing what a tight budget can deliver, the principles stay the same: clarity beats complexity, and thoughtful details create luxury feelings.
Take one approach from this guide that matches your situation and timeline, then commit to seeing it through completely rather than halfway implementing multiple ideas. Maybe it’s finally creating that clean backdrop and one perfect furniture zone, or maybe it’s phasing a DIY build so each layer feels finished before moving forward. Small, focused efforts in outdoor pool design create spaces that look expensive and feel intentional, pulling you outside instead of leaving you wishing for something better. Your pool area is ready for the transformation—it just needs your decision to start with clarity instead of trying to do everything at once.

“I share simple, beautiful and affordable home decor ideas to help you style every corner of your home with ease.