

There is something deeply comforting about stepping into a backyard that feels alive, rooted, and real. Not perfectly manicured. Not showroom-polished. But warm, textured, and honest — like a place that was built slowly, with care, over many seasons. If you have ever stood in a garden that made you exhale and think this is exactly where I want to be, you already understand what rustic design can do to a space. That feeling is not accidental. It is crafted.
This guide is for you if you are tired of generic, catalog-style backyards and want something that genuinely reflects nature’s imperfect beauty. These 5 rustic garden decor ideas for 2026 will walk you through every element — from weathered furniture and reclaimed wall art to vintage yard pieces, romantic outdoor setups, and cozy lawn zones — so you can build a backyard that feels timeless, personal, and completely your own.
Rustic Backyard Foundations: Balance, Texture, and Natural Charm
Great rustic gardens do not happen by accident. They are built on a clear foundation: natural materials, deliberate layering, and a commitment to imperfection. Before you add a single pot or bench, understanding these core principles will save you time, money, and a lot of redesigning.
Why Balance Is the Secret to a Rustic Backyard
A common mistake is going too hard in one direction — all wood, all stone, or all greenery. The magic of rustic design lives in the contrast between these elements.
- Wood brings warmth and organic character
- Stone adds permanence and structure
- Greenery softens edges and ties everything together
- Metal accents (galvanized, aged iron) introduce industrial texture
When these four materials appear together in the right proportions, the backyard reads as effortlessly natural rather than deliberately constructed.
The Rule of Imperfection
Unlike modern or minimalist design, rustic style actually improves with age. A slightly warped plank, a mossy stone border, a faded terra cotta pot — these are not flaws. They are features.
- Choose materials that weather gracefully
- Avoid overly sealed or varnished finishes on outdoor wood
- Let climbing vines soften structural edges over time
- Embrace uneven spacing in pathways and plantings
The goal is not perfection. It is authenticity.
Pathways That Feel Organic and Inviting
Pathways do more than connect points A and B — they set the tone for the entire backyard. In rustic garden design, paths should meander slightly rather than cut in sharp straight lines.
- Use irregular flagstone, reclaimed brick, or compacted gravel
- Leave small gaps between stones for moss or creeping thyme to grow
- Edge paths with low-growing plants or natural timber borders
- Allow slight curves that feel discovered rather than designed
Why it works: An organic pathway slows you down, invites exploration, and makes the garden feel larger than it actually is.
Pin this rustic pathway guide! 📌
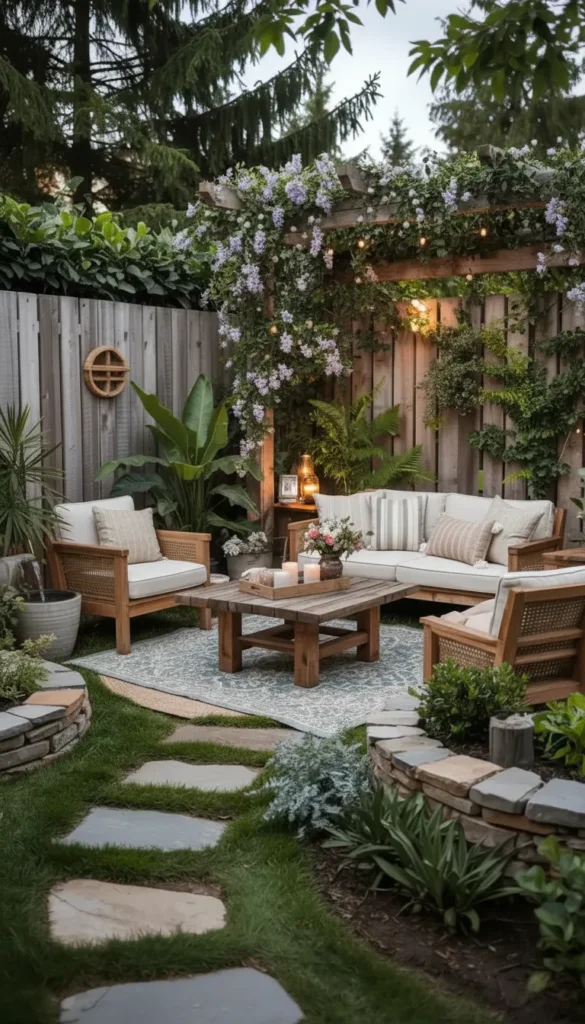
Furniture That Sets the Rustic Tone Immediately
Furniture is the fastest way to anchor the visual identity of a rustic backyard. The right pieces communicate the entire aesthetic without a single word.
- Weathered wood benches are the cornerstone — look for teak, cedar, or reclaimed pine
- Wicker seating adds texture without heavy visual weight
- Reclaimed farmhouse tables work for dining and casual gathering zones
- Metal accents on chair legs or table frames add industrial contrast
Cushions matter too. Choose neutral tones — cream, oatmeal, sage, slate — in linen or canvas fabric. Bright, synthetic colors clash with rustic materials and break the mood.
Lighting That Creates Warmth, Not Drama
Rustic backyards glow rather than shine. The lighting philosophy here is subtle, warm, and ambient.
- String lights draped over pergolas or between trees are universally effective
- Lanterns on pathways or steps add height variation and vintage charm
- Solar-powered stake lights keep maintenance low and lines clean
- Candles in glass hurricane holders work beautifully on tables
Avoid: Cool-white LED spotlights. They are too sharp for the rustic aesthetic and make the space feel like a parking lot after dark.
Adding Seasonal Focal Points That Keep the Space Dynamic
One of the biggest challenges in backyard design is keeping things interesting year-round. Rustic gardens handle this naturally because seasonal change is part of the design.
- Spring: Wooden crates filled with wildflowers or tulips near the entrance
- Summer: Sunflowers in galvanized buckets, hanging herbs in clay pots
- Fall: Pumpkins on steps, corn stalks tied to fence posts
- Winter: Bare branches with white lights, evergreen wreaths on gates
Small seasonal swaps cost very little but completely refresh the visual story your backyard tells.
Save this backyard seasonal strategy! 📌
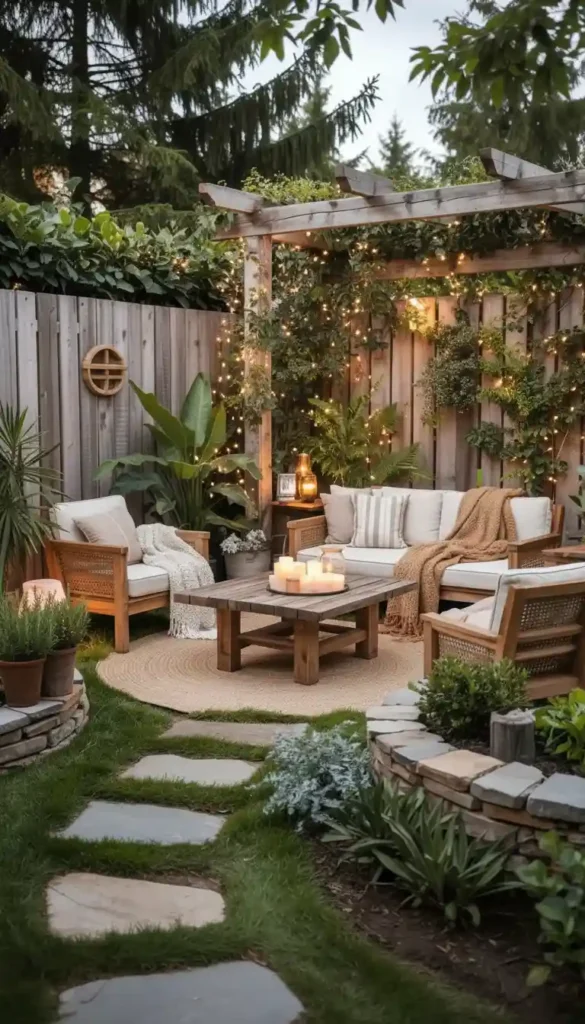
Container Planting That Layers Depth and Color
One of the most versatile tools in a rustic backyard is the planted container. Unlike in-ground beds, containers can be moved, swapped seasonally, and grouped in infinite combinations.
- Clay and terracotta pots are the classic choice — they age beautifully and breathe well for plant roots
- Galvanized metal buckets and troughs add industrial texture and hold larger plants
- Weathered wooden crates work as low planters for herbs or trailing flowers
- Stone or concrete urns provide formal structure in a softer context
Grouping strategy: Cluster three containers of different heights near seating zones, at pathway intersections, and beside entryways. The contrast in heights creates visual rhythm without additional cost or construction.
Layering Plants for a Lush, Expansive Look
Plant layering is the technique that separates flat-looking gardens from ones that feel genuinely immersive. The principle is simple: use tall, medium, and low plants together in the same zone.
- Tall layer (4–6 ft): Ornamental grasses, climbing roses, tall salvias, verbena bonariensis
- Mid layer (18 in – 3 ft): Lavender, coneflowers, Russian sage, dwarf shrubs
- Ground layer (under 12 in): Creeping thyme, chamomile, clover, low sedums
Why it works: When the eye moves from ground level to mid-height to tall, it reads the garden as deep and expansive — even if the actual space is quite small. This is how professional landscape designers make modest-sized backyards feel enormous.
Closing Principle
The foundation of any great rustic backyard is restraint with intention. Choose fewer, better pieces. Let natural materials do the talking. And resist the urge to fill every corner — the spaces between elements are just as important as the elements themselves. A garden that breathes is a garden that invites.
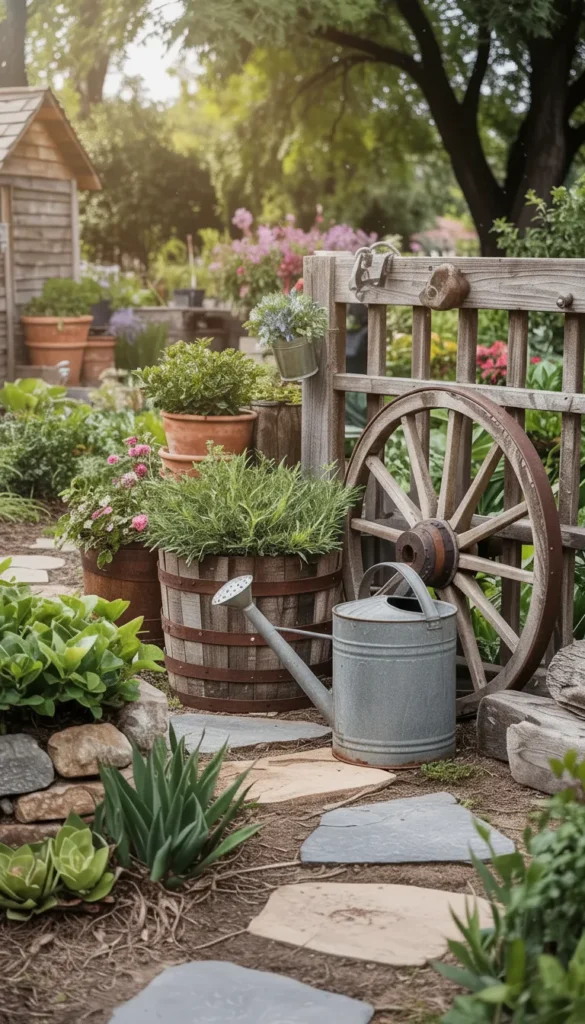
Vintage Yard Decor and Landscaping with Character
Vintage decor elevates rustic gardens from simply “natural-looking” to genuinely storytelling spaces. When done right, your backyard will feel like it has been loved and curated over decades — even if you built it last spring. The goal is to create a garden that feels collected, not purchased.
The Art of Storytelling Through Objects
Every vintage piece you place in a garden carries implied history. A rusted wagon wheel, an antique milk can, a weathered ladder — each one prompts a quiet question: where did this come from? That curiosity is what makes vintage-rustic gardens so compelling.
- Choose objects that look like they had a previous purpose
- Avoid pieces that are “new vintage” — mass-produced items made to look old
- Mix eras: early farm tools, mid-century watering cans, Victorian iron elements
- Keep a loose theme so the collection feels personal, not chaotic
Why it works: Objects with apparent history create emotional resonance. They make the space feel inhabited and human.
Best Vintage Pieces for a Rustic Landscape
Certain vintage items consistently perform well as garden decor because of their material durability and visual weight.
- Wagon wheels: Position against a fence, near a flower bed, or as a gate feature
- Wooden ladders: Lean against a wall and use rungs as shelves for small pots
- Aged barrels: Excellent as planters for herbs, lavender, or trailing flowers
- Galvanized metal watering cans: Group in clusters of three near entry points
- Old metal tools (rakes, shovels): Mount on fences as wall art
Each of these items is both functional and sculptural. They earn their space twice.
How to Source Authentic Vintage Pieces
You do not need to spend a fortune to get genuinely characterful pieces.
- Estate sales and farm auctions are the best sources for real patina
- Flea markets often carry pieces at low prices that only need cleaning
- Online marketplaces (Facebook Marketplace, Craigslist) frequently list old tools and farm equipment
- Demolition yards and salvage companies stock reclaimed wood and metal
Tip: When sourcing, prioritize items made from cast iron, solid wood, or thick-gauge metal. These materials age beautifully outdoors and require minimal maintenance.
Pin this vintage sourcing guide! 📌
Placing Vintage Elements Without Overcrowding
The biggest error people make with vintage garden decor is using too much of it. When every corner holds an antique, nothing stands out.
- Apply the rule of three: group items in odd numbers for visual balance
- Leave breathing room around each feature piece
- Use plants and greenery between vintage elements to soften the transitions
- Designate two or three “feature zones” and keep the rest of the garden cleaner
Using Greenery to Integrate Vintage Decor
Hard vintage objects can feel out of place without plant softening. Greenery is what bridges the gap between the man-made and the natural.
- Trail ivy or Virginia creeper over metal structures and wooden ladders
- Plant lavender or rosemary around barrel planters to blur their edges
- Use ornamental grasses behind wagon wheels to add movement
- Let moss grow naturally on aged stone and wood surfaces
The result: Vintage pieces that look like they grew into their surroundings rather than being placed there.
Pathway Design That Connects Decorative Zones
A pathway is not just a functional route — in a vintage-styled garden, it is the thread that ties all your decorative moments together.
- Connect each vintage feature with a clear, intentional path
- Use gravel, stepping stones, or brick to mark the route
- Add low border plants (creeping thyme, chamomile) along path edges
- Place lanterns every 4–6 feet along the pathway for evening definition
Practical tip: Use a garden hose to lay out your path before digging. Walk it several times to test the natural flow before committing.
Evening Lighting for Vintage Zones
Subtle lighting transforms vintage garden zones after dark and extends how long you can actually enjoy the space.
- Hang Edison bulb string lights on metal structures or between posts
- Place glass lanterns with pillar candles near barrel planters
- Use low-voltage stake lights to illuminate pathway edges
- Solar-powered wall sconces mounted on wooden fence sections work well near tool displays
Save this vintage garden lighting approach! 📌
The Importance of Mixing Materials in Vintage Design
All-wood vintage displays can feel flat. All-metal displays can feel cold. The visual richness of a great vintage garden comes from intentional material contrast.
- Pair weathered wood (warm, organic, soft grain) with oxidized metal (cool, hard, aged patina)
- Combine clay and terracotta (earthy, matte) with galvanized tin (reflective, industrial)
- Add natural fiber elements — rope, jute, woven baskets — to break up hard surfaces
- Introduce stone as a grounding element that connects everything to the earth
Visual rule: If three adjacent elements are the same material, one of them needs to change. Repetition builds rhythm, but monotony kills interest.
Closing Principle
Authenticity over abundance. A single well-placed wagon wheel outperforms twenty cheaply sourced “vintage-style” items. Invest in quality pieces, space them generously, and let the plants do the work of integration. The vintage garden you are building is not a collection — it is a story. Make sure every chapter earns its place.
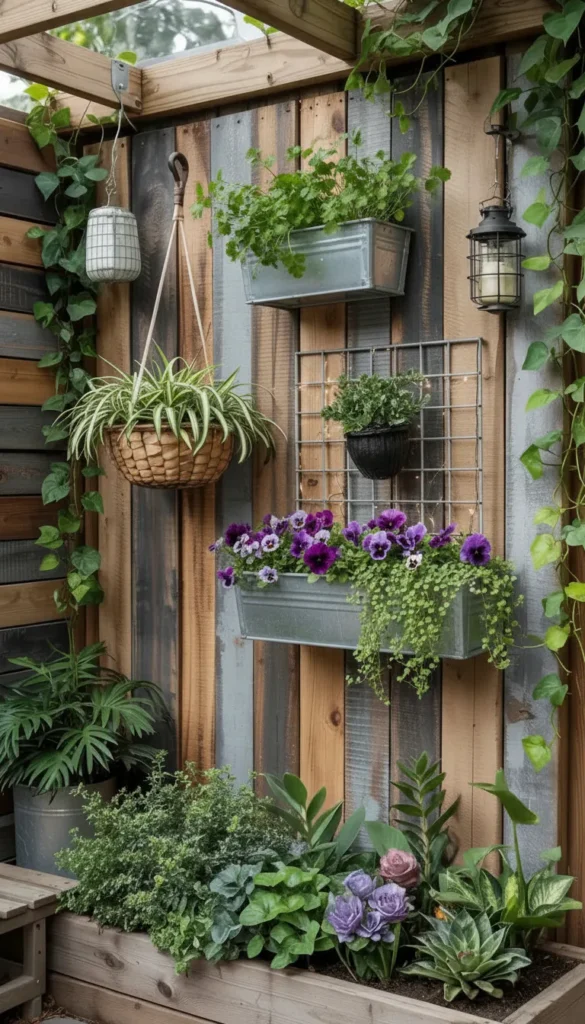
Rustic Garden Wall Decor Using Reclaimed Materials
Vertical space is one of the most underused opportunities in backyard design. Walls, fences, and vertical structures offer a canvas that most gardeners completely ignore. Rustic wall decor adds texture, depth, and visual layers without consuming a single square foot of ground space. This makes it especially powerful in smaller gardens and patios.
Why Vertical Space Changes Everything
When you add interest to walls and fences, you literally expand the perceived size of your garden. The eye travels upward and outward rather than staying flat on the ground plane.
- Vertical elements add dimension to small, flat spaces
- They create natural backdrops for photography and gathering areas
- Layered vertical texture draws the eye through the space
- Wall decor can define zones and create visual separation
Especially useful for: Urban backyards, narrow side yards, apartment patios, and enclosed garden rooms.
Best Reclaimed Materials for Garden Walls
Reclaimed materials are ideal for rustic wall decor because they arrive pre-aged. The weathering, grain variation, and wear marks are built in.
- Reclaimed wood planks: Horizontal or vertical, create rich textural backdrops
- Old wooden shutters: Mount on fence sections as decorative panels
- Metal grids or bed frames: Excellent structures for hanging planters or tools
- Vintage window frames: Used as wall art or as shadow boxes for small plants
- Pallet sections: Broken down and remounted as textured wall panels
Where to find them: Architectural salvage yards, demolition sites, and barn sales are your best sources.
How to Build a Reclaimed Wood Wall Panel
This is one of the most impactful DIY projects for a rustic backyard, and it requires minimal skill.
- Select planks of varying widths and thickness for visual interest
- Mix wood tones — pale driftwood gray, warm honey, dark walnut
- Mount on a plywood backing for structure, then attach to fence or wall
- Space planks with small, irregular gaps for an authentic look
- Seal lightly with matte outdoor varnish to preserve without over-polishing
Estimated cost: $30–$80 depending on salvage pricing in your area.
Pin this reclaimed wall panel project! 📌
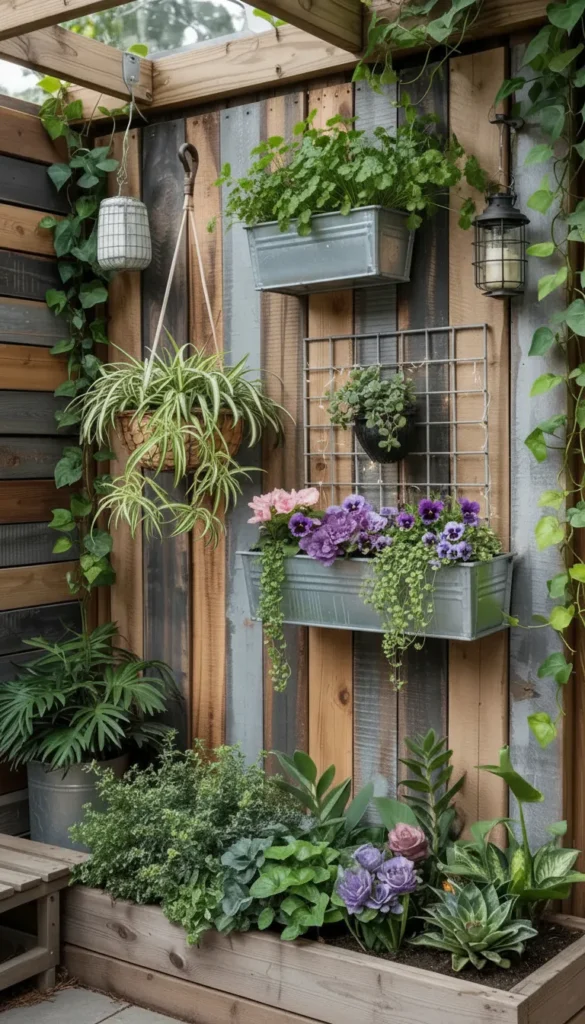
What to Hang on a Rustic Garden Wall
Once you have your wall surface, the layering begins. Think of the wall as a display shelf turned vertical.
- Hanging planters: Terracotta, galvanized tin, or wooden box styles
- Lanterns: Wrought iron or aged metal with candles or solar inserts
- Floating shelves: Reclaimed wood brackets holding small herb pots
- Metal hooks: For garden tools used as decorative sculpture
- Woven baskets: Natural fiber styles holding trailing plants
Key principle: Mix functional and decorative items. A wall that only displays art feels flat. A wall with both art and living plants feels layered and alive.
Climbing Plants That Enhance Rustic Walls
Living plants are the most powerful tool for integrating wall decor with the garden’s natural environment.
- Clematis: Fast-growing, available in white and purple, clings to metal grids beautifully
- Roses (climbing variety): Classic rustic choice, softens wood and brick
- Honeysuckle: Fragrant and vigorous, grows over fences and walls naturally
- Virginia creeper: Spectacular fall color, extremely low maintenance
- Jasmine: Softens metal structures and adds fragrance
Planting tip: Position climbing plants 18 inches from the wall base to allow root spread and air circulation.
Consistency in Materials for Visual Harmony
The most common mistake in wall decor is mixing too many different materials and losing cohesion.
- Choose one or two dominant materials (e.g., wood + metal) and repeat them
- Repeat similar finishes — matte, weathered, oxidized — across multiple elements
- Use color as a unifier: limit wall decor to two or three color tones
- Echo wall materials in other parts of the garden (furniture, planters, edging)
Why it matters: Repetition creates rhythm. Rhythm creates cohesion. Cohesion makes a space feel intentionally designed rather than randomly assembled.
Height Variation on Garden Walls
A flat, evenly-distributed wall display reads as static. Introduce height variation to create movement.
- Place taller elements (lanterns on hooks, tall planters) at one or two anchor points
- Fill mid-height with hanging planters and shelves
- Use small trailing plants at lower positions to connect wall to ground
- Step back frequently and assess the composition from a distance
Save this rustic wall decor layering technique! 📌
Adding Functional Storage to Rustic Walls
One of the underappreciated benefits of rustic wall design is how naturally it accommodates storage without looking utilitarian.
- Mount a row of iron S-hooks on reclaimed wood planks to hold garden tools
- Use old wooden crates mounted horizontally as open shelving for small pots
- Hang a pegboard covered with reclaimed wood panels for a clean but rustic tool station
- Install a weathered mail box or tin container as a small supply holder near the garden gate
Practical benefit: When tools and small supplies have a visible, designated place on the wall, the rest of the garden stays cleaner and more organized — even if it looks effortlessly natural.
Closing Principle
The wall is not a background — it is part of the design. Treat every vertical surface as an opportunity to add texture, life, and character. Reclaimed materials, climbing plants, and varied heights will transform a flat fence into one of the most memorable features of your entire backyard. The wall you ignored last season might become the element your guests comment on most.
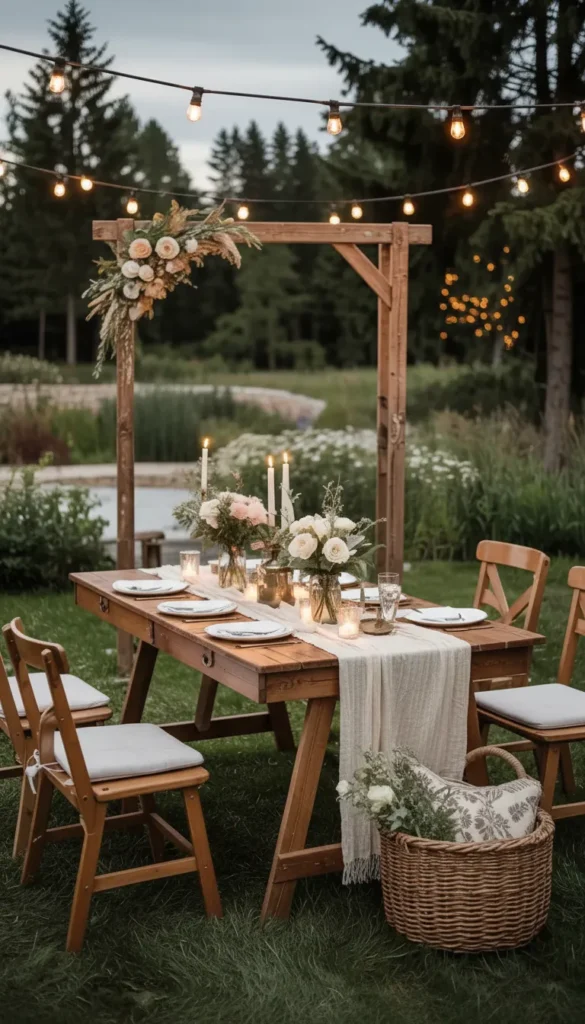
Rustic Garden Wedding Decor for a Romantic Outdoor Setting
Few settings are more naturally romantic than a well-designed rustic garden. The combination of aged wood, soft candlelight, wildflowers, and open sky creates an atmosphere that no banquet hall can replicate. Whether you are planning a full wedding or simply an intimate celebration, these rustic wedding decor ideas will help you build a setting that feels timeless and genuinely beautiful.
The Foundation: Softness and Atmosphere
Romantic rustic design differs from everyday rustic design in one key way: softness takes precedence. You are still using natural materials, but the selection and arrangement should feel delicate rather than rugged.
- Prioritize linen, cotton, and natural fiber textiles over coarse burlap
- Choose muted floral tones — blush, ivory, sage, dusty rose — over bold colors
- Keep lighting warm and low rather than bright and overhead
- Allow greenery and florals to flow naturally rather than sitting in rigid arrangements
The goal: Guests should feel enveloped by the space, not impressed by it.
Structural Elements That Define the Setting
The structural backbone of a rustic wedding garden creates the framework everything else hangs from.
- Wooden arch or arbor: The single most impactful structural element. Build from cedar or reclaimed timber. Allow climbing roses or greenery to drape naturally.
- Farmhouse tables: Long wooden tables create communal intimacy. Avoid round tables with skirted linens — they read as ballroom, not garden.
- Vintage chairs: Mismatched wooden chairs add charm. Cross-back chairs, painted ladder-backs, and simple Windsor styles all work beautifully together.
- Hay bales with linen covers: Used as casual seating in ceremony areas
Practical note: Structural elements should be installed at least 48 hours before the event to allow settling and finishing adjustments.
Pin this rustic wedding structure checklist! 📌
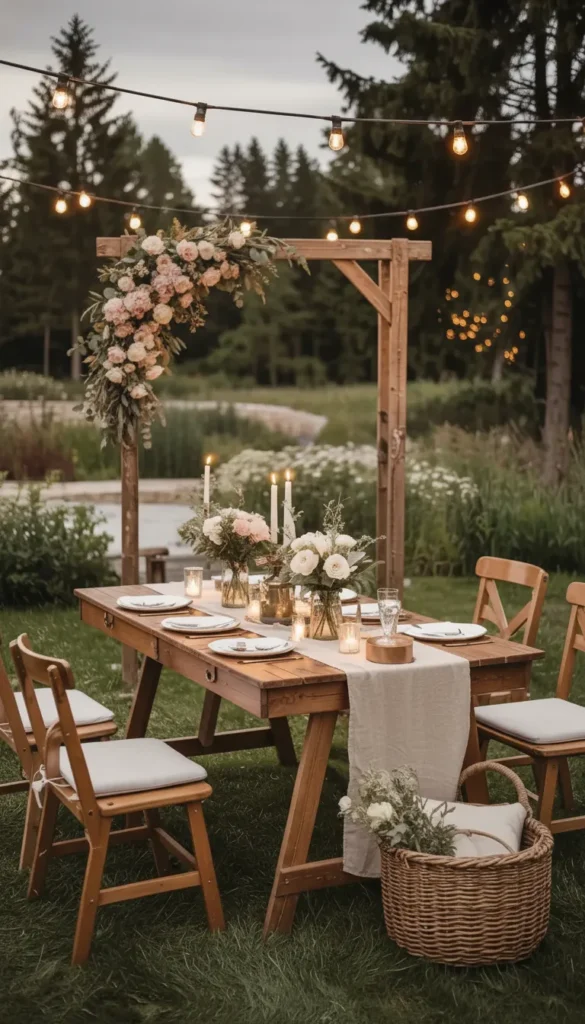
Tablescapes That Feel Wild and Intentional
The table is where guests spend most of their time, so it deserves careful attention.
- Use raw wood slabs or linen runners instead of full tablecloths
- Fill mason jars, vintage milk bottles, and low terracotta pots with wildflowers
- Add pillar candles in varying heights for evening ambiance
- Scatter small eucalyptus sprigs, pinecones, or dried seed heads as natural filler
- Use aged metal charger plates rather than glossy or highly polished options
Color palette to aim for: Ivory, aged gold, dusty green, terracotta, and warm wood tones. These four colors together never fail in an outdoor rustic setting.
Floral Arrangements for a Rustic Wedding Garden
Flowers are the heartbeat of a romantic rustic setting. The right choices feel like they were gathered from a meadow rather than designed by a florist.
- Wildflowers: Cosmos, chamomile, cornflowers, Queen Anne’s lace
- Greenery fillers: Eucalyptus, ferns, olive branches, jasmine vine
- Classic rustic blooms: Garden roses, dahlias, peonies, lavender
- Dried elements: Wheat stems, dried lavender, pampas grass for texture
Avoid: Tropical flowers (birds of paradise, anthuriums), tightly structured ball arrangements, and monochromatic single-flower bouquets. They work against the organic feel.
Lighting That Transforms the Evening Experience
Evening lighting is what separates a beautiful rustic wedding garden from a truly magical one. Plan your lighting as carefully as your florals.
- Overhead string lights: Drape between poles, trees, or a pergola to create a lit canopy
- Candles on every table: Grouped pillar candles at varying heights in glass holders
- Lanterns along pathways: Hang from shepherd’s hooks or place on ground
- Uplighting on trees: Warm amber uplights on large trees create dramatic atmosphere
- Firepit or fire bowls: Doubles as both light source and gathering point
Safety note: In outdoor settings, always use flameless LED candles in areas with wind exposure. Reserve real candles for sheltered table settings.
Creating Flow and Movement Through the Space
A well-designed event space moves guests naturally through defined zones without confusion or crowding.
- Map three clear zones: ceremony, cocktail/mingling, and dining
- Create physical transitions between zones with arbors, hedges, or fabric panels
- Ensure pathways between zones are at least 4 feet wide for comfortable two-way traffic
- Place visual anchors (a floral installation, a large lantern cluster) at the entrance of each zone
Why it matters: When guests understand intuitively where to move, the event feels relaxed. When they are confused, the space feels chaotic regardless of how beautiful the decor is.
Planning for Weather and Adaptability
Outdoor events require contingency planning that indoor venues do not.
- Have clear stretch tents or sail shades available for rain or intense sun
- Choose fabric decor that dries quickly and does not permanently stain when wet
- Prepare blankets in baskets near seating areas for cool evenings — this is both practical and charming
- Stake and anchor all tall structural elements against wind
- Provide umbrella stands at key sun-exposed seating areas
Pro tip: Assign one person specifically to weather monitoring on the day. Having a clear plan in place means any change is handled calmly rather than reactively.
Save this outdoor wedding planning approach! 📌
Seating Arrangements That Create Intimacy
How you arrange seating in an outdoor wedding garden profoundly affects the emotional quality of the event.
- Long communal tables seat 10–20 guests and create a shared dining experience — intimate and celebratory at the same time
- Cluster small tables of 4–6 in the cocktail zone for flexible mingling
- Face ceremony seating toward the focal point (arch, tree, water feature) with a clear center aisle at least 5 feet wide
- Allow standing room zones between seated areas for natural social mixing
Key insight: The best wedding gardens feel like one continuous story — guests move from ceremony to cocktail to dinner as if following a gentle narrative path, not navigating logistics.
Closing Principle
The most romantic rustic wedding gardens succeed because every decision prioritizes how the space feels over how it looks in photographs. When guests are comfortable, warm, and surrounded by natural beauty, the photographs take care of themselves. Build for the people first. The memories — and the photos — will follow.
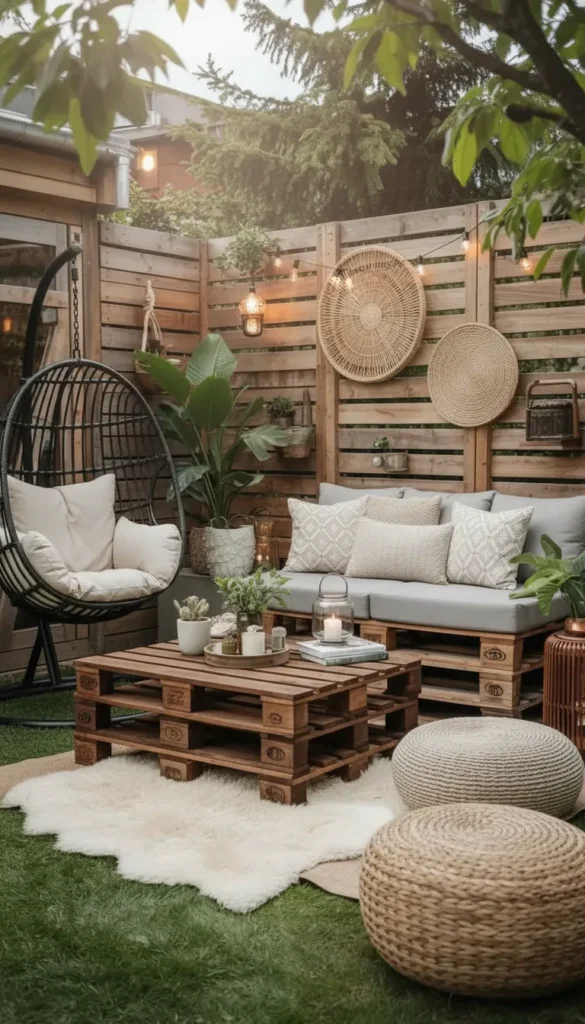
Cozy Rustic Lawn Decor That Feels Organic and Lived-In
The final element of a great rustic backyard is the lawn zone — the area designed specifically for sitting, gathering, relaxing, and staying. This is where your backyard stops being decorative and starts being genuinely livable. A well-designed rustic lawn zone does not look like it came from a furniture showroom. It looks like it grew there — slowly, comfortably, over time.
Designing for Comfort First, Aesthetics Second
The biggest mistake people make in outdoor seating areas is prioritizing visual impact over physical comfort. A beautiful space that no one wants to sit in has failed.
- Start with seating comfort: cushion depth, chair height, weather resistance
- Then layer in visual character: materials, colors, textures
- Ensure there is always shade available — either from trees, a pergola, or sail shades
- Keep the space flexible: movable pieces allow adaptation for different group sizes
Why it works: People return to spaces that feel good. Comfort creates repeat use. Repeat use creates the lived-in feeling that rustic design is meant to evoke.
The Foundation: Defining the Space Without Walls
A cozy lawn zone needs definition — a sense that it is its own distinct place — without actually enclosing it with hard structures.
- Use low wooden borders or natural stone edges to define the perimeter
- Place area rugs (indoor-outdoor rated) to anchor the seating arrangement
- Plant low hedging, ornamental grasses, or lavender rows along the edges
- Use a canopy, pergola, or large umbrella overhead to create a sense of ceiling
Recommended materials for borders: Cedar timber, natural flat stone, reclaimed brick. Avoid plastic edging — it immediately undermines the rustic aesthetic.
Furniture That Defines the Rustic Lawn Aesthetic
Rustic lawn furniture should feel solid, slightly imperfect, and materials-forward. Every piece should look better after a season outdoors than it did when new.
- Wooden pallet sectionals: Highly customizable, extremely low cost, excellent character
- Handmade wooden benches: Either purchased or built from rough-sawn timber
- Low coffee tables: Reclaimed wood with simple metal hairpin legs
- Wicker or rattan chairs: Add softness and natural texture
- Tree stump side tables: The ultimate rustic accent piece — functional and completely organic
Cushion strategy: Choose removable, washable covers in canvas or outdoor linen. Store cushions in a weatherproof basket or bench box between uses.
Pin this rustic lawn furniture guide! 📌
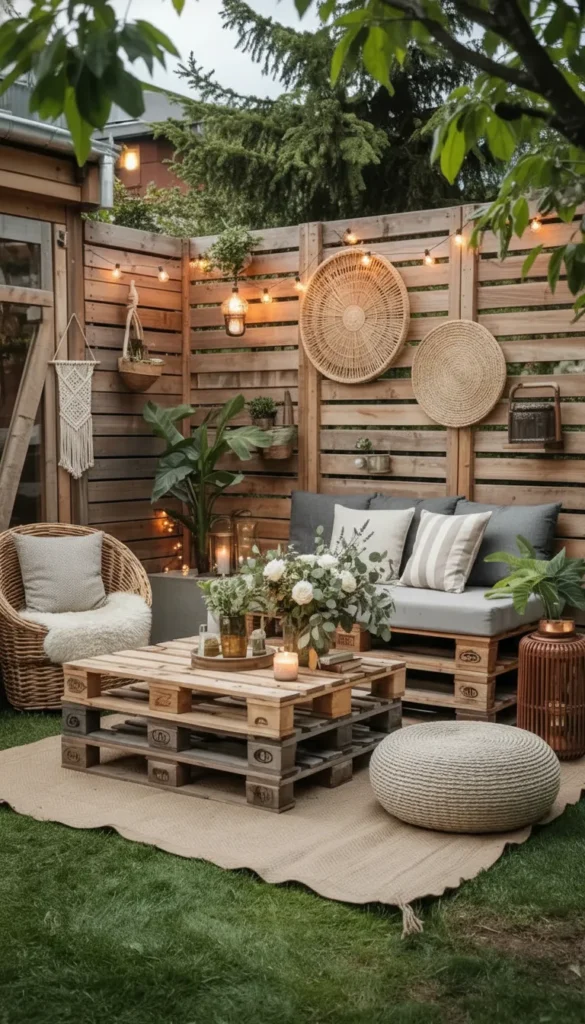
Ground Covers and Rugs That Soften the Space
The ground layer of a lawn zone is what determines whether the space feels cozy or clinical.
- Indoor-outdoor rugs in natural tones (jute-look, stripe, or simple geometric) define the seating zone
- Gravel areas around the seating perimeter keep mud at bay after rain
- Stepping stones from the house to the seating zone make access easy and intentional
- Creeping ground plants (chamomile, thyme, clover) between stones add natural softness
Important: Choose rugs rated for UV and moisture resistance. Standard indoor rugs will fade, mold, and deteriorate within one season outdoors.
Plants and Flowers That Bring the Lawn Zone to Life
A seating area without plants feels isolated from the garden. Plants are what connect a furniture arrangement to its natural surroundings.
- Place tall ornamental grasses at the corners of the seating zone for height and movement
- Add potted herbs (rosemary, basil, thyme) on low tables — they look beautiful and smell wonderful
- Use trailing plants (nasturtiums, sweet potato vine) in hanging pots or over borders
- Cluster seasonal flowers in clay pots near seating for color changes throughout the year
Design tip: Use plants in odd-numbered groupings (3 pots, 5 plants). Odd numbers are asymmetric and therefore feel more natural than even, symmetric arrangements.
Lighting the Lawn Zone for Evening Use
A great rustic lawn zone extends the day. Thoughtful lighting means you use the space from noon until midnight, not just until sunset.
- String lights overhead: The single most effective and cost-efficient choice
- Lanterns on low side tables: Provide intimate, face-level light for conversation
- Solar stake lights along pathway edges and borders: Low maintenance, no wiring
- A fire pit or chiminea at the center or edge: Provides both light and warmth, and becomes the natural focal point after dark
Fire pit safety: Keep a bucket of water or garden hose within reach at all times. Maintain a 3-foot clear zone of non-flammable material around any open fire element.
DIY Rustic Lawn Decor That Adds Personal Character
Handmade elements are the fastest way to make a lawn zone feel personal rather than catalog-assembled.
- Hand-painted stepping stone markers with herb or plant names
- Woven macramé plant hangers for trailing herbs or flowers
- Wooden crate shelving stacked beside a seating area for books, candles, or small plants
- Stamped clay pot saucers as coasters for outdoor drinks
- Reclaimed timber signs with simple phrases or family names mounted on fence posts
Cost range: Most DIY rustic lawn pieces cost between $5–$40 in materials. The labor is minimal. The personal character they add is significant.
Maintaining the Space Through Seasons
A rustic lawn zone should actually get better with age — but it still requires some seasonal care to stay at its best.
- Spring: Check all wooden furniture for splits, apply linseed oil or teak oil as needed
- Summer: Water container plants regularly, replace seasonal flowers as they fade
- Fall: Store cushions and textiles, apply fresh gravel to any worn areas
- Winter: Cover or store wicker and rattan pieces, leave wooden furniture to weather naturally
The golden rule: Less maintenance, better materials. Invest in higher-quality pieces upfront so ongoing care is minimal. Cedar and teak require almost no maintenance. Cheap pine requires constant attention.
Save this seasonal lawn zone maintenance plan! 📌
Closing Principle
The most beloved rustic lawn zones have one thing in common: they look used. The cushions are a little faded. The wood has silver streaks from sun exposure. The gravel has settled. These signs of use are not failures — they are proof that the space is doing exactly what it was designed to do: inviting real life in.
Conclusion
Creating a rustic backyard is not a project you complete in a weekend and photograph for social media. It is a process — one that rewards patience, curiosity, and a willingness to work with natural materials rather than against them. The ideas in this guide are not trends. They are principles that have been shaping beautiful, livable outdoor spaces for generations, and they will still be working long after the latest design fad has faded.
Start with one section. Pick the area of your backyard that most needs attention — maybe it is the bare fence wall, the unused lawn corner, or the entryway that lacks character — and apply the ideas that fit your space, your budget, and your vision. Rustic design is forgiving by nature. There is no wrong answer when your materials are wood, stone, metal, and plants. The only mistake is not starting.

“I share simple, beautiful and affordable home decor ideas to help you style every corner of your home with ease.