
There is something deeply personal about a backyard pool. It is not just water and walls — it is the place where summer actually happens. It is where your kids laugh until the sun goes down, where you finally exhale after a long week, where your home stops feeling like just a house and starts feeling like a life. If you have been staring at your backyard wondering whether an above-ground pool could ever look truly beautiful, this article is your answer.
The truth is, above-ground pools in 2026 are nothing like what you remember from the 1990s. No more flimsy blue plastic rings that embarrass the whole neighborhood. Today’s designs are stylish, durable, and when planned right, they look like they were built into the yard by a professional landscape architect. These five ideas will show you exactly how to make that happen — no matter your budget, yard size, or design experience.
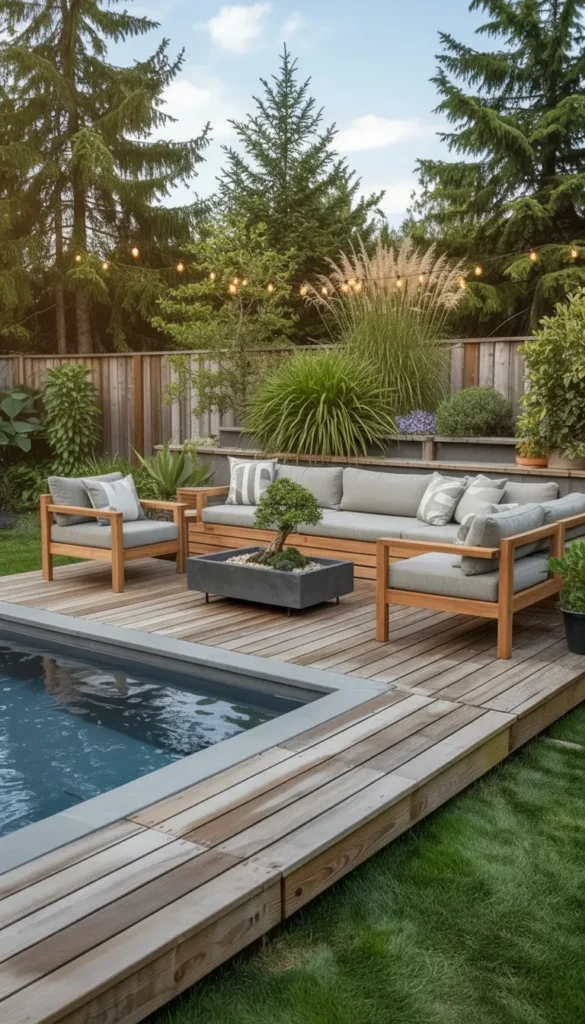
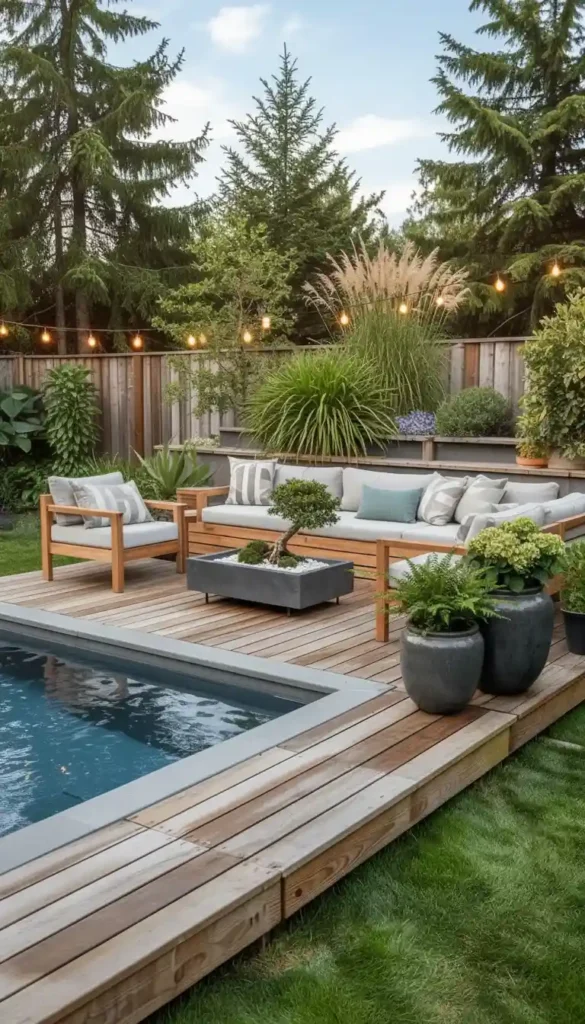
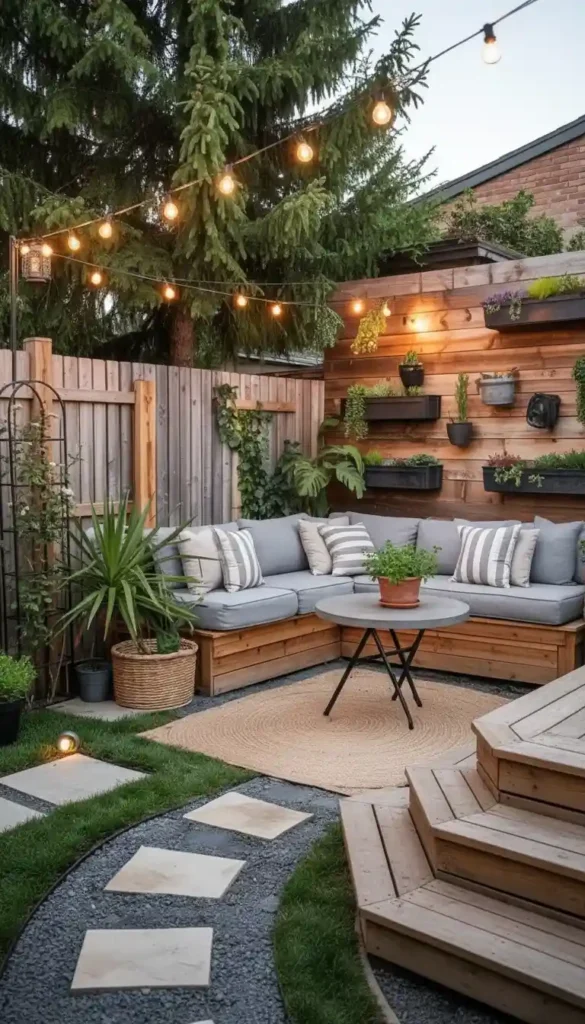
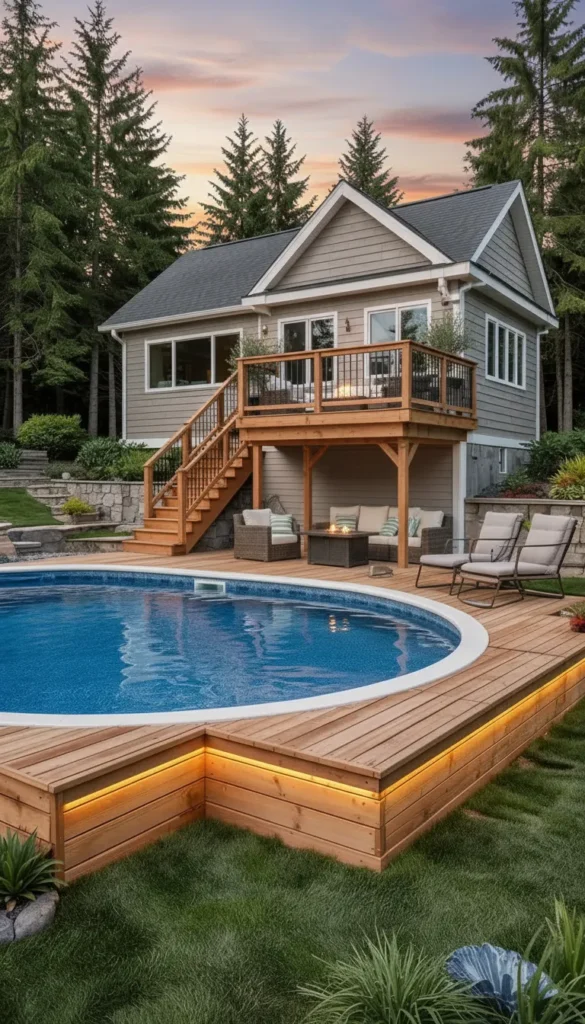
Modern Above-Ground Pools Ideas With Deck For Stylish Outdoor Living
A deck transforms everything. Without one, an above-ground pool sits in your yard like a standalone object. With one, it becomes the centerpiece of a fully designed outdoor living space. This is the single most impactful upgrade you can make, and it works for almost every yard size and pool shape.
Why a Deck Makes the Biggest Difference
The moment you add a deck, several things happen at once:
- The pool’s height becomes invisible — the deck visually “lowers” the structure into the ground
- You gain a dedicated space for lounging, eating, and entertaining right next to the water
- The yard feels intentional and designed, not assembled from separate pieces
- Access to the pool becomes easier and safer for every age group
This single addition changes how the entire yard feels. It signals that this space was planned.
Choosing the Right Decking Material
Not all deck materials perform equally well around water. You need something that resists moisture, UV exposure, and heavy foot traffic year after year.
Composite decking is the top choice in 2026 for most homeowners. It looks like real wood but never warps, splinters, or rots. Brands like Trex and TimberTech offer dozens of tones — from pale driftwood to rich charcoal — that pair beautifully with any pool color.
Pressure-treated wood costs less upfront but requires annual sealing and maintenance. If you enjoy outdoor projects, this is a budget-friendly starting point. If you want zero maintenance, go composite.
Concrete pavers work especially well for partial-wrap decks or ground-level transitions. They’re durable, easy to replace individually, and pair well with modern landscaping.
Key things to look for in any material:
- Non-slip surface texture (critical for wet feet)
- Heat resistance (light tones stay cooler underfoot in summer)
- Compatibility with your pool’s wall material and color
How to Design the Layout
There is no single correct deck layout — but there are a few proven approaches that work in most yards.
Full-wrap decks surround the pool on all sides. They maximize usable space and look incredibly polished, but require the most materials and investment.
Partial-wrap decks cover two or three sides. This is the most popular choice because it balances cost, function, and visual impact.
Entry decks are simply a platform at the pool’s entry point — a single section with steps, a railing, and a small lounging area. This is the most budget-friendly option and still dramatically improves the pool’s appearance.
📌 Pin this deck layout guide! 📌
Deck sizing tips to plan by:
- Allow at least 6 to 8 feet of deck width for comfortable lounging chairs
- Plan for 4 feet minimum around the steps for safe foot traffic
- Leave space for a small outdoor table and 2–4 chairs if entertaining is a priority
- Consider where the afternoon shade falls — position seating in that zone
Adding Lighting and Built-In Features
A great deck does more than hold furniture. The best designs include features that make the space feel complete.
LED deck lighting should be your first add-on. Recessed step lights, rail-mounted strips, and subtle post-cap lights create an inviting atmosphere after dark. Solar-powered options require zero wiring and work well in most climates.
Built-in storage benches are one of the smartest space-saving moves. The bench top opens to reveal hidden storage for towels, pool toys, cleaning supplies, and floats. No more cluttered deck surfaces.
Planters at deck corners soften the entire look. Use ornamental grasses, lavender, or boxwood for year-round greenery that requires almost no care. Tall grasses also provide a sense of privacy without needing a full fence.
Shade Solutions That Improve Comfort
Heat is the biggest reason people underuse their pool decks. Add shade and you double the usable hours.
Options ranked by cost and impact:
- Large offset umbrellas — affordable, adjustable, easy to move (best for small decks)
- Sail shades — modern, stylish, and cover large areas without posts in the way
- Attached pergolas — the most permanent and visually impressive choice; can support climbing plants for natural shade
A pergola attached directly to the house ties the pool area to the home architecture. This is the detail that makes a backyard look professionally designed rather than just assembled.
The Finishing Principle
The best deck designs share one quality: cohesion. Every element — material color, furniture tone, lighting style, plant choice — belongs to the same visual family.
Pick a two-tone palette. Stick to it. Neutral base (grey, tan, natural wood) plus one accent (black hardware, white cushions, deep green plants). That’s all you need to look like you hired a designer.
📌 Save this deck styling strategy! 📌
Creative Above-Ground Pools Backyard Ideas To Transform Any Space
Not everyone starts with a perfect yard. Small lots, irregular shapes, sloped terrain, or existing trees and structures — these are real constraints that most homeowners deal with. The good news is that creative layout thinking turns limitations into design features. The yards that look the most unique are often the ones that worked around something difficult.
Rethinking Pool Placement
Most people default to centering the pool in the yard. This is usually the worst option.
Off-center placement creates multiple distinct zones in the same space:
- A lounging zone beside the pool
- A dining or fire pit zone at the far end
- A greenery or garden zone along the back fence
This zoning approach makes even a small yard feel larger because each area has its own purpose. The eye travels through the space rather than stopping at the center.
Consider placing the pool:
- In one corner, freeing up a large open zone for other uses
- Along a fence line, using the fence as a natural backdrop or privacy screen
- At an angle if your yard is irregularly shaped — this often looks intentional and modern
Defining Zones With Mixed Materials
One of the most effective design techniques for above-ground pool backyards is using different materials to signal different zones.
Gravel works beautifully around the pool base. It drains well, stays cool, and looks clean with minimal maintenance. Use pea gravel or river stone in a neutral tone.
Concrete pavers define pathways and transition zones. A simple stepping-stone path from the back door to the pool creates flow and directs movement naturally.
Wood or composite sections anchor the pool entry point and any seating areas. Even a small 4×6 foot platform makes the pool feel significantly more designed.
Combining three materials in one backyard:
- Gravel around the pool perimeter
- Pavers for pathways
- Wood for seating or deck areas
This layered approach costs far less than a full deck build but delivers a similarly polished result.
📌 Pin this zone-defining strategy! 📌
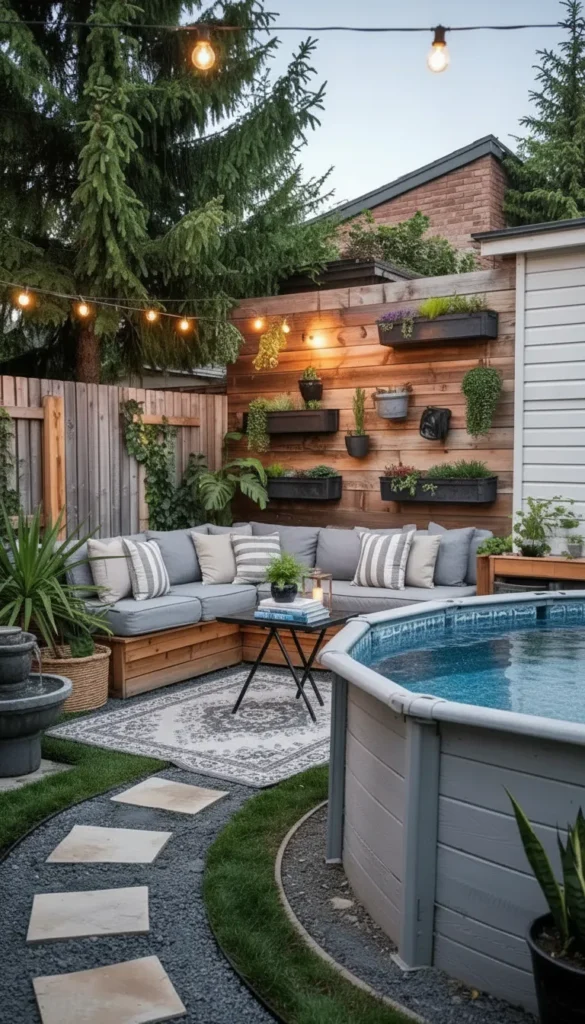
Using Vertical Space for Privacy and Style
Horizontal space is limited. Vertical space is almost always ignored — and that’s where real creative opportunity lives.
Vertical garden panels can be attached to existing fences to create a lush green wall. This softens hard surfaces and adds life to the space.
Tall ornamental grasses planted in groupings around the pool create natural privacy screens. Pampas grass, feather reed grass, and maiden grass all grow 4 to 6 feet tall and require minimal care.
Trellises with climbing plants along fence lines add depth and greenery without taking up ground space. Jasmine, climbing roses, or sweet potato vine all work well.
Vertical elements also help with acoustics. A dense planting barrier absorbs sound, making the pool area feel more private and peaceful.
Layered Lighting for Evening Use
A backyard that only looks good in daylight is only half-designed. Layered lighting extends your outdoor hours and creates an entirely different atmosphere after sunset.
Three layers that work together:
- Ambient lighting — string lights strung overhead between posts or along the fence line; these create a warm glow over the entire space
- Path lighting — solar stake lights along pathways and around the pool perimeter; they improve safety and add visual depth
- Accent lighting — uplights aimed at plants or trees, subtle LED strips under deck edges, or color-changing lights inside the pool itself
String lights are the single most cost-effective upgrade for evening ambiance. They transform a standard backyard into something that looks like it belongs in a design magazine.
Adding an Anchor Element
Every great backyard design has a focal point — something that your eye naturally travels to and that ties the whole layout together.
Fire pits are the most popular anchor element right now. A simple round propane fire pit placed at the far end of the yard creates a natural gathering zone that works year-round, even when the pool is not in use.
Water features add sound and movement. A small fountain or bubbling urn near the pool creates a spa-like atmosphere and masks neighborhood noise.
Outdoor dining sets serve as a functional anchor. Position a 4-to-6 person table with an umbrella in the zone opposite the pool. This balances the visual weight of the space.
📌 Save this backyard layout guide! 📌
The Finishing Principle
Balance matters more than size. A thoughtfully planned compact backyard always looks better than a large yard with no clear organization. Choose your anchor element first, plan your zones around it, and let the pool be the star of the show it was always meant to be.
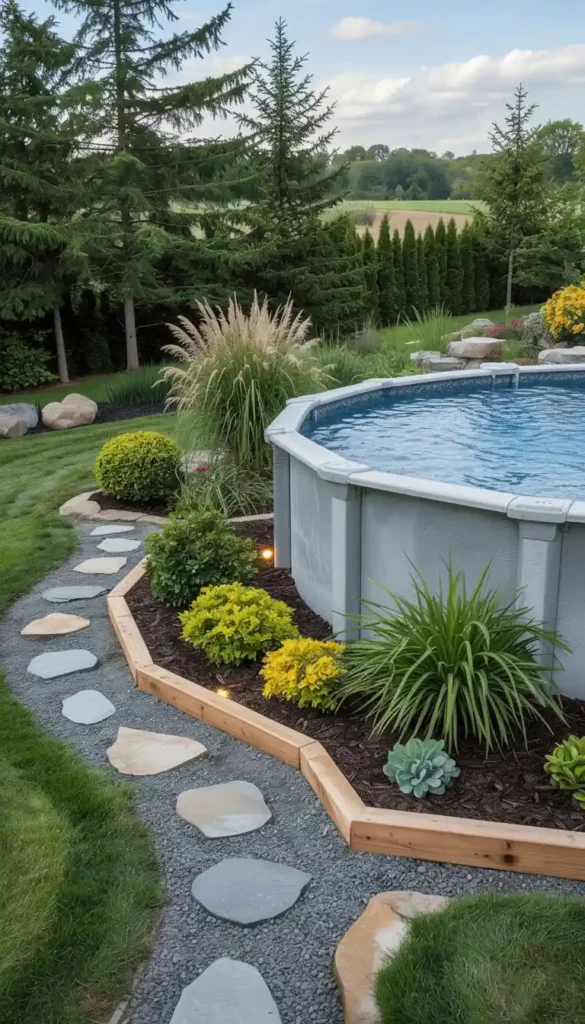
Budget-Friendly Landscaping Ideas For Above-Ground Pools That Look Expensive
Here is the thing about expensive-looking landscaping: most of it is not expensive at all. The appearance of luxury comes from consistency, quality of selection, and intentional placement — not from how much you spent. With the right approach, you can landscape around your above-ground pool for a few hundred dollars and have neighbors asking who you hired.
Start With the Pool Base
The space immediately around the pool is the first thing everyone sees. Getting this right costs very little but makes an enormous impact.
Gravel borders are your best friend here. A 12-to-18 inch gravel border around the pool base:
- Prevents weeds and mud from splashing onto the pool walls
- Keeps the area clean-looking year-round with zero maintenance
- Creates a clear visual separation between the pool and the rest of the yard
- Costs roughly $50 to $150 depending on yard size and gravel type
Use a weed barrier fabric underneath the gravel for long-term cleanliness. River stone and pea gravel are the most attractive and widely available options.
Mulch borders work similarly to gravel and cost even less. Dark brown or black mulch around the pool base creates a rich, clean contrast that looks intentional and polished.
📌 Pin this budget landscaping formula! 📌
Plant Selection That Looks Expensive
Expensive-looking planting is not about rare or exotic plants. It is about choosing the right plants for the right spots and repeating them consistently.
Ornamental grasses are the MVP of budget pool landscaping:
- Grow quickly to create height and texture
- Require almost no watering or care once established
- Cost $10 to $25 per plant at most nurseries
- Move beautifully in the breeze, adding life and movement to the space
Shrubs with structure — like boxwood, knockout roses, or spirea — add permanence and formality without high maintenance.
Ground cover plants — creeping phlox, mondo grass, or sedum — fill in bare ground cheaply and suppress weeds naturally.
The key to expensive-looking planting: plant in odd-number groupings (3, 5, or 7 plants together) rather than single specimens spread randomly. Groups look intentional. Singles look accidental.
Defining the Space With Edging
Clean edges are the secret weapon of professional landscapers. A crisp edge between lawn, gravel, and planting beds signals that the space was designed, not just planted.
Budget edging options:
- Steel landscape edging — clean, modern, and lasts forever; approximately $1 per linear foot
- Wooden edging — natural look, easy to install; slightly less durable but very affordable
- Concrete curbing — the most permanent option; best for permanent installations
- Brick edging — classic look; individual bricks can be found cheap or free on local buy-nothing groups
Even simple plastic edging dramatically improves the appearance of a landscape bed when it is installed cleanly and consistently.
Using Stepping Stones to Create Flow
Pathways tell people where to walk and make the space feel organized. They do not have to be expensive to work well.
A simple path from the back door to the pool using 18-inch concrete stepping stones:
- Costs $50 to $150 total
- Takes a Saturday afternoon to install
- Immediately makes the backyard feel more complete and designed
Space stones 18 to 24 inches apart (center to center) for a comfortable walking pace. Set them slightly below grade so they don’t catch mower blades. Fill in between with gravel or ground cover for a finished look.
📌 Save this affordable pool landscaping approach! 📌

The Low-Maintenance Watering Plan
Here is where many beautiful landscapes fall apart: they look stunning in June and dead by August because watering was too complicated. Solve this before planting.
Drip irrigation systems are now surprisingly affordable. A basic drip kit for a small landscape bed costs $30 to $80 at most hardware stores and can be attached to a basic timer for completely automated watering.
Soaker hoses work similarly and cost even less. Lay them through planting beds and connect to a timer. Plants stay consistently watered without any effort.
Choosing drought-tolerant plants in the first place also eliminates this problem entirely. Lavender, ornamental grasses, sedum, and native wildflowers all thrive with minimal water once established — ideal for pool-side plantings where your focus is on fun, not gardening chores.
The Finishing Principle
Budget landscaping that looks expensive follows one rule: limit your palette. Choose two to three plants, two materials, and one edging style. Use them consistently and repeatedly throughout the space. The moment you introduce too many different elements, the space starts to look like a collection of separate decisions rather than a single design.
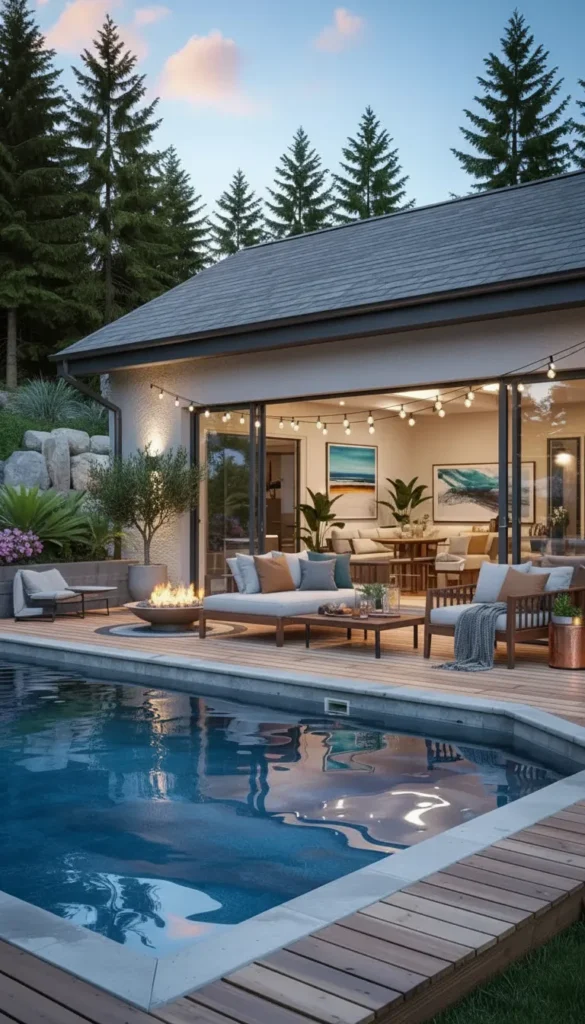
Above-Ground Pools And Deck Ideas For Seamless Indoor-Outdoor Flow
The most beautiful pool installations do not feel like an outdoor project. They feel like a natural extension of the home itself — as if the living room simply continued outside. This is the indoor-outdoor flow concept, and it is the design principle that separates good pool yards from truly stunning ones.
Aligning With Your Home’s Architecture
Every design decision in the pool area should reference something from the house itself. This is what creates that seamless, intentional feeling.
Look at your home and identify:
- Primary exterior color — use this as your deck or furniture accent tone
- Trim and hardware finishes — match outdoor lighting and rail finishes to these
- Flooring material at back door — transition the same tone or texture into the deck material
- Architectural style — modern, craftsman, farmhouse, and traditional all call for different outdoor design vocabularies
A modern home with grey horizontal siding pairs perfectly with a composite deck in weathered grey tones, black powder-coated railings, and minimal rectangular furniture. A craftsman home suits natural wood tones, bronze hardware, and lush layered planting.
Choosing Outdoor Furniture That Mirrors Indoor Comfort
The biggest mistake people make with pool furniture is defaulting to basic plastic chairs. In 2026, outdoor furniture has caught up with indoor quality — and the best pieces look like they belong inside a well-designed living room.
What to prioritize:
- Deep-seat cushioned sofas and chairs — the same comfort level you have indoors
- Outdoor rugs — these single-handedly transform a deck from a surface into a room
- Side tables and coffee tables in powder-coated metal or concrete — durable and stylish
- Weather-resistant fabrics in Sunbrella or similar performance materials — they resist fade, moisture, and mildew
📌 Pin this indoor-outdoor furniture selection guide! 📌
Color and material coordination tips:
- Keep cushion fabrics within the same color family as your interior palette
- Outdoor rugs in geometric patterns add visual interest without demanding attention
- Limit furniture to two or three material types — wood, metal, and fabric work together naturally
Creating Smooth Physical Transitions
Visual flow is important. Physical flow matters just as much. The transition from inside to outside should feel natural, not like stepping through a barrier.
Wide doorways help enormously. Sliding glass doors or French doors that open fully create an obvious indoor-outdoor connection. If renovation is not in your budget, simply removing a screen door or adding a retractable screen can open up the space considerably.
Matching floor heights between indoor flooring and the deck surface eliminate the “step down” that signals a separate zone. Not always possible, but worth planning for in new builds or major renovations.
Matching flooring tones — for example, using a composite deck that matches the tone of your interior hardwood floors — creates subconscious visual continuity that feels expensive and deliberate.
Lighting Consistency Between Inside and Outside
Lighting is where most indoor-outdoor designs lose their cohesion. The outside ends up with contractor-grade coach lights that have nothing to do with the interior fixtures, and the connection breaks.
Fix this by:
- Matching outdoor fixture finishes (matte black, brushed nickel, oil-rubbed bronze) to your interior hardware and fixtures
- Using warm white LED bulbs throughout (2700K to 3000K) — the same color temperature indoors and out
- Installing dimmer-compatible outdoor fixtures so the light level can be adjusted for different uses
A string of Edison-style bulbs over a deck creates a warm, ambient glow that reads as continuous with warm interior lighting. It is a simple, inexpensive detail that ties everything together.
📌 Save this indoor-outdoor lighting strategy! 📌
Seasonal Transition Elements
The best indoor-outdoor spaces remain usable beyond summer. A few smart additions extend the season and make the entire investment more worthwhile.
Outdoor heaters — either ceiling-mounted electric heaters or free-standing propane units — add weeks or months to the usable season in most US climates.
Partial coverings — a pergola with a polycarbonate or fabric roof allows use during light rain and blocks intense midday sun.
Outdoor curtains on pergola posts create a sense of enclosure without blocking airflow. They also add texture and softness to the space.
Throw blankets in a basket beside the outdoor seating area complete the indoor comfort experience. This one detail communicates that the space is designed for real living, not just summer photo opportunities.
The Finishing Principle
Indoor-outdoor flow is not a renovation project. It is a design decision. Every element you choose for the pool area should ask the question: does this feel like it belongs to the same home as my living room? When the answer is yes throughout, the result is remarkable.
Smart Deck Ideas For Above Ground Pools Attached To House Designs
Attaching the pool deck directly to your home is the most ambitious version of above-ground pool design — and it delivers the most dramatic results. When it is done right, the pool stops being a backyard feature and becomes part of the home’s architecture. This is the approach that adds genuine property value and makes the yard feel professionally designed.
Understanding the Structural Basics
Before anything else, you need to understand what an attached deck involves structurally. This is not a weekend DIY project for most homeowners — but it is also not as complicated as it might seem with the right planning.
Key structural considerations:
- Ledger board attachment — the deck attaches to the house via a ledger board secured to the home’s rim joist; this must be done correctly to prevent water infiltration and structural failure
- Permit requirements — most municipalities require permits for attached decks; check local codes before starting
- Load calculations — the deck must be engineered to support furniture, people, and the wet zone adjacent to the pool
- Flashing and waterproofing — proper flashing at the ledger connection is non-negotiable; improper installation is the leading cause of attached deck failure
Hire a structural engineer or licensed contractor to design and permit the attachment point, even if you plan to build the rest yourself. This one professional investment protects your home and your investment.
📌 Pin this attached deck planning checklist! 📌
Designing for Elevation Changes
One of the biggest advantages of an attached deck is its ability to handle elevation changes between the home’s entry level and the pool. Multi-level decks solve this problem elegantly.
Two-level designs are the most practical:
- Upper level — connects to the home at the door threshold; used for dining, cooking, and transition
- Lower level — steps down to pool height; used for pool access, lounging, and water activities
This split creates natural zone separation. The upper level functions like an outdoor living room. The lower level is the active pool zone. Each has its own purpose and atmosphere.
Level transition design tips:
- Use wide, shallow steps (at least 11 inches deep, 7 inches high or less) for comfortable traffic flow
- Add railing that complements the house architecture — cable rail for modern homes, wood balusters for traditional styles
- Consider built-in lighting at every step change for nighttime safety
Built-In Features That Maximize Efficiency
An attached deck is a permanent structure. Build in the features you want now rather than adding them later as afterthoughts.
Built-in seating along the perimeter or at the pool edge eliminates the need for freestanding chairs that blow over in wind and take up space when not needed. Bench seating with storage underneath is ideal.
Integrated planters at corners and transitions soften the structure and add greenery without needing separate containers that can tip over.
Outdoor kitchen or bar sections are most practical when included in the original design. A simple built-in counter with a sink, small refrigerator, and prep space transforms the deck into an entertainment hub.
Cover roller storage built into the deck structure — typically a recessed bay at one end of the pool — makes pool cover management effortless. Without a dedicated spot, covers get piled in corners and eventually damaged.
Material Matching With the House
This is the detail that makes an attached deck look like it was always part of the home versus added later.
Siding match — use trim colors or materials from the house exterior on deck railings, fascia boards, or pergola posts. Even a simple color match on painted elements creates cohesion.
Roofline integration — when the deck includes a roof or pergola, align its pitch and materials with the existing roofline. A shed-style pergola that echoes the house roof pitch looks architecturally intentional.
Window and door alignment — position the deck so it aligns with existing windows and doors rather than blocking them. This maintains the indoor view and allows natural light into the home.
📌 Save this attached deck design strategy! 📌
Safety Features Non-Negotiable in Attached Designs
When a deck connects to your home, safety considerations increase. Pool proximity adds additional requirements.
Required safety features to include from the start:
- Non-slip decking surface — textured composite or anti-slip strips on smooth surfaces; especially critical for pool wet zones
- Proper railings — required by code on any deck section 30 inches or more above grade; typically 36 to 42 inches high
- Self-closing, self-latching pool gate — if the deck creates a pathway to the pool from inside the house, a safety gate is essential for homes with young children
- GFI outlets — all outdoor electrical outlets must be ground-fault protected; required by code and critical near water
- Pool fence compliance — many jurisdictions require fencing around above-ground pools; verify local requirements before designing the deck
None of these features compromise the aesthetics of a well-designed deck. In fact, beautiful railings, gates, and lighting are design features in their own right.
Maintenance Planning Built Into the Design
An attached deck needs less maintenance than you might think — if you plan for it from the start.
Choose composite over wood for the primary decking surface. The annual savings in staining, sealing, and replacement far exceed the upfront cost difference over a 10-to-20 year lifespan.
Use aluminum or stainless hardware throughout. These materials do not rust in wet pool environments. Galvanized hardware will eventually rust regardless of coating.
Design for drainage from the beginning. Slight slope away from the house (1/8 inch per foot minimum), open joist spacing underneath, and gravel or open ground below the deck prevent moisture buildup that degrades wood framing over time.
Pool cover system — invest in an automated or semi-automated cover roller. A covered pool stays cleaner, requires fewer chemicals, and is significantly safer. When the roller is built into the deck design, it disappears when not in use.
The Finishing Principle
An attached deck is the most significant upgrade available for an above-ground pool. It changes the relationship between the home and the yard permanently. When planned carefully — with proper permits, quality materials, and thoughtful design — it adds genuine property value and years of use. The investment in doing it right from the start always costs less than fixing it later.
Conclusion
Above-ground pools have come a long way. The ideas in this guide are not about making a budget option look better than it is. They are about recognizing that with thoughtful design, the right materials, and a clear plan, an above-ground pool can be the best feature in any backyard — period. From a simple gravel border and some ornamental grasses to a full multi-level deck attached to the house, every level of investment can produce results that feel genuine, stylish, and intentional.
Start with one idea that matches your budget and your yard. Plan it carefully. Execute it with quality materials. Then step back and let the space do what it was always supposed to do — give you and your family somewhere to actually live this summer. The pool you have always wanted is closer than you think.

“I share simple, beautiful and affordable home decor ideas to help you style every corner of your home with ease.