

Watching your child struggle to focus on homework while hunched over the kitchen table or sprawled across their bed with papers everywhere isn’t just frustrating—it’s a sign that something fundamental is missing from their room. A proper desk setup isn’t about buying expensive furniture or creating a Pinterest-perfect corner that nobody actually uses. It’s about giving your child a dedicated space that supports real learning, builds homework habits, and grows with them from elementary school through high school. If you’ve been putting off adding a desk because the bedroom feels too small or you’re worried it’ll become another clutter magnet, you’re not alone in that hesitation.
The truth is, the right kids desk setup can completely change how your child approaches schoolwork, organization, and even their confidence in tackling assignments independently. In this guide, I’m breaking down five practical approaches to creating kids desk spaces that work in real bedrooms—not just styled photos. You’ll learn how to position a desk where natural light and room flow actually support concentration, how to build layouts that adapt as your child grows, and how to create focused homework stations that don’t require constant parent supervision. Whether you’re working with a tiny shared bedroom, a tight budget, or a child who resists sitting still, these strategies will help you design a desk area that becomes a natural, used part of daily life.
Kids Desk Ideas In Bedroom For Everyday Learning
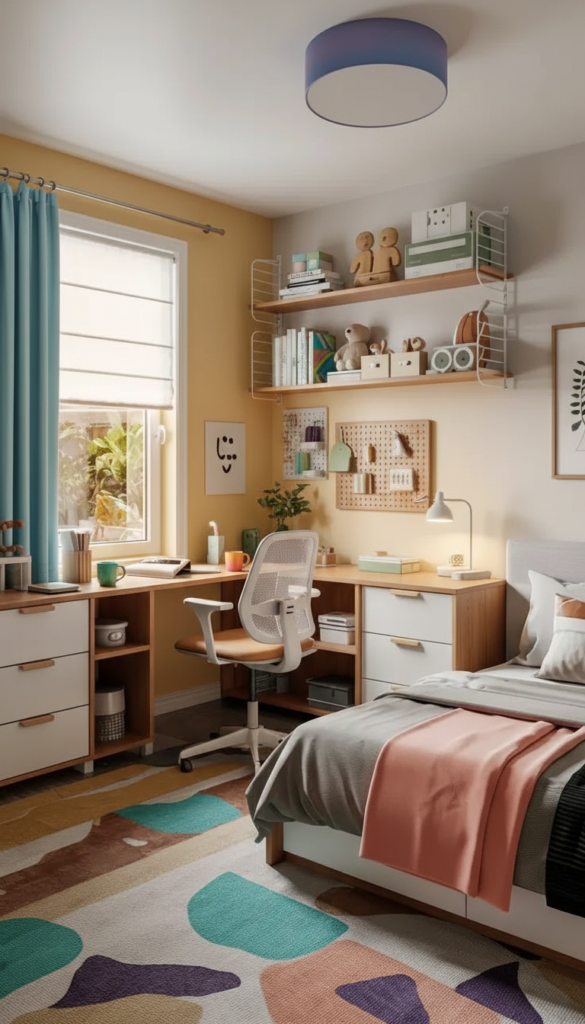
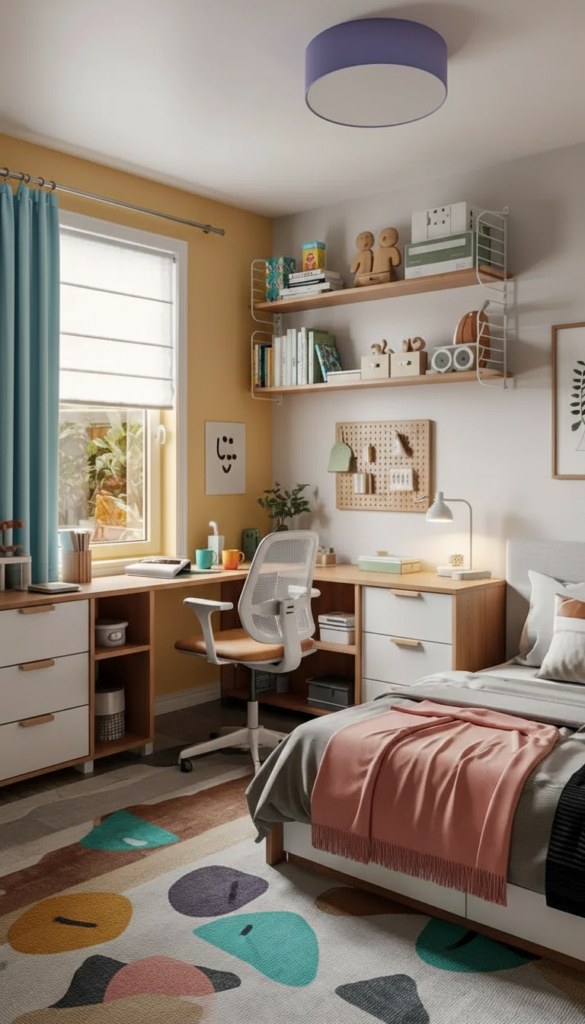
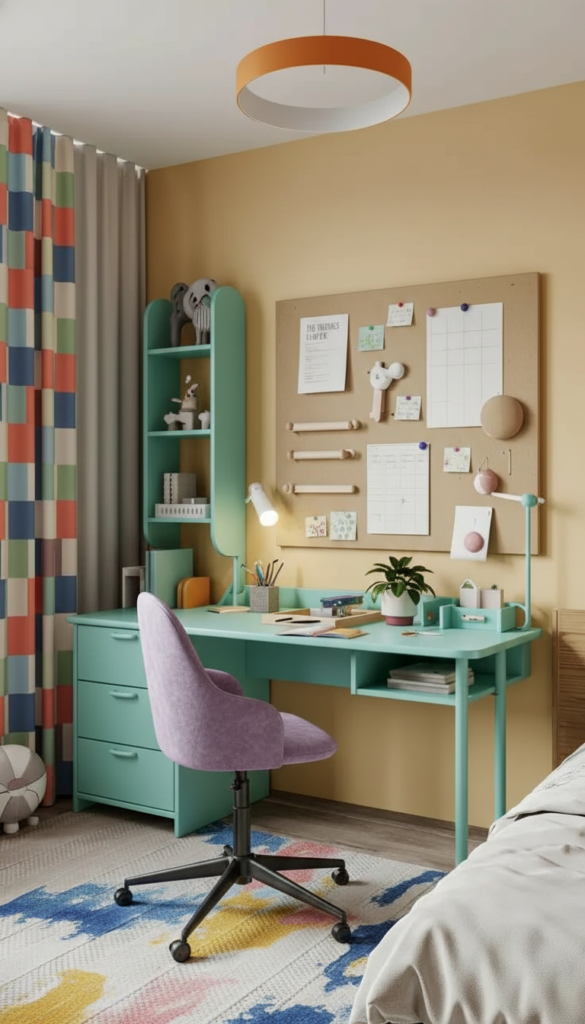
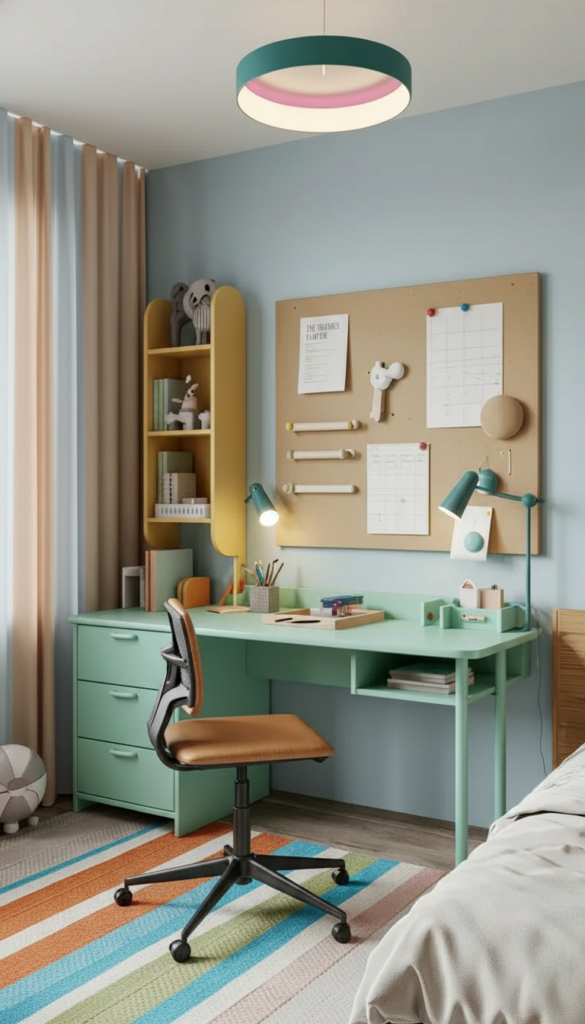
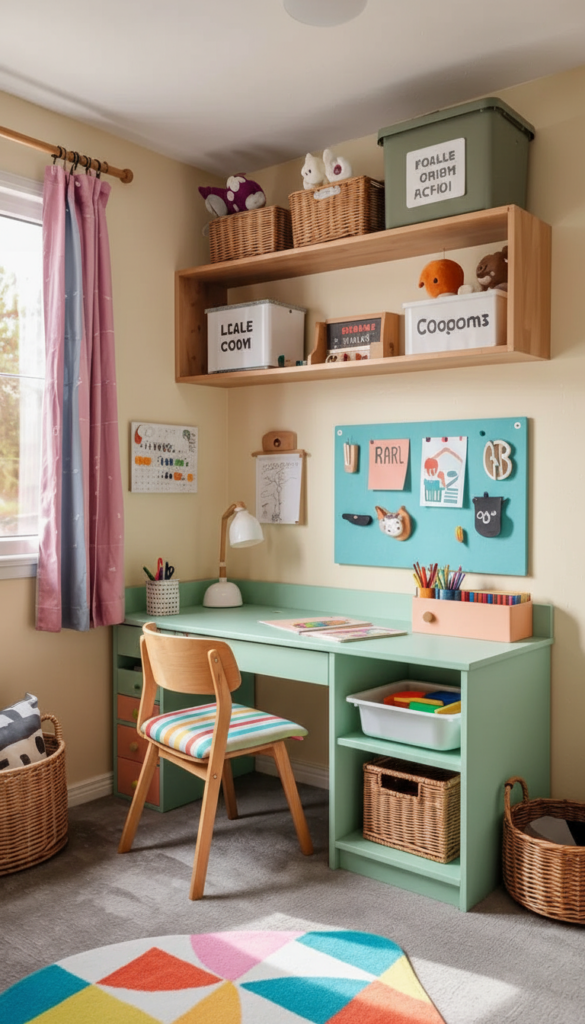
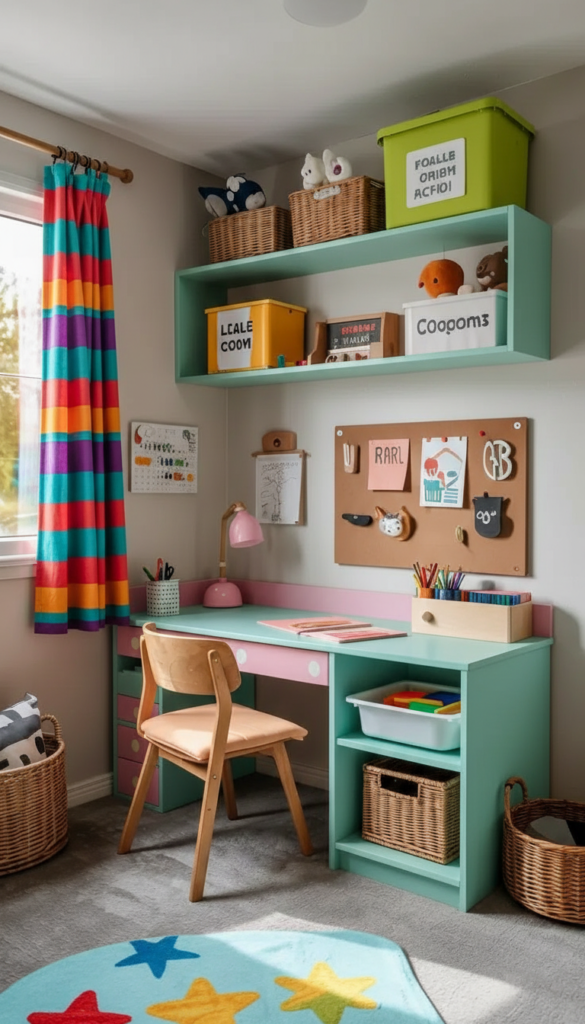
A bedroom desk isn’t just furniture—it’s a dedicated learning zone that signals to your child that this is where schoolwork happens. The key is integrating the desk into the room naturally so it feels like a normal part of the space, not a punishment corner. In 2026, the most successful bedroom desk setups prioritize natural light, calm backgrounds, and just enough storage to keep supplies organized without overwhelming the room.
Positioning For Natural Light And Room Flow
Desk placement makes the difference between a space your child gravitates toward and one they avoid.
Optimal Desk Locations:
- Near a window for natural daylight during afternoon homework
- Against a long wall to keep traffic paths clear
- Away from the bed to separate sleep and work zones psychologically
- Facing away from main play areas to reduce visual distractions
What To Avoid: Don’t place the desk facing a door where people pass constantly. Don’t position it where the child’s back is to the room if they feel anxious about what’s behind them.
Natural light makes reading easier, keeps the space feeling open, and improves mood during study time. If a window spot isn’t possible, prioritize good artificial lighting instead.
Creating A Calm Visual Background
The wall and area around the desk should support focus, not compete for attention.
Background Elements:
- Neutral wall color or subtle paint tone behind the desk (soft gray, beige, warm white)
- Simple pinboard or cork board for rotating artwork and reminders
- Minimal decorations on the desk wall—avoid busy patterns or toys in sightline
- One functional display like a whiteboard, calendar, or schedule grid
Why This Matters: Visual clutter exhausts focus. A calm backdrop helps kids concentrate on the task at hand rather than getting distracted by wall decorations or toys.
Keep the study wall simple. Save personality and fun decor for other walls in the room.
Essential Desk Furniture That Supports Learning
You don’t need elaborate furniture—just functional pieces that make homework easier.
The Basic Setup:
- Simple desk with 1-2 drawers for immediate supply storage
- Comfortable chair with firm back support and appropriate height
- Task lamp with warm bulb (2700K-3000K) to eliminate harsh shadows
- Small desktop organizer for pens, pencils, and daily supplies
Storage Additions:
- One closed drawer for hiding clutter quickly
- One open cubby or shelf for frequently used items
- Shallow bookshelf within arm’s reach
- Small tray for current assignment papers
The furniture should feel proportional to the child’s size. Oversized desks overwhelm small rooms and small kids.
📌 Pin this bedroom desk positioning guide! 📌
Smart Storage That Keeps Supplies Accessible
Storage needs to be simple enough for kids to maintain independently.
Effective Storage Solutions:
- Desk drawers with simple dividers for pencils, erasers, scissors
- Open cubby or basket on desk for notebooks and folders in use
- Wall-mounted shelves above desk for books and reference materials
- Rolling bin under desk for papers, art supplies, or overflow
Organization Principle: Everything used daily should be within arm’s reach. Everything used weekly can be on a nearby shelf. Everything used monthly goes in closed storage elsewhere.
Label drawers and bins for younger kids. Clear expectations make cleanup faster and more consistent.
Lighting Layers For Day And Night Study
One overhead light isn’t enough for comfortable homework sessions.
Three-Layer Lighting Plan:
- Natural daylight during after-school hours (primary source)
- Ceiling light or room lamp for general evening illumination
- Desk task lamp with adjustable arm for focused reading and writing
Bulb Temperature: Use warm white bulbs (2700K-3000K) to reduce eye strain. Cool white (4000K+) creates harsh shadows and feels uncomfortable.
Task Lamp Placement: Position the lamp on the opposite side from the child’s dominant hand to prevent shadow-casting while writing.
Chair Selection For Growing Bodies
The chair is more important than the desk for maintaining focus and preventing discomfort.
Chair Requirements:
- Adjustable height or appropriately sized to current height
- Firm seat and back support—not soft cushions that encourage slouching
- Feet flat on floor or on a footrest—dangling legs cause fatigue
- Armrests optional but helpful for longer work sessions
Height Test: When seated, your child’s elbows should be at 90 degrees when typing or writing. Thighs should be parallel to the floor.
If the desk is fixed height and the chair won’t adjust high enough, add a footrest or sturdy box under their feet.
Keeping One Surface Clear For Active Work
A cluttered desk forces kids to work in tiny spaces or gives them an excuse not to start.
The Clear Space Rule: Keep at least 50% of the desk surface clear at all times—enough space to open a notebook and textbook simultaneously.
Daily Reset Practice:
- Put away completed assignments
- Return supplies to organizers
- Clear trash and wrappers
- Lay out supplies for next day’s work
Why It Works: Kids are more likely to sit down and start homework when they don’t have to clear a space first. The visible open surface removes a friction point.
Adding One Personal Touch
A completely utilitarian desk feels cold. One meaningful personal item makes it feel like their space.
Personal Item Ideas:
- Small framed photo or art piece
- Favorite character figurine (one, not a collection)
- Inspirational quote or poster they chose
- Plant in a simple pot
The One-Item Rule: Limit personal decor to one or two items maximum. More than that starts creating visual noise that distracts from work.
The desk should feel welcoming but still clearly designated for learning, not play.
📌 Save this everyday learning setup! 📌
Cable Management Even For Kids Spaces
Laptop chargers and lamp cords create tripping hazards and visual mess.
Simple Cable Solutions:
- Adhesive cable clips along the desk edge to route cords
- Cable sleeve or wrap to bundle multiple cords together
- Power strip mounted under desk or on wall to centralize connections
- Velcro ties to keep excess cord length bundled
Check cables monthly to ensure nothing is frayed or creating a hazard as kids move chairs and equipment around.
Wall Protection Behind The Desk
Kids kick walls, scuff paint, and generally wear down the area behind their desk and chair.
Protective Measures:
- Washable paint or wipeable wall covering behind the desk area
- Acrylic sheet or plexiglass mounted 12-18 inches up from floor
- Furniture bumpers on chair legs to prevent scuffing
This is especially important if you’re renting or want to preserve wall condition. Prevention is easier than repainting.
Kids desk spaces in bedrooms succeed when they feel like natural parts of the room, not added afterthoughts. The setup should invite use, not require constant parental intervention to maintain.
Kids Desk Ideas Bedroom Layouts That Grow With Your Child
The best kids desk layouts adapt through different school stages without requiring complete furniture replacement. In 2026, families are prioritizing flexible designs that work for early elementary homework, then transition seamlessly to middle and high school study needs. This means choosing furniture arrangements and storage systems that can be reconfigured, not themed setups that get outgrown in two years.
Planning For Five-Year Flexibility
Think beyond current needs to avoid replacing everything as your child grows.
Growth-Friendly Planning:
- Position desk along a long wall with space to add a wider desk or second chair later
- Choose neutral furniture finishes that work from age 6 to 16
- Select modular storage that can shift from toy bins to textbook organization
- Leave wall space for future monitor, larger pinboard, or expanded shelving
What Changes Over Time:
- Desk surface width (younger kids need 36-40 inches, teens need 48-60 inches)
- Chair size and ergonomic requirements
- Storage needs (from crayons to calculators to laptops)
- Technology integration (charging stations, monitor space, cable management)
Starting with adaptability in mind saves money and reduces disruption to established homework routines.
Positioning Away From Primary Play Zones
Separating work and play areas helps kids shift mentally between activities.
Layout Strategy:
- Desk on one side of room, bed and play area on the other
- Desk near the door or window, play area toward room interior
- Visual barrier if needed—bookshelf, dresser, or area rug to define zones
Why Separation Matters: When the desk is surrounded by toys or play equipment, kids struggle to switch into homework mode. Physical distance creates mental separation.
If space is extremely tight, use the desk itself as a divider—position it perpendicular to the wall to create distinct zones.
Building With Modular Storage Systems
Modular systems let you rearrange as needs change without buying new furniture.
Effective Modular Options:
- Cube organizers (Kallax-style): Bins hold toys now, books and supplies later
- Wall-mounted shelving systems (Elfa-style): Shelves and accessories move up as child grows
- Drawer units on casters: Roll them where needed, add or remove as required
The Configuration Advantage: Start with lower shelves for easy kid access. Raise them as the child grows taller. Add desk extensions or additional storage towers when needed.
📌 Pin this modular growth strategy! 📌
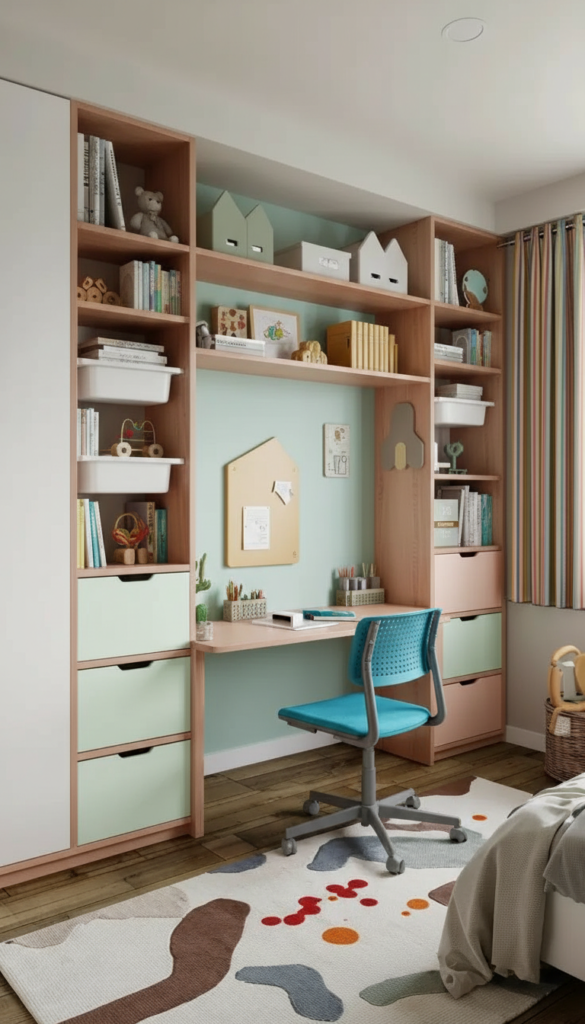
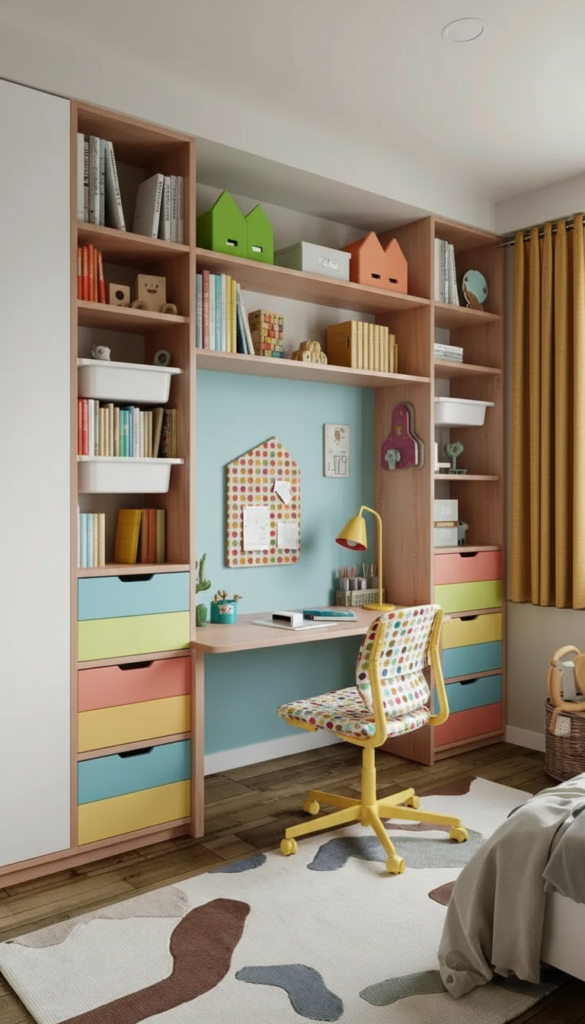
Creating The Built-In Look Without Custom Carpentry
You can achieve a cohesive, permanent-looking setup using standard furniture pieces.
DIY Built-In Approach:
- Two storage towers (bookcases or cube units) on either side
- Desktop spanning between them—butcher block, plywood, or simple desk top
- Upper shelving mounted on the wall above for books and display
Why This Works: It looks custom and intentional, provides massive storage, and can be disassembled or reconfigured as needs change.
Measurement Guidelines:
- Desktop should be 24-30 inches deep for comfortable work space
- Storage towers should be 12-18 inches wide each
- Leave 36-48 inches between towers for desk space
Paint or stain everything the same color for a truly built-in appearance.
Adding Flexible Work Surfaces
Sometimes kids need more space for big projects or group work.
Expandable Surface Options:
- Pull-out keyboard tray converted to an extra work surface
- Folding wall-mounted table that drops down when needed
- Second desk surface beside the main desk (L-shaped configuration)
- Movable cart or small table that rolls in for project work
When To Use: Science fair projects, art assignments, building models, or collaborative work with siblings or friends.
The main desk stays organized while temporary work happens on the secondary surface.
Storage For Rotating Interests
Kids accumulate collections, supplies, and hobby materials that change frequently.
Adaptive Storage Solution:
- One “active interest” bin or drawer for current hobbies and collections
- One “archive” bin in closet or under bed for outgrown collections
- Rotation system: When a new interest starts, archive the old one
Why It Prevents Clutter: Everything doesn’t need permanent display. Active interests get prime real estate. Past interests get stored, not thrown away.
This approach works for everything from Pokémon cards to art supplies to sports equipment.
Planning Lighting In Layers For Reconfiguration
As desk position or room layout changes, lighting needs to adapt.
Flexible Lighting Strategy:
- Multiple light sources rather than one fixed position
- Portable desk lamp that moves with desk repositioning
- Ceiling fixture that illuminates the whole room
- Wall sconces or clamp lights that can relocate
Growth Consideration: Younger kids need overhead light during supervised homework. Older kids and teens prefer desk task lamps and dimmer ambient lighting for evening study.
Build in outlets or power strips in multiple wall locations so desk can move without losing power access.
Knee Clearance And Chair Space Planning
Furniture that fits perfectly now might not work in two years.
Measurement Checklist:
- Knee clearance under desk: Minimum 24 inches from floor to desktop underside
- Chair push-back space: Minimum 36 inches from desk to wall or furniture behind
- Desk to bed clearance: At least 30 inches for comfortable walking path
- Desk to closet clearance: At least 36 inches to open doors without moving chairs
Why Measure: Kids grow. Desks that felt spacious become cramped. Planning for growth clearance prevents having to move furniture later.
📌 Save this layout growth checklist! 📌
Label Systems That Evolve
Organization systems work only if kids can maintain them independently.
Age-Appropriate Labels:
- Picture labels for pre-readers (ages 4-6)
- Word labels for early readers (ages 6-9)
- Category labels for older kids (ages 9+)
- No labels for teens who have internalized the system
Update Schedule: Replace picture labels with word labels as reading improves. Simplify or remove labels entirely as organizational habits become automatic.
The goal is building independence, not creating permanent dependence on labeled systems.
Planning For Sibling Desk Sharing
If two kids will eventually need to share workspace, plan ahead.
Shared Layout Options:
- Two desk spaces side-by-side with divider panel between for focus
- L-shaped configuration where each child faces a different direction
- One main desk plus one secondary surface for flexible shared use
Storage Separation: Each child gets designated drawers or bins clearly marked. Shared supplies (pencils, paper) go in a central location both can access.
Plan furniture placement assuming you’ll need to fit a second chair and work area in the future.
Growing layouts succeed when furniture and systems can adapt without major overhauls. The room should evolve with your child, not fight against their changing needs.
Kids Desk Ideas Homework Station For Focused Study Time
A homework station isn’t just a desk—it’s a purposefully designed zone that supports concentration and independent work habits. The difference between a desk that gets used and one that collects clutter comes down to how well it reduces distractions, keeps supplies organized, and creates a predictable routine. In 2026, effective homework stations prioritize function over cuteness, with setups that kids can maintain without constant adult intervention.
Creating Physical And Visual Separation From Play Areas
Location determines whether kids can actually focus or just go through the motions.
Strategic Positioning:
- Separate from bed to avoid the temptation to lie down
- Away from toy storage so play items aren’t in peripheral vision
- Not facing high-traffic doorways where people pass constantly
- Back to wall or corner if kids feel anxious about open space behind them
Why Separation Works: Physical distance creates mental boundaries. When the desk is surrounded by or facing distractions, focus becomes nearly impossible.
If the room is too small for true separation, use a bookshelf or curtain panel as a visual divider between zones.
Sizing The Desk For Current And Future Needs
The desk should fit your child now but accommodate growth and technology later.
Desk Dimensions:
- Elementary age (6-10): 36-40 inches wide, 20-24 inches deep
- Middle school (11-14): 42-48 inches wide, 24-28 inches deep
- High school (15+): 48-60 inches wide, 28-30 inches deep
Technology Planning: Even if your young child doesn’t have a laptop yet, plan for one. Leave space for a 13-15 inch laptop plus an open notebook beside it.
Height Consideration: Standard desk height is 28-30 inches. Use an adjustable chair to accommodate your child’s current height.
Essential Desktop Organization
A clear system keeps supplies accessible without creating surface chaos.
The Three-Zone System:
Active Work Zone (center):
- Clear space for open notebook and textbook
- Minimum 18×18 inches completely clear
Supply Zone (dominant hand side):
- Pencil cup with pens, pencils, highlighters
- Small organizer tray for erasers, clips, sticky notes
Reference Zone (non-dominant side):
- Current assignment folder or tray
- Timer or clock for time management
- Small desk lamp
What Stays Off The Desk: Toys, collectibles, craft supplies, completed assignments. If it’s not actively used for homework, it doesn’t belong on the surface.
📌 Pin this homework station organization! 📌
Vertical Storage For Small Spaces
When floor space is limited, build storage upward.
Vertical Solutions:
- Wall-mounted shelves above desk for books and binders
- Narrow tower shelf beside desk (12 inches wide or less)
- Pegboard or slat wall with hooks for backpacks and headphones
- Floating shelves at multiple heights for different categories
Storage Priorities: Top shelves: Rarely used reference books or archived supplies Middle shelves: Current textbooks and frequent-use items Bottom shelves: Daily supplies and active notebooks
Vertical storage keeps the desktop clear while keeping everything reachable.
Closed Storage Solutions For Hidden Clutter
Not everything can stay visible. Closed storage prevents visual overwhelm.
Hidden Storage Options:
- Desk drawers for supplies that aren’t needed daily
- Bins or baskets that slide under the desk
- Cabinets or closet space nearby for overflow supplies
- File box or accordion folder for graded papers and old assignments
Quick Reset Advantage: When homework time is done, kids can sweep everything into closed storage in under 60 seconds. The desk resets to clean for the next session.
Closed storage makes cleanup fast enough that kids will actually do it.
Sound Management For Noise-Sensitive Kids
Some kids struggle to focus when there’s ambient household noise.
Noise Reduction Strategies:
- Fabric pinboard or cork board on wall behind desk to absorb sound
- Area rug under desk and chair to dampen sound from other rooms
- White noise machine or fan to mask household conversations
- Noise-canceling headphones for extremely distractible kids
When To Use: If your child has siblings, lives in a busy household, or has sensory processing challenges, sound management can dramatically improve focus.
Position the desk away from shared walls with noisy rooms (kitchen, living room, playroom).
Building A Predictable Routine Structure
The station works best when homework happens the same way every time.
Four-Step Routine:
1. Unpack (2 minutes):
- Remove backpack contents
- Place assignments in active tray
- Lay out needed supplies
2. Work (assignment time):
- Use timer for focused intervals
- Take short breaks between subjects
3. Pack (2 minutes):
- Return completed work to backpack
- Refill needed supplies
4. Reset (1 minute):
- Clear trash
- Put supplies away
- Lay out tomorrow’s materials
Why Routines Matter: Predictable steps reduce decision fatigue and arguments. Kids know exactly what to do without asking.
Timer And Clock Placement
Time awareness helps kids stay on task and manage assignments independently.
Time Tools:
- Visible analog clock on the wall or desk for overall time awareness
- Timer for focused work intervals (digital or visual countdown)
- Schedule chart showing homework time block
Time Management Strategy: Use the Pomodoro-style approach—25 minutes focused work, 5 minute break. Adjust intervals for younger kids (15 minutes work, 3 minute break).
Seeing time pass helps kids understand how long tasks actually take and builds estimation skills.
📌 Save this focus and routine guide! 📌
Visual Simplicity On Surrounding Walls
The wall space around the homework station should support, not compete with, focus.
Minimal Wall Approach:
- One pinboard or whiteboard for rotating reminders and current work
- One reference chart (multiplication table, periodic table, etc.)
- Clear wall space otherwise—no posters, decorations, or busy patterns
Weekly Rotation: Update the pinboard weekly with current assignments, upcoming tests, or motivational quotes. Remove old items immediately.
Too many permanent visuals create background noise that exhausts focus without kids realizing it.
Supply Management System
Running out of pencils or paper mid-assignment derails homework flow.
Homework-Only Supply Kit:
- Dedicated bin or drawer with homework supplies separate from craft supplies
- Weekly check system to refill before running out
- Backup supplies stored separately (extra notebooks, pens, paper)
Common Supply List:
- Pens and pencils (at least 5 sharp pencils always)
- Eraser and pencil sharpener
- Ruler and scissors
- Highlighters (3 colors minimum)
- Lined paper and graph paper
- Sticky notes and index cards
Keep a master list on the inside of the supply drawer lid so you know what needs replenishing.
Trash And Recycling Within Reach
A nearby trash option keeps the desk from becoming buried in paper scraps and wrappers.
Waste Management:
- Small trash can directly beside or under the desk
- Recycling bin for paper if your family recycles
- Designated spot for papers to keep vs. throw away
Daily Habit: Empty the trash can weekly and sort the “keep” papers into a file folder monthly.
When trash is easy to reach, kids are more likely to actually use it instead of letting waste pile up on the desk surface.
Homework stations succeed when they make starting work easier than avoiding it. The goal is removing friction points—unclear organization, distracting surroundings, missing supplies—that give kids excuses not to sit down and focus.
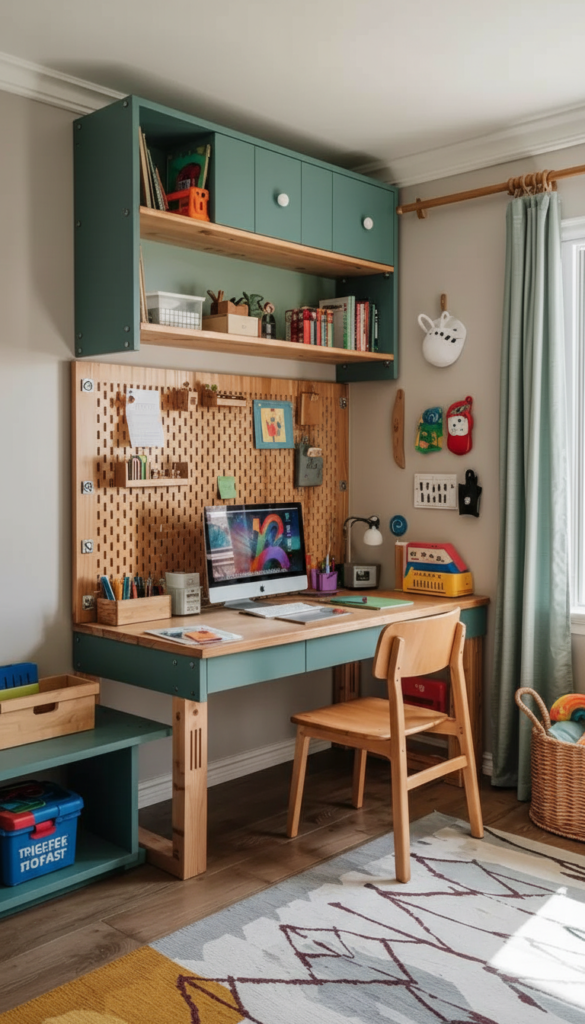
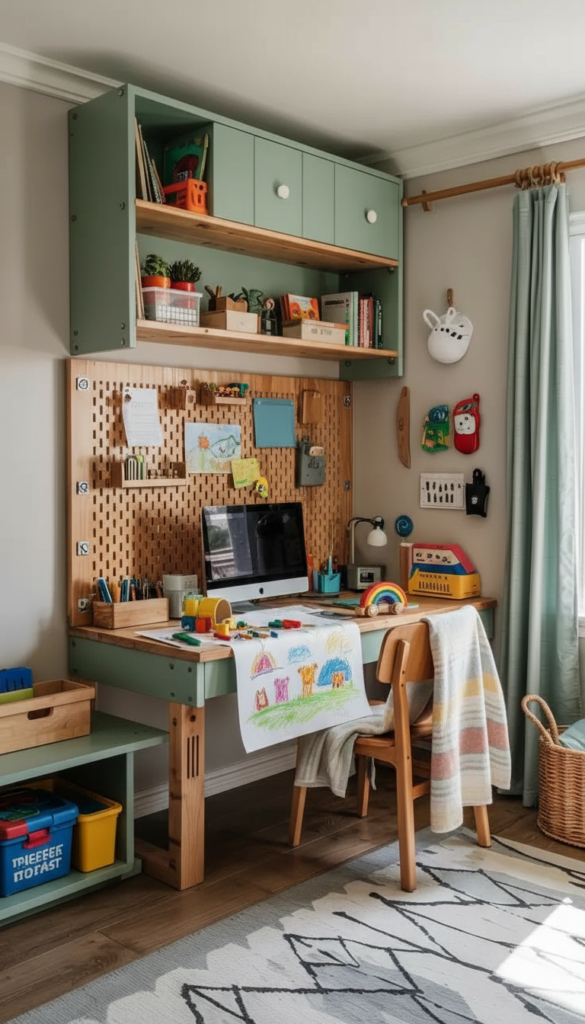
Kids Desk Ideas Homework Station DIY Projects Parents Can Build
DIY homework stations let you customize exactly what your child’s room needs while staying within budget. Building your own desk setup isn’t about advanced carpentry—it’s about creating functional, clean-looking stations using basic materials and simple assembly. In 2026, the most successful DIY projects prioritize safety, durability, and the ability to fit odd room shapes or specific storage needs that standard furniture can’t address.
Wall-Mounted Floating Desk For Tight Spaces
A floating desk eliminates floor clutter and works perfectly in small or awkwardly shaped rooms.
Materials Needed:
- Solid wood board or butcher block (48-60 inches long, 20-24 inches deep)
- Heavy-duty shelf brackets or cleat system rated for weight
- Wood screws into wall studs (never drywall anchors alone for desks)
- Sandpaper and finish (polyurethane or wipeable paint)
Assembly Steps:
- Locate wall studs and mark bracket positions
- Install brackets or cleat at 28-30 inches from floor
- Mount desktop securely to brackets
- Sand all edges smooth and apply finish
Weight Capacity: Ensure brackets support at least 100 pounds to handle the desktop, supplies, and a child leaning on it.
Advantage: No legs means easy floor cleaning underneath. Perfect for rooms where floor space is at a premium.
Building Between Two Storage Units
Create a built-in look using bookcases or cube organizers as desk supports.
What You Need:
- Two identical storage units (cube organizers, narrow bookcases, or drawer units)
- Desktop board to span between them (size depends on unit width)
- L-brackets to secure desktop to storage units
- Paint or stain to match everything
Construction Process:
- Position storage units 36-48 inches apart
- Cut desktop to span with 1-2 inch overhang on each side
- Secure desktop to top of storage units with brackets
- Add upper shelving above if desired
Customization Options:
- Use drawer units for hidden storage
- Use cube organizers with bins for flexible organization
- Paint everything white or a cohesive color for built-in appearance
Cost Advantage: Often cheaper than buying a complete desk with storage, and provides significantly more organization space.
📌 Pin this DIY desk building guide! 📌
Using Modular Systems As Desk Bases
Modular storage systems create adjustable, reconfigurable desk solutions.
Popular Base Systems:
- Cube organizers (Kallax-style): Lay horizontally with desktop on top
- Trofast-style bin units: Pair with simple plank top for desk with toy storage
- Elfa or similar systems: Mount desk surface directly to wall standards
Why Modular Works: As your child grows and needs change, you can add bins, shelves, or drawers without replacing the entire desk.
Assembly Tip: Secure modular units to the wall even if they’re supporting a desktop. Kids lean and climb on furniture, so anchoring prevents tipping.
Simple Plywood And Cleat Construction
For parents comfortable with basic power tools, a custom-sized desk costs under $50.
Materials:
- 3/4-inch plywood cut to desired desk size
- 2×2 or 2×4 cleats for wall mounting
- Wood screws and wall anchors for stud mounting
- Edge banding or trim to finish plywood edges
- Paint or stain for finished appearance
Building Steps:
- Cut plywood to exact size needed for space
- Apply edge banding to all exposed edges
- Install cleat on wall at desk height into studs
- Mount plywood top to cleat and wall
- Finish with paint or wipe-clean coating
Customization Freedom: Build to exact dimensions of your space. Create corner desks, L-shapes, or extra-deep surfaces that standard furniture can’t offer.
Adding Built-In Charging Stations
Integrate power management into your DIY desk for a clean, professional look.
Cable Management Build-In:
- Drill grommet hole in desktop for cord pass-through
- Mount power strip to underside of desk or back of storage unit
- Use cable clips along desk edge to route cords neatly
Drawer Charging Station:
- Designate one drawer for device charging
- Drill small hole in back of drawer for cord entry
- Add surge protector inside drawer with short cables
Safety Note: Use surge protectors, not just extension cords. Ensure all connections are secure and cords aren’t pinched by drawer mechanisms.
Pegboard Or Slat Wall Integration
Add vertical organization directly into your DIY design.
Installation:
- Mount pegboard to wall above desk with 1-inch spacers for hook clearance
- Paint pegboard to match room before mounting
- Add hooks, baskets, and small shelves as needed
What Goes On Pegboard:
- Backpack hook
- Headphone hanger
- Small baskets for supplies
- Cup hooks for scissors or rulers
Slat Wall Alternative: Slat walls (wood slats with gaps) create a modern look and work with special hook attachments. More expensive but cleaner aesthetic than pegboard.
📌 Save this DIY integration strategy! 📌
Safety And Durability Requirements
DIY projects must be as safe and stable as store-bought furniture.
Non-Negotiable Safety Features:
- All tall storage anchored to wall with furniture straps or L-brackets into studs
- No sharp corners—sand or round all edges before finishing
- Sturdy construction—desks must support 100+ pounds without wobbling
- Non-toxic finishes—use low-VOC paints and sealers
Testing Before Use: Press down hard on all corners and the center of the desktop. Apply sideways force to storage units. If anything shifts or wobbles, reinforce before letting your child use it.
Hardware Quality: Don’t cheap out on screws, brackets, or anchors. Use construction-grade hardware rated for the loads your furniture will experience.
Finishing For Easy Cleaning
Kids are messy. Your DIY desk needs surfaces that wipe clean easily.
Finish Options:
- Polyurethane (3-4 coats): Creates durable, wipeable surface on wood
- Semi-gloss paint: Easier to clean than flat paint
- Laminate sheet adhesive: Adds washable surface to plywood
- Clear acrylic sheet: Protects painted or stained surfaces
Maintenance Planning:
- Add felt pads where drawers or bins slide
- Use coasters or desk pads in high-wear areas
- Touch up finish annually before damage spreads
Why It Matters: A desk that stains, scratches, or marks easily becomes an eyesore quickly. Proper finishing extends life and keeps it looking intentional.
Neutral Materials For Long-Term Use
Build with materials and colors that won’t feel dated as your child grows.
Smart Material Choices:
- Natural wood tones (oak, maple, birch) that work from age 6 to 16
- White or light gray paint for a clean, ageless look
- Black metal components for modern industrial style
- Simple hardware without decorative details
Avoid:
- Bright primary colors that feel juvenile
- Character themes that kids outgrow
- Trendy finishes that date quickly
Let removable decor provide personality. Keep the permanent furniture neutral.
Budget Priority Allocation
When money is limited, spend strategically on what matters most.
Priority Spending Order:
- Safety hardware—wall anchors, quality brackets, proper screws
- Desktop surface—invest in good plywood or solid wood, not particle board
- Durable finish—quality paint or sealant that lasts
- Ergonomic chair—even if the desk is DIY, don’t cheap out on the chair
Save Money On:
- Decorative elements (add later)
- Storage bins and organizers (upgrade over time)
- Lighting (start simple, improve later)
A well-built desk with a cheap chair is worse than a simple desk with a proper chair. Seating directly affects focus and posture.
Expansion Planning Built In
Design your DIY project with future additions in mind.
Built-In Flexibility:
- Leave wall space beside desk for future shelving or second desk section
- Use modular base units that can have additional units added later
- Install extra wall cleats during initial build for easy shelf additions
- Plan cord routing for future technology needs
Why Plan Ahead: Adding to an existing system is easier and cheaper than rebuilding. Think about what your child might need in 2-3 years, not just today.
DIY homework stations succeed when they’re built with the same stability and thought as store-bought furniture, customized to fit exact space and storage needs, and finished to withstand years of real kid use.
Kids Desk Ideas DIY For Creative And Budget Friendly Rooms
Creative, budget-friendly desk setups prove you don’t need expensive furniture to create functional homework spaces. The key is working with what you already have, shopping secondhand strategically, and using paint and organization to make simple pieces feel intentional. In 2026, budget-conscious families are prioritizing smart spending on what actually matters—stability, lighting, and seating—while getting creative with storage and style.
Starting With What You Already Own
Before buying anything, assess existing furniture that could be repurposed.
Items That Can Become Desk Stations:
- Small dining table or side table with appropriate chair becomes instant desk
- Dresser with cleared top surface can function as desk with added task lamp
- Bookshelf turned sideways creates desk height with built-in storage
- Kitchen cart or utility table provides work surface plus storage shelves
What To Look For:
- Stable construction without wobbling
- Appropriate height (28-30 inches for desk work)
- Flat surface at least 24 inches deep
- Room underneath for chair and legs
Repurposing saves money and reduces furniture waste. Add a fresh coat of paint to make it feel new.
Secondhand And Thrift Store Finds
Used furniture offers quality materials at fraction of retail cost.
Where To Shop:
- Facebook Marketplace and Craigslist for local pickup
- Thrift stores (Goodwill, Salvation Army) for frequent inventory rotation
- Estate sales for solid wood furniture at low prices
- School surplus sales for institutional desks designed for kids
What To Inspect:
- Structural stability (no loose joints or wobbling)
- Drawers that open and close smoothly
- Surface condition (minor scratches okay, deep damage isn’t)
- Size appropriateness for your space
Red Flags:
- Strong chemical or smoke odors that won’t air out
- Particle board that’s20 Vanity Desk Ideas 2026 For Modern Bedroom Aesthetic And Makeup Organization
Finding the perfect vanity desk feels like searching for a missing piece of your daily routine—because it is. Every morning, you deserve a space that makes getting ready feel intentional, not chaotic. Whether you’re applying makeup, organizing skincare, or simply needing a quiet corner to start your day, your vanity desk should work as hard as you do while looking effortlessly beautiful.
The best vanity desks in 2026 aren’t just furniture—they’re personal sanctuaries that blend function with emotion. They hold your favorite lipsticks, your morning coffee, and the quiet moments before the world demands your attention. This guide walks you through 20 carefully crafted vanity desk ideas that transform ordinary bedrooms into spaces you’ll actually want to wake up in, with practical solutions for modern homes, luxury aesthetics, small spaces, and DIY enthusiasts who want something truly their own.
Vanity Desk Ideas Bedroom For Modern Homes
Modern bedroom vanities have evolved beyond simple furniture pieces into essential daily stations that define how your morning unfolds. The key lies in creating a setup that disappears into your room’s architecture while remaining completely functional. In 2026, modern vanity design emphasizes floating effects, concealed cable management, and lighting that enhances rather than overwhelms.
The Foundation of Modern Vanity Design
Start with a desk profile that respects your room’s footprint. Modern vanities work best when they maintain clear walking paths and allow chairs to recline without hitting drawers or closet doors.
- Shallow-depth desks (12-16 inches) preserve floor space without sacrificing function
- Matte finishes in white or light oak feel contemporary and hide daily wear
- Sharp, clean edges create visual consistency with modern bedroom furniture
- Floating desk installations make rooms feel larger and simplify floor cleaning
Lighting That Flatters Without Overpowering
The difference between a functional vanity and a truly effective one often comes down to lighting placement. Wall-mounted sconces positioned on both sides eliminate shadows and render skin tones accurately.
- Place lights 60-66 inches from the floor for optimal face illumination
- Choose warm white LED bulbs (2700-3000K) for natural-looking skin tones
- Vertical sconces provide even coverage without harsh overhead shadows
- Dimmable switches let you adjust from morning makeup to evening ambiance
Storage Solutions That Maintain Clean Lines
Modern aesthetics demand that storage remains present but invisible. One closed storage unit prevents visual clutter while keeping essentials within reach.
- Use lidded vessels for cotton pads, brushes, and daily essentials
- Install under-desk drawer inserts for charging cables and small tools
- Designate one tray for items you use every single morning
- Keep countertop items to a maximum of five pieces for deliberate composition
Pin this modern vanity foundation approach! 📌
Dual-Purpose Design for Work and Beauty
If your vanity needs to function as both a makeup station and study table, height becomes critical. Standard desk height (28-30 inches) accommodates laptop work while remaining comfortable for seated makeup application.
- Choose chairs with good back support for extended sitting periods
- Ensure desktop depth allows laptop placement without crowding makeup storage
- Install accessible charging points that remain hidden from view
- Use drawer organizers that separate work supplies from beauty products
Creating a Focal Point Without Clutter
Modern vanities thrive when one element commands attention while everything else supports it quietly. Consider your vanity the silent foundation, then spotlight a single statement piece.
- A sculptural lamp with organic curves softens geometric furniture lines
- An oversized round mirror contrasts beautifully with linear desk edges
- A textured wall panel behind the vanity adds depth without pattern chaos
- One carefully chosen plant brings life without overwhelming the minimalist aesthetic
Material Choices That Define Modern Style
The materials you select communicate your design intention immediately. In modern bedrooms, less variety creates more impact.
- Light oak brings warmth without traditional heaviness
- Matte white surfaces reflect light while hiding fingerprints
- Brushed metal hardware in black or nickel adds subtle contrast
- Glass or acrylic accessories maintain openness and lightness
The Power of Negative Space
Empty wall space above your vanity isn’t wasted—it’s an essential element of modern design. Resist the urge to fill every vertical surface.
- Leave at least 60% of wall space above the vanity clear
- If adding art, choose one large piece over multiple small ones
- Consider a narrow floating shelf instead of traditional frames
- Let the mirror be your primary vertical element
Defining the Vanity Zone
A narrow rug beneath the chair physically marks the vanity area while protecting flooring from chair movement. This small addition creates boundaries without disrupting sight lines.
- Choose low-pile rugs that won’t interfere with chair rolling
- Size the rug to extend 12-18 inches beyond the chair’s range of motion
- Match rug colors to existing bedroom textiles for cohesion
- Consider natural fiber rugs for texture that reads as subtle
Save this modern vanity strategy! 📌
Consistency in Accent Colors
If black accents appear elsewhere in your bedroom—lamp bases, picture frames, or hardware—repeat them in your vanity setup for visual harmony.
- Match chair leg finish to bed frame metal
- Coordinate drawer pulls with closet door hardware
- Echo bedside lamp finish in vanity lighting
- Use the same metal tone for mirror frame and accessories
Window Treatment Coordination
When your vanity sits near a window, layered window treatments give you control over natural light at different times of day.
- Sheer curtains for soft morning light during makeup application
- Blackout layers prevent mirror glare during bright afternoons
- Side-pull options keep the vanity area accessible
- Motorized shades offer modern convenience for hard-to-reach windows
Modern vanity design succeeds when every element serves a purpose and nothing fights for attention. The result feels effortless, intentional, and perfectly suited to how you actually live.
Vanity Desk Ideas Bedroom Luxury With Elegant Details
Luxury in vanity design isn’t about gold-plated excess—it’s about materials that feel exceptional, lighting that flatters naturally, and details that make daily routines genuinely pleasurable. The 2026 approach to bedroom luxury emphasizes livable elegance over showroom perfection, creating spaces that feel like personal sanctuaries rather than untouchable displays.
Defining Luxury Through Material Quality
Luxury reveals itself through surfaces that feel different under your fingertips. A faux stone-top desk or high-gloss lacquer finish immediately elevates the tactile experience.
- Marble-effect surfaces resist heat from styling tools while looking sophisticated
- Soft-close drawers eliminate jarring sounds and feel premium with every use
- Lined organizer interiors protect products and create a curated unboxing experience
- Weighted drawer pulls in brushed brass or polished nickel add subtle richness
Seating That Transforms the Experience
The chair you choose changes how luxury feels in practice. A boucle or velvet upholstered seat turns a functional task into a moment of comfort.
- Look for chairs with gentle curves that support your lower back
- Choose fabrics that feel inviting even in a quick sit-down
- Consider a small swivel base for easy access to different drawer sections
- Match chair upholstery to other soft furnishings in the room for cohesion
Mirror Selection for Elegant Impact
The mirror shapes how your entire vanity reads visually. Oversized mirrors with slim frames command attention without overwhelming the space.
- Arched mirrors bring architectural elegance and soften rectangular room lines
- Oval shapes feel classic and sophisticated without appearing dated
- Floor-to-ceiling options work beautifully in rooms with high ceilings
- Slightly rounded corners on rectangular mirrors add a custom, refined touch
Pin this luxury vanity material guide! 📌
The Art of Restrained Metal Accents
Metallic finishes signal luxury, but too many create visual noise. Limit yourself to 2-3 metallic touches in consistent tones.
- Choose one primary metal finish and maintain it throughout
- Brushed brass reads warm and current in 2026 design
- Polished nickel offers cooler elegance that pairs with crisp whites
- Matte black metal provides modern luxury without traditional shine
Lighting That Creates Hotel-Luxury Ambiance
Layered lighting transforms your vanity from purely functional to genuinely atmospheric. The goal is flattering illumination that adjusts to different needs.
- Flank the mirror with adjustable sconces for even, shadow-free light
- Add a low-profile pendant overhead for ambient evening glow
- Install dimmer switches for control from bright task lighting to soft mood
- Choose warm color temperatures that make skin appear healthy and rested
Creating Material Rhythm
Luxury vanities feel most successful when materials echo and balance each other throughout the bedroom. If your bed features a plush upholstered headboard, carry that softness to your vanity chair while keeping the desktop clean and architectural.
- Soft textures on seating balance hard surfaces on the desk
- Matte finishes on large surfaces prevent glare and feel sophisticated
- One high-shine element (mirror, lacquer finish) provides visual interest
- Consistent wood tones create flow even when mixing materials
The Luxury of Breathing Room
True luxury includes generous circulation space. A vanity that crowds the room contradicts the sense of ease you’re trying to create.
- Allow 36-48 inches between vanity and bed for comfortable movement
- Ensure drawers can fully extend without hitting other furniture
- Consider the chair’s footprint when pulled out for use
- Leave space on either side of the vanity for visual balance
Concealed Organization Systems
The exterior calm of a luxury vanity depends entirely on hidden interior organization. What you don’t see matters as much as what you do.
- Install custom drawer dividers for lipsticks, brushes, and skincare
- Use velvet-lined compartments for jewelry and delicate items
- Designate specific homes for hair tools to prevent cord tangles
- Keep backup products in separate storage to maintain surface serenity
Save this luxury vanity organization strategy! 📌
Additional Seating for Layered Function
A small upholstered ottoman near the vanity serves multiple purposes while reinforcing the luxury aesthetic.
- Provides a surface for a robe or outfit while getting ready
- Acts as temporary seating for a partner or friend
- Can hold a decorative throw for added texture
- Creates a more furnished, considered room composition
Decorative Storage Solutions
Luxury doesn’t mean everything stays hidden. A few beautiful boxes on the desktop can house items you access frequently while maintaining the peaceful appearance.
- Choose boxes in coordinating finishes (lacquer, leather, or marble)
- Use them for hair accessories, watches, or everyday jewelry
- Select sizes that relate to each other proportionally
- Limit desktop boxes to 2-3 to avoid cluttered appearance
Wall Treatments That Frame the Vanity
The wall behind your vanity offers an opportunity to define the zone as special. Subtle texture or pattern creates depth without competing for attention.
- Textured wall panels in neutral tones add dimension
- Subtle wallpaper in tone-on-tone patterns feels refined
- A different paint finish (matte vs. eggshell) quietly defines the area
- Maintain the same color family as surrounding walls for cohesion
Coordinating Adjacent Spaces
If your vanity sits near a bathroom door, thoughtful finish coordination makes the transition feel deliberate rather than accidental.
- Match metal finishes between vanity hardware and bathroom fixtures
- Echo countertop materials if possible
- Coordinate lighting styles for visual flow
- Use similar color palettes to blur the boundary between spaces
Luxury vanity design succeeds when every detail supports a feeling of ease, beauty, and personal care. The goal is creating a space that makes you feel valued every single day.
Vanity Desk Ideas Bedroom Aesthetic For Stylish Spaces
An aesthetic bedroom vanity strikes the perfect balance between Instagram-worthy beauty and real-world functionality. This style embraces gentle forms, comfortable materials, and thoughtfully curated displays that feel personal rather than staged. In 2026, the aesthetic approach leans into warm neutrals, soft curves, and lighting layers that create depth and interest.
Building Your Vanity Composition
Think of your vanity as a carefully arranged vignette that happens to be completely functional. The placement within your room matters as much as the pieces themselves.
- Position near windows to capture natural morning light
- Align with the bed or create a deliberate angle for visual interest
- Ensure the vanity feels integrated into the room’s overall layout
- Consider sightlines from the doorway and bed for pleasing views
Selecting the Foundation Pieces
Start with a simple desk in white or light wood, then build personality through your chair choice and one standout accent element.
- Plain desks provide a calm backdrop for layered styling
- Comfortable chairs with personality (curved backs, interesting legs) add character
- One statement piece—curved mirror, sculptural lamp, or unique drawer pulls—creates focus
- Light wood tones bring warmth without the weight of traditional finishes
Storage That Maintains the Aesthetic
The challenge with aesthetic spaces is keeping them beautiful while actually using them. Matching container series and drawer dividers solve this elegantly.
- Use containers in coordinating colors and materials
- Choose open storage for items you use daily and reach for quickly
- Install drawer dividers so interiors look as considered as exteriors
- Keep deeper drawers for backup products and tools
Pin this aesthetic vanity composition guide! 📌
The Art of Surface Styling
Your desktop becomes a curated display of functional objects. The key is editing ruthlessly and replacing clutter with intention.
- Display 5-7 items maximum on the surface
- Include varied heights (tall mirror, medium lamp, low tray)
- Add one organic element (plant, flowers, or natural fiber basket)
- Use a linen runner or small tray to group smaller items
Introducing Color Subtly
If you want to incorporate trending colors like blush pink without overwhelming the space, use them as quiet accents rather than main features.
- A blush chair cushion adds softness without dominating
- Artwork with pink undertones introduces color at eye level
- A single pink storage box among neutral ones creates interest
- Pale pink flowers in a neutral vase bring temporary seasonal color
Creating Cohesive Color Stories
Aesthetic vanities work best with limited color palettes punctuated by one contrasting element. This creates visual interest without chaos.
- Choose 2-3 main colors and stick to them
- Add one contrast note (black hardware, dark wood, or deep accent color)
- Repeat your chosen colors in different materials for depth
- Use the 60-30-10 rule: 60% dominant color, 30% secondary, 10% accent
Avoiding the Clutter Trap
Even beautiful vanities become overwhelming when too many small objects compete for attention. Fewer, larger, more intentional pieces create better visual impact.
- Evaluate each item: does it serve a purpose or bring joy?
- Choose one large decorative object over three small ones
- Group tiny items (lipsticks, brushes) into contained systems
- Regularly edit and remove items that no longer serve you
Making It Photography-Ready
If you enjoy sharing your space on social media, the daily reality must work as well as the styled shot. This means managing cords and tool storage before styling the visible surfaces.
- Install cord management solutions that keep cables hidden
- Store hot tools in drawer organizers immediately after cooling
- Keep styling products in cabinets rather than on display
- Style the top last, after functional elements are resolved
Save this aesthetic vanity styling strategy! 📌
Functional Accessories That Look Intentional
Every visible object should earn its place through beauty, function, or ideally both.
- Brush holders in ceramic or glass display tools as part of the aesthetic
- Small catchalls for jewelry removed at night prevent lost pieces
- Decorative trays corral daily essentials while looking curated
- Perfume bottles with beautiful packaging become display objects
Working With Limited Wall Space
If your bedroom doesn’t offer much wall area around the vanity, get creative with vertical storage and display.
- Replace traditional framed art with a narrow picture ledge over the desk
- Use the ledge to rotate small prints, photos, or greeting cards
- Install small floating shelves on either side of the mirror
- Consider a pegboard painted to match the wall for functional wall art
Lighting for Ambiance and Function
Adjustable lighting lets you shift between soft ambient glow and precise task illumination depending on your needs.
- Choose fixtures with dimmer capabilities
- Layer sources: overhead for ambiance, side lights for tasks
- Warm bulbs (2700-3000K) photograph better and feel more inviting
- Consider a small adjustable desk lamp for detailed makeup work
Balancing Proportions
The relationship between your mirror and desk width affects how intentional the setup appears. Aim for visual harmony.
- Mirrors slightly narrower than the desk width feel balanced
- Oversized floor mirrors work when desk is simple and understated
- Round mirrors need adequate breathing room on all sides
- The mirror bottom should sit 4-6 inches above the desktop
Adding Closed Storage When Needed
If you collect products enthusiastically, closed cabinet modules prevent the aesthetic from becoming chaotic.
- Add one cabinet unit that matches your desk finish
- Use it for backup products, seasonal items, or bulk storage
- Keep doors closed to maintain the curated appearance
- Organize interiors thoughtfully even though they’re hidden
An aesthetic vanity succeeds when it looks like an extension of your personality—styled but livable, beautiful but genuinely useful, photogenic but entirely practical for Tuesday mornings.
Vanity Desk Ideas Aesthetic With Clean And Trendy Looks
The clean, trend-forward aesthetic prioritizes edited simplicity, strategic negative space, and storage solutions that maintain serenity even during daily use. This approach works beautifully in modern or minimalist bedrooms where the vanity supports rather than disrupts the overall calm. Quality over quantity defines this style, with careful repetition of shapes and a restrained color palette creating cohesion.
The Core Elements of Clean Design
This aesthetic relies on a few excellent pieces rather than many adequate ones. Every item must justify its presence through function or intentional beauty.
- Streamlined desks with two drawers maximum and thin profiles
- Lightweight chairs with slim frames or low backs that don’t block sightlines
- Concealed storage that keeps surfaces clear of visual clutter
- Repeated shapes—all straight lines or all soft curves—for consistency
Lighting That Feels Natural
The right lighting in a clean aesthetic vanity creates flattering illumination without theatrical drama. The effect should feel effortless and organic.
- Vertical sconce pairs provide even, shadow-free light
- Mirrors with perimeter glow eliminate the need for separate fixtures
- LED strips under floating desks add subtle ambient lighting
- Natural color temperatures (3000-4000K) keep the space feeling fresh
Strategic Storage Visibility
Most storage remains hidden, but one visible tray or container for daily essentials prevents the frustration of constantly opening drawers.
- Use a single coordinating tray for items you reach for every morning
- Keep this tray edited to 5-7 essential items maximum
- Store everything else in drawer systems with dividers
- Choose drawer organizers in neutral colors that blend together
Pin this clean vanity organization method! 📌
Dual-Purpose Functionality
When your vanity serves both beauty and work needs, the clean aesthetic demands careful planning to prevent clutter accumulation.
- Maintain clear desktop real estate for laptop placement
- Use a slim laptop stand that coordinates with your color palette
- Designate one drawer exclusively for makeup, another for work supplies
- Install cable management systems that hide cords completely
The No-Mirror Approach
Some spaces benefit from eliminating the traditional vanity mirror entirely, using wall mirrors or closet door mirrors instead.
- Frees up valuable desktop space for other functions
- Works well in small bedrooms where every inch counts
- Allows the desk to transition seamlessly between uses
- Maintains the clean lines of a simple desk profile
Creating User-Friendly Simplicity
Clean aesthetics shouldn’t sacrifice functionality. When everything has a designated home, maintaining the look becomes effortless.
- Assign specific storage spots for each product category
- Use similar-height containers for visual uniformity
- Keep the system simple enough to maintain during busy weeks
- Choose closed storage for categories with many items
Photography-Ready Organization
Clean, edited spaces naturally photograph well, which matters if you enjoy documenting your space or routines.
- Uniform containers read as a set rather than random collection
- Similar finishes create cohesion that translates beautifully on camera
- Minimal surface items prevent the “too busy” look in photos
- Proper lighting eliminates harsh shadows that distort in images
The Power of One Sculptural Element
While most pieces remain understated, one sculptural object prevents the space from feeling sterile.
- A curved lamp with organic form softens geometric furniture
- A round vase adds feminine contrast to linear elements
- An interesting chair provides personality without chaos
- Limit yourself to one statement piece to maintain the clean aesthetic
Save this clean aesthetic approach! 📌
Hidden Hair Tool Storage
Styling tools and their cords create visual chaos quickly. Dedicated concealed storage maintains the clean appearance.
- Use heat-resistant pouches inside drawers for hot tools
- Install hooks on drawer interiors for cord management
- Choose under-desk baskets that slide out of sight
- Allow tools to cool completely before storing to protect drawer interiors
Drawer Interior Upgrades
What happens inside drawers matters in clean aesthetics because the experience of opening storage should feel as intentional as the visible surfaces.
- Add felt liners to cushion items and reduce noise
- Install adjustable dividers that adapt as needs change
- Use shallow drawer inserts for small items like lipsticks
- Keep drawer contents edited—if you don’t use it, remove it
Detail Work Solutions
Some makeup and grooming tasks require magnification or different lighting. Plan for these needs without cluttering the surface.
- Store a small magnifying mirror in a drawer for detailed work
- Use it as needed, then return it to storage
- Choose a lighted magnifying mirror with a stand if you use it daily
- Position it near a wall outlet to avoid cord visibility
Soft Accessories for Function
Small additions maintain functionality without disrupting the clean aesthetic.
- A single wall hook for a robe or headband keeps items accessible
- Choose hook finishes that match existing hardware
- Position hooks where they’re useful but not visually prominent
- Limit yourself to one or two hooks to prevent clutter creep
Balancing Texture
When the bedroom includes significant texture in bedding, rugs, or window treatments, keep vanity finishes smooth for balance.
- Choose desks with smooth, matte surfaces
- Select chairs with simple upholstery rather than heavy texture
- Use glass or acrylic accessories that feel weightless
- Let the rest of the room provide textural interest
The clean, trendy aesthetic succeeds when edited simplicity makes daily routines feel easier rather than more complicated. Every organizational decision should reduce friction and maintain visual calm.
Vanity Desk Ideas DIY For Creative Personal Touches
DIY vanity projects offer the ultimate customization—solutions built exactly to your measurements, storage needs, and aesthetic preferences. The key to successful DIY vanities in 2026 is maintaining clean lines and consistent finishes that read as intentional rather than makeshift. Start with accurate room measurements and a clear understanding of what you need to store, then build around those requirements.
Planning Your Custom Dimensions
The beauty of DIY is creating a vanity that fits your specific space perfectly. Measure carefully and plan for how you’ll actually use the area.
- Measure your available wall width and plan desk width 6-12 inches narrower
- Standard desk height (28-30 inches) works for most people, but adjust to your chair
- Depth of 16-20 inches accommodates makeup application without wasting floor space
- Account for baseboard depth if mounting to the wall
The Desk Top Foundation
A solid top surface forms the base of most DIY vanity projects. Choose materials that balance durability, appearance, and budget.
- Butcher block countertop sections from home improvement stores offer quality at accessible prices
- Wood boards with a sealed finish create custom looks in specific dimensions
- Floating shelf installations work beautifully for minimal, wall-mounted designs
- Pre-finished surfaces save time and ensure professional-looking results
Support Structure Options
How you support your desktop determines the overall style and storage capacity of your vanity.
- Two matching drawer units create symmetrical storage and visual balance
- Simple legs allow for open storage baskets underneath
- Wall-mounted brackets enable floating desk installations that maximize floor space
- Mix one drawer unit with one set of legs for asymmetrical interest
Pin this DIY vanity foundation guide! 📌
Storage Solutions You Can Build
Custom storage means solving your specific organizational challenges rather than adapting to ready-made limitations.
- Install shallow drawers (3-4 inches deep) for makeup and brushes
- Add one deeper drawer (8-10 inches) for hair tools and larger items
- Use off-the-shelf drawer units and customize with paint or new hardware
- Build simple open shelving on one side for attractive storage boxes
The Power of Paint
Paint is the most dramatic transformation lever in DIY projects. A quality paint job makes the difference between homemade and custom-built.
- White remains fresh and flexible, working with evolving bedroom styles
- Black creates bold modern impact and hides imperfections well
- Two coats minimum ensure even coverage and durability
- Quality primer helps paint adhere and creates a smoother final surface
Hardware That Elevates DIY
Investing in quality drawer pulls and handles transforms basic builds into custom pieces.
- Choose hardware that complements bedroom furniture finishes
- Install pulls carefully with accurate measurements for professional appearance
- Consider leather pulls, brass knobs, or matte black bars for current looks
- Replace existing hardware on thrifted or upcycled furniture pieces
Lighting Without Complex Wiring
Plug-in sconces eliminate the need for electrical work while providing the essential side lighting for makeup application.
- Position sconces 60-66 inches from the floor, flanking the mirror
- Use cord covers that match your wall color to minimize visibility
- Choose sconces with on-cord switches for easy operation
- Consider smart bulbs that offer dimming without rewiring
Drawer Organization From Day One
Install organizational systems immediately rather than adding them later. This prevents the storage chaos that undermines DIY projects.
- Use adjustable drawer dividers that adapt as your needs change
- Add small bins or boxes for categories of products
- Install dividers before you move items in for best results
- Plan organization based on what you actually own and use
Save this DIY storage strategy! 📌
Finishing Touches That Matter
The details separate temporary solutions from custom-quality builds. Take time on the elements that signal craftsmanship.
- Sand all edges smooth before painting or staining
- Match hardware spacing precisely for professional appearance
- Seal wood surfaces to protect against makeup spills and styling tool heat
- Touch up paint carefully if you notice imperfections after installation
Upgrading Existing Furniture
Sometimes the best DIY project is transforming a piece you already own rather than building from scratch.
- Replace outdated drawer pulls with current hardware
- Apply fresh paint in a modern color
- Add a new sealed top surface over damaged original finish
- Install better lighting to completely change the function
Testing Before Finalizing
Live with your setup for a week before making permanent changes. This reveals what works and what needs adjustment.
- Notice which items you reach for most frequently
- Observe whether drawer depths work for your actual products
- Pay attention to lighting quality at different times of day
- Adjust storage organization based on real use patterns
Cable Management Systems
Even DIY vanities benefit from thoughtful cord control. Plan for this from the beginning rather than adding it later.
- Use adhesive cable clips under the desktop to route cords neatly
- Install a power strip with surge protection in a drawer or under the desk
- Choose a power strip with USB ports for phone and device charging
- Keep charging cables organized with velcro ties or cord wraps
Wall-Mounted Organization Additions
If your DIY style accommodates it, wall-mounted systems add function without cluttering the desktop.
- Rail systems with S-hooks hold brushes, tools, and small containers
- Peg boards painted to match walls provide customizable storage
- Small floating shelves add vertical storage for daily items
- Keep wall additions minimal to prevent the space from feeling busy
Protective Finishes for Durability
DIY vanities near bathrooms or in humid climates need protection from moisture and temperature changes.
- Use moisture-resistant paint formulations in semi-gloss or satin finishes
- Seal wood thoroughly to prevent warping
- Choose closed surfaces over open shelving for better moisture resistance
- Apply polyurethane or similar sealants to desktop surfaces
Comfort Additions
A DIY vanity isn’t complete until it’s genuinely comfortable to use. Small additions make significant differences.
- Add a chair pad for seating comfort during longer sessions
- Include a small rug beneath the chair to define the space
- Hang a framed print or mirror at eye level for visual interest
- Install proper task lighting that reduces eye strain
Budget Management Strategies
DIY projects can quickly exceed budgets if you’re not careful. Prioritize spending where it shows.
- Invest in the desktop surface since it’s the most visible element
- Spend more on hardware than on paint—pulls get touched constantly
- Buy quality lighting that will last and function well
- Save on organization systems by using affordable bins and dividers
Learning From the Process
Your first DIY vanity teaches valuable lessons. Document what works well and what you’d change next time.
- Take photos during construction to remember successful techniques
- Note measurements that worked particularly well
- Keep a list of products and materials that exceeded expectations
- Consider building a version 2.0 with your newfound knowledge
DIY vanity projects succeed when careful planning meets quality execution. The result is a completely customized workspace that fits your needs, your space, and your budget while looking like it was professionally designed just for you.
Conclusion
Creating your ideal vanity desk isn’t about following rigid design rules—it’s about building a space that honors your daily routine while reflecting your personal style. Whether you’re drawn to modern minimalism, luxury elegance, aesthetic warmth, clean simplicity, or hands-on DIY solutions, the foundation remains the same: thoughtful planning, quality materials, and honest attention to how you’ll actually use the space every single day.
Your vanity desk should make getting ready feel like self-care rather than a rushed obligation. The best setup is the one that works seamlessly on Tuesday mornings when you’re running late, looks beautiful enough to make you smile when you walk into your bedroom, and grows with you as your needs and style evolve. Start with the ideas that resonate most deeply, measure carefully, plan storage honestly, and create a space that genuinely serves the life you’re living right now.

“I share simple, beautiful and affordable home decor ideas to help you style every corner of your home with ease.