

There’s something magical about the smell of charcoal on a Saturday afternoon, the sound of laughter mixing with sizzling steaks, and that perfect moment when everyone gathers around good food. But here’s the truth most people discover too late: a great BBQ experience isn’t just about the grill—it’s about the entire space you create around it. I’ve watched too many friends squeeze a beautiful new grill onto a cramped patio, only to spend the whole cookout juggling platters on their lap because there’s nowhere to set anything down.
Whether you’re working with a sprawling backyard or a tiny balcony, the right BBQ area transforms cooking from a chore into an experience everyone wants to be part of. In 2026, we’re seeing outdoor cooking spaces that rival indoor kitchens in both style and function, with designs that work for real life—not just magazine photoshoots. This guide breaks down 31 proven ideas that solve the problems you actually face: awkward layouts, limited space, weather challenges, and making it all look intentional instead of thrown together.
Outdoor BBQ Area Ideas For Modern Living Spaces
Modern outdoor living is about erasing the line between inside and out. Your BBQ area should feel like a natural extension of your home, not an afterthought stuck in the corner of the yard.
Create Clear Movement Zones
The biggest mistake I see is mixing cooking paths with guest traffic. Your BBQ area needs two distinct zones that never overlap.
- Cooking line: Direct path from prep to grill to plating, no obstacles
- Social line: Comfortable flow from seating to dining without crossing the hot zone
- Buffer space: At least 3 feet between the grill and any seating area
- Clear exits: Two ways out of the cooking zone for safety
Design a Downwind Layout
Smoke direction makes or breaks your BBQ experience. Nobody wants to sit in a cloud of mesquite while trying to enjoy their meal.
- Position your grill so prevailing winds carry smoke away from seating
- Place the cooking zone downwind from your main gathering area
- Use tall planters or screens as gentle wind redirects
- Test smoke flow during different times of day before finalizing placement
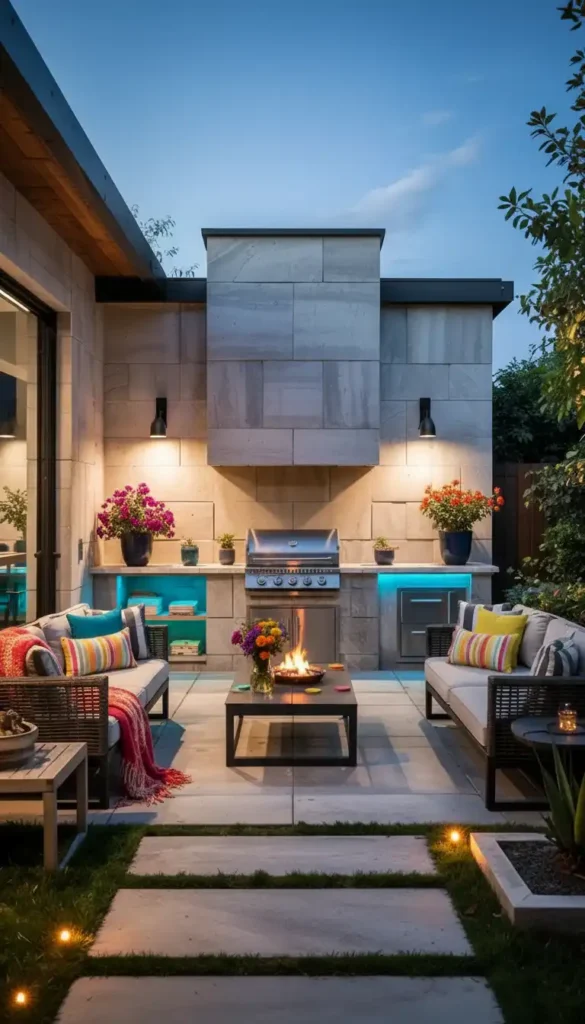
Build in Lighting from Day One
Your BBQ area should work as well at 9 PM as it does at noon. Lighting isn’t an afterthought—it’s essential infrastructure.
Pin this lighting strategy! 📌
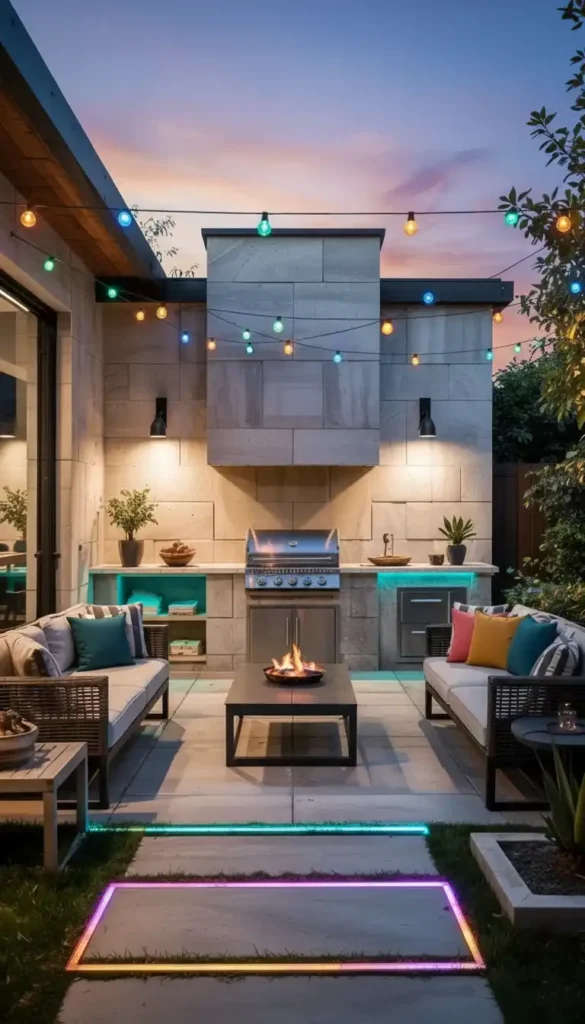
- Wall sconces on house-facing sides for ambient glow (40-60 watts)
- Task lighting directly over the grill and prep areas (75+ watts)
- Path lights along walkways at 8-foot intervals
- Accent lighting in planters or under counters for atmosphere
Choose Low-Profile Furniture That Works Hard
Modern doesn’t mean uncomfortable. The right furniture balances sleek lines with real comfort.
- Deep lounge chairs with weather-resistant cushions in neutral tones
- Low-profile sectionals that create conversation areas without blocking views
- Compact coffee tables with heat-resistant tops for casual serving
- Built-in benches along edges to save floor space
Add a Dedicated Prep Counter
This single upgrade prevents more frustration than anything else. A proper prep surface keeps your dining table clean and your workflow smooth.
- Slim counter or mobile cart positioned between fridge/storage and grill
- Heat-resistant top material (stainless steel, tile, or treated concrete)
- Lower shelf for storing serving platters and tools
- Minimum 24 inches wide for functional workspace
Create a Landing Zone for Hot Items
Those five seconds after you pull food off the grill are when accidents happen. A designated landing spot is essential.
- Heat-proof surface within arm’s reach of the grill
- Trivet or metal surface that handles 500°F+ temperatures
- Clear space with no clutter or decorative items
- Positioned so you’re not reaching across the grill
Save this safety setup! 📌
Use Material Repetition for Cohesion
The secret to making everything look intentional is limiting your material palette and repeating it throughout the space.
- Choose one primary countertop material for all horizontal surfaces
- Repeat metal finishes between grill, furniture frames, and light fixtures
- Use the same wood tone for table, benches, and planters
- Stick to 2-3 colors maximum for cushions and accessories
Consider Family-Friendly Details
If kids are part of your BBQ gatherings, small design choices make a huge difference in stress levels.
- Rounded table corners instead of sharp edges
- Stable, wide-based chairs that don’t tip on uneven pavers
- Washable, quick-dry cushion covers that handle spills
- Lower serving surfaces so kids can reach safely
Add Strategic Storage Behind Seating
A narrow console or shelf behind your seating area multiplies your functional space without visual clutter.
- 12-16 inch depth is perfect for drinks and serving boards
- Install at arm height from seated position (26-30 inches)
- Include small planters or citronella for dual purpose
- Keep items corralled in matching trays or baskets
Plan for Weather Protection
Modern design embraces shade structures that enhance rather than hide your space.
- Retractable awnings that disappear when not needed
- Sleek pergolas with adjustable louvers for sun control
- Large umbrellas in neutral colors with heavy, stable bases
- Permanent roof extensions that match your home’s architecture
The modern BBQ area succeeds when comfort meets function. Once your seating is genuinely lounge-worthy and your workflow is smooth, people naturally stay longer and cook more often.
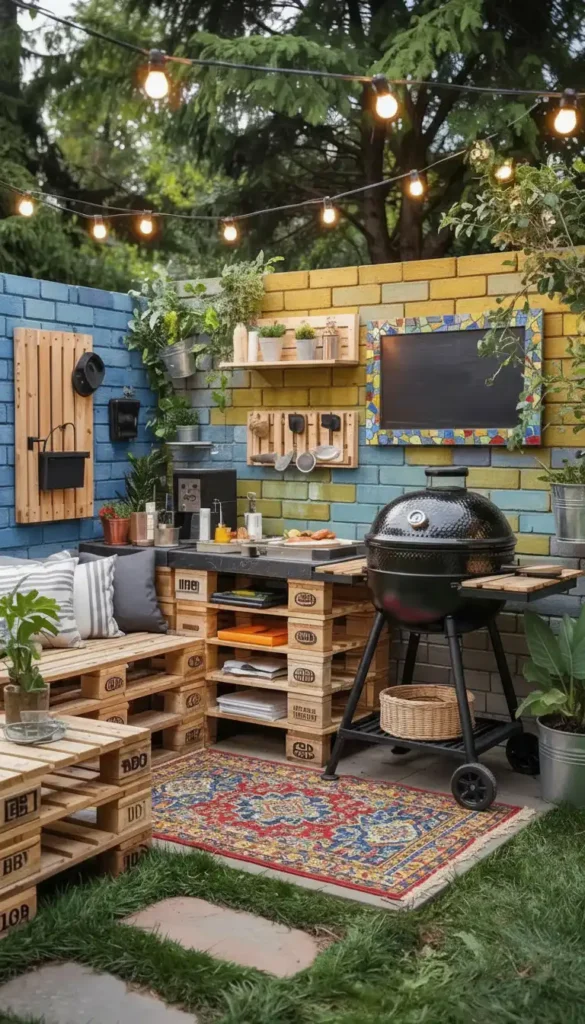
DIY Outdoor BBQ Area Ideas For Creative Homeowners
Building your own BBQ area doesn’t mean it has to look homemade. With the right approach, DIY projects deliver custom results at a fraction of professional costs.
Start with a Modular Mindset
The smartest DIY projects grow with your budget and skills. Build in phases so each piece stands alone but connects to the next.
- Begin with essential prep station and seating
- Add storage and shade in phase two
- Finish with lighting and decorative elements
- Design connections so additions look planned, not patched
Create a Defined Foundation
Even simple BBQ areas need proper ground preparation. Skip this step and you’ll fight wobbly furniture and drainage problems forever.
- Gravel base: 4-inch crushed stone layer, compacted, then topped with patio pavers
- Stepping stone path: Creates visual boundary while maintaining drainage
- Level checking: Use a 6-foot level; adjust base before laying final surface
- Edging: Metal or plastic edge restraints keep materials from migrating
Build a Pallet Prep Station
Pallets are free or cheap, but they need proper treatment to work safely near heat and food.
Pin this DIY station guide! 📌
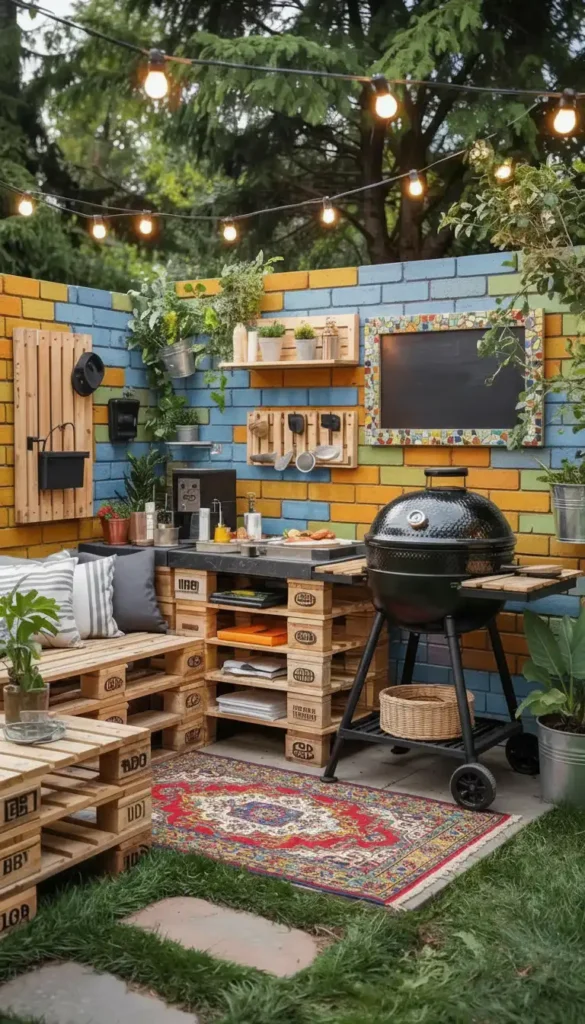
- Choose heat-treated (HT) pallets only—check stamps carefully
- Sand thoroughly; splinters ruin the experience
- Reinforce structure with 2×4 cross bracing underneath
- Apply outdoor wood sealer, let cure for 48 hours before use
- Top with concrete pavers, outdoor tile, or stainless sheet
Add Heat-Resistant Work Surfaces
Your DIY station needs surfaces that can handle hot pans, spills, and weather without warping or staining.
- Concrete pavers: Inexpensive, durable, easy to replace individually
- Tile on cement board: More upscale look, seal grout lines well
- Stainless steel sheets: Professional appearance, riveted or screwed to frame
- Sealed butcher block: Warm aesthetic but requires regular maintenance
Install Functional Storage Below
A simple bench with hidden storage solves multiple problems and keeps your area organized.
- Hinged seat top for accessing storage bin underneath
- Drill drainage holes in storage bottom to prevent water pooling
- Use marine-grade hardware that won’t rust
- Size storage to hold charcoal bags, grill covers, and serving trays
Create a Tool Organization System
Keeping tongs, spatulas, and towels accessible but tidy makes cooking dramatically more pleasant.
- Mount stainless steel hooks on the side of your prep station
- Install a towel bar at comfortable reaching height (36-40 inches)
- Add small magnetic strip for metal tools and thermometer clips
- Hang basket for charcoal chimney and fire starter supplies
Balance Handmade with Refined Pieces
The secret to professional-looking DIY is knowing when to buy rather than build.
- Invest in quality dining set or umbrella as your anchor piece
- Build supporting elements (benches, storage, planters) yourself
- Choose neutral, classic designs that won’t date quickly
- One polished element elevates everything around it
Build a Simple Wind Break
Smoke control makes the difference between pleasant and miserable BBQ sessions.
Save this smoke solution! 📌
- Slatted privacy screen (1-inch gaps) redirects without blocking airflow completely
- Tall planters (24+ inches) with bamboo or ornamental grass
- Galvanized metal panels framed in wood for modern industrial look
- Position 4-6 feet from grill at 90-degree angle to prevailing wind
Add an Outdoor Wash Station
This unglamorous addition might be your favorite feature once you use it regularly.
- Large plastic tub on sturdy stand for washing utensils and vegetables
- Gravity-fed water jug if you don’t want to run plumbing
- Drain hose that leads to gravel or garden area
- Covered storage underneath for cleaning supplies and trash bags
Finish with Patio-Rated Soft Elements
These final touches make your DIY space feel complete and intentional.
- Outdoor-rated string lights on dimmer switch for ambiance control
- Patio rug (polypropylene) defines seating area and softens hard surfaces
- Weather-resistant planters in matching finish or color
- Throw pillows in outdoor fabric that can handle sun and moisture
DIY BBQ areas shine when cleanup and maintenance are considered from the start. Build smart storage, choose durable materials, and your weekend project becomes a daily pleasure.
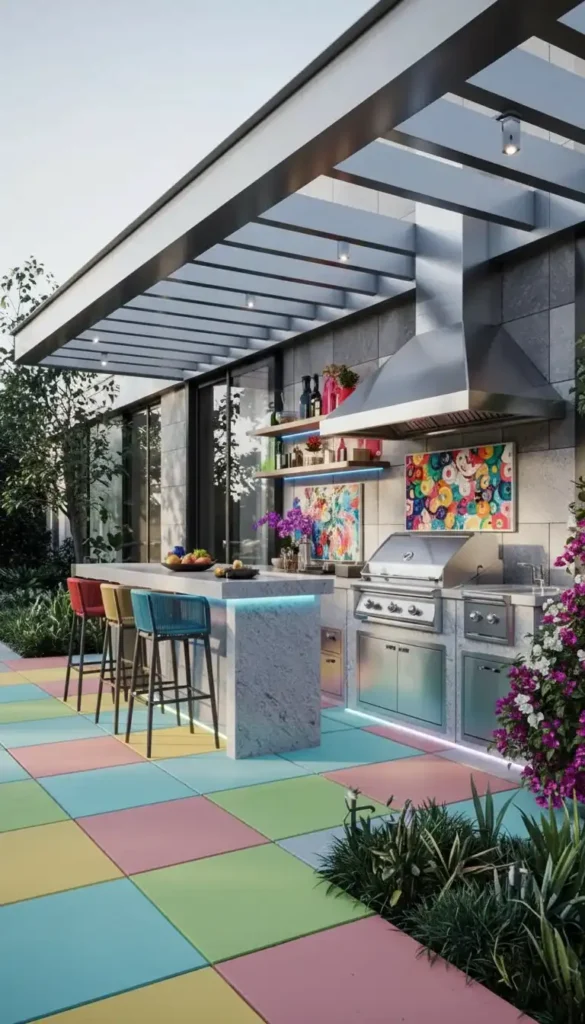
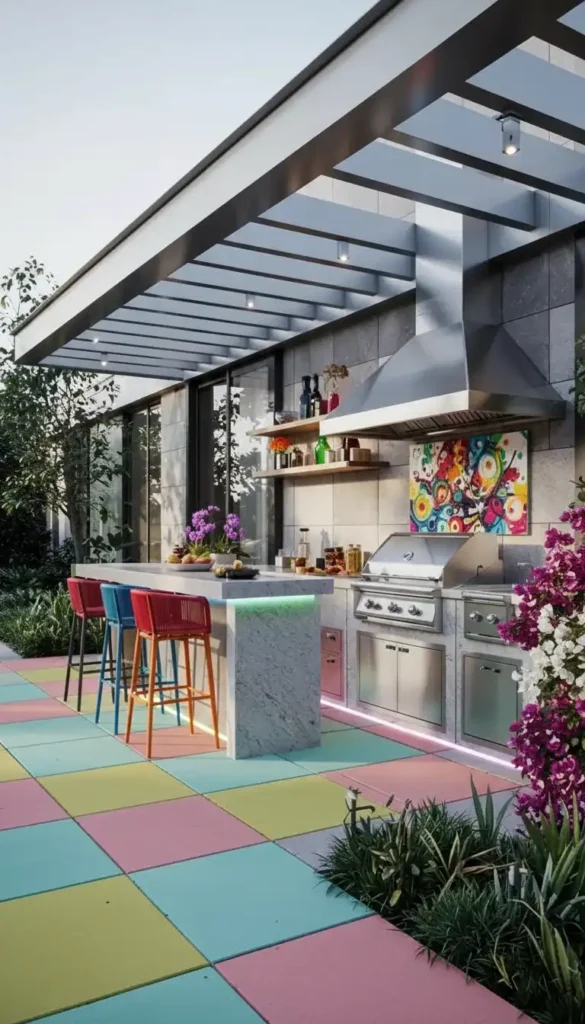
Modern Outdoor BBQ Area Ideas With Sleek Design
Sleek design is about precision and restraint. Every element earns its place, and nothing competes for attention with the food and conversation.
Design a Continuous Counter Run
The most sophisticated outdoor kitchens feel like furniture, not appliances scattered across a patio.
- Long, unbroken counter line spanning 8-12 feet minimum
- Integrated grill that sits flush with countertop height
- Consistent 36-inch height for comfortable prep and cooking
- Seamless transitions between sections with minimal gaps
Hide Working Components
Modern design conceals the messy parts of outdoor cooking behind clean facades.
- Under-counter fridge or cooler drawer keeps drinks accessible but invisible
- Flush-mounted trash pull-out with soft-close hardware
- Propane tank cabinet with ventilated door (required for safety)
- Wire management channels for lighting and appliance cords
Choose Industrial-Grade Surface Materials
Sleek spaces demand materials that stay beautiful under constant sun, temperature swings, and heavy use.
Pin this material guide! 📌
- Sintered stone: Non-porous, heat-proof, minimal maintenance
- Stainless steel: Commercial look, 16-gauge minimum for durability
- Sealed concrete: Customizable color, requires resealing every 2-3 years
- Porcelain slab: Lightweight alternative to stone, UV-resistant
Create Bar-Height Seating
A counter overhang transforms your cooking zone into the social center of gatherings.
- 15-inch overhang for comfortable leg clearance
- Bar stools at 30 inches high for 42-inch counter height
- Support brackets every 24 inches under overhang
- Stools with backs for extended sitting comfort
Add a Separate Lounge Zone
Even sleek designs need a place to relax away from cooking heat.
- Position seating 8-10 feet from grill area
- Choose low-profile furniture that doesn’t interrupt sight lines
- Include side tables at arm height (18-22 inches)
- Use same color palette but different furniture style for subtle definition
Install Under-Counter Lighting
This single detail separates amateur from professional outdoor kitchens.
- LED strip lights under counter lip for task lighting
- Warm white (2700-3000K) for flattering ambiance
- Weatherproof rating IP65 minimum for outdoor use
- Connect to dimmer for adjustable brightness
Build a Defining Vertical Element
Sleek horizontal lines need a vertical counterpoint to feel complete.
Save this design principle! 📌
- Slatted privacy screen creates room feeling without walls
- Low masonry wall (30-42 inches) for subtle separation
- Vertical garden panel adds life without softness
- Metal frame with frosted panels for modern sophistication
Plan Your Work Triangle
Borrowing from kitchen design, your outdoor setup needs efficient distances between key zones.
- Grill to sink: 4-6 feet maximum
- Sink to refrigeration: 4-7 feet ideal
- Refrigeration to grill: 4-9 feet for complete triangle
- Total perimeter: 13-22 feet for optimal workflow
Integrate Appliances Thoughtfully
Every appliance addition should enhance function without cluttering your design.
- Side burner for sauces positioned within easy reach of grill
- Warming drawer below main cooking surface
- Ice maker if you entertain frequently (budget $800-2000)
- Built-in cutting board that slides out when needed
Control Visual Clutter
Sleek design fails the moment spice bottles and tool collections appear.
- Closed cabinets for everything not currently in use
- Matching containers for frequently used items
- Magnetic spice rack on hidden cabinet interior
- Single tray for often-used oils and seasonings
Modern outdoor kitchens prove that less truly is more when everything you keep is exactly what you need and use.
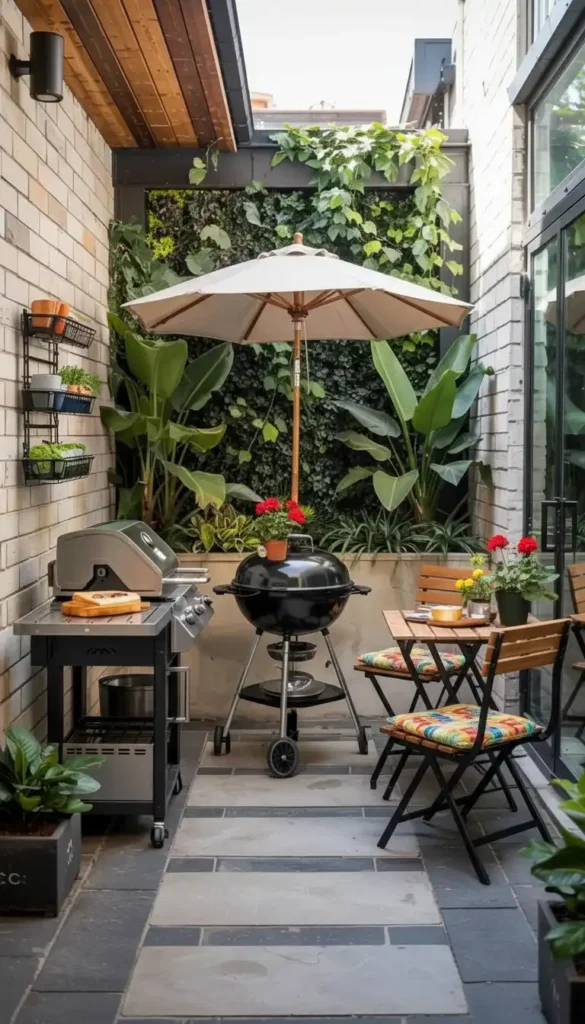
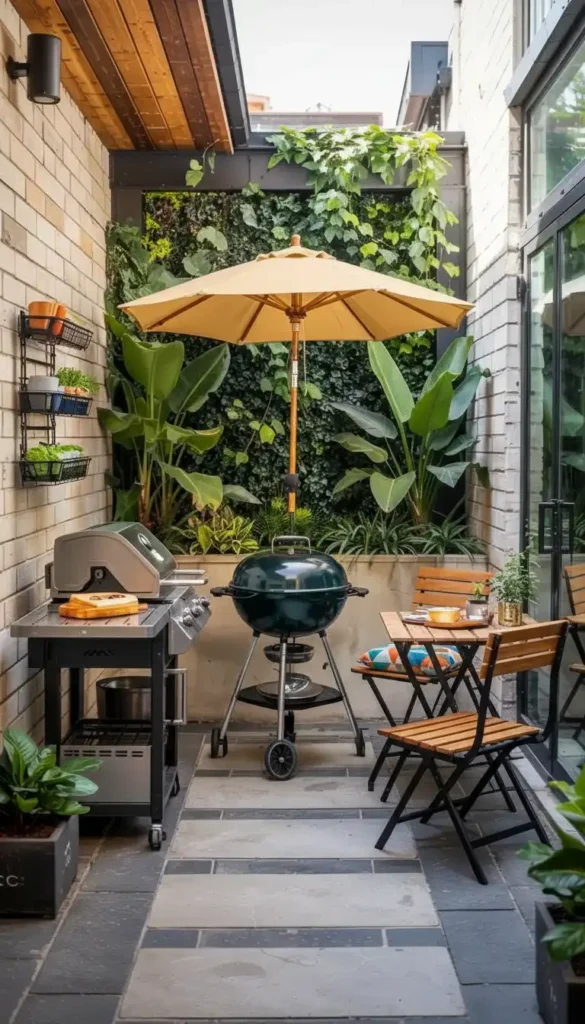
Small Space Outdoor BBQ Area Ideas That Maximize Function
Small spaces demand ruthless editing and smart layering. Every item must justify its footprint.
Map Your Circulation First
In tight quarters, traffic flow makes or breaks usability. Plan movement before furniture.
- Minimum 30-inch walkway beside grill for safe access
- 24-inch clearance behind dining chairs when pulled out
- Single clear path from door to grill without obstacles
- Test with actual furniture dimensions, not guesses
Choose Compact Grills Wisely
Size matters, but so does cooking area. Find the sweet spot for your actual needs.
- Measure cooking grate, not overall dimensions
- 300-400 square inches handles meals for 4-6 people
- Folding side tables add function without permanent footprint
- Vertical storage for small charcoal grills when not in use
Install a Fold-Down Prep Table
This space-saving solution gives you a full prep surface when cooking, then disappears completely.
Pin this small-space solution! 📌
- Wall-mounted bracket supporting 24×36 inch surface
- Piano hinge and safety chain to prevent over-rotation
- Heat-resistant top material rated for 250°F minimum
- Folds flush to wall, secured with simple hook latch
Use a Rolling Cart System
Mobility transforms small spaces by letting you reconfigure for different activities.
- Locking wheels (minimum 3-inch diameter) for stability on pavers
- Multiple shelves for layered storage (tools, ingredients, serving)
- Stainless steel or weather-resistant material
- Slim profile (18-24 inches wide) that tucks into corners
Embrace Stackable and Folding Seating
Furniture that compresses or stores vertically is essential for flex space.
- Folding chairs that hang on wall hooks when not needed
- Stackable stools that nest to single-chair footprint
- Bench with removable cushion slides completely under table
- Aim for furniture that reduces to 1/3 of deployed size
Add Vertical Storage Solutions
When you can’t expand outward, build upward along walls and fences.
- Wall-mounted rails with S-hooks for hanging tools and baskets
- Narrow shelving unit (8-12 inches deep) for plates and condiments
- Magnetic knife strip mounted to grill surround or wall
- Overhead hooks from pergola beam for hanging planters or lights
Choose Strategic Shade Options
Bulky shade structures overwhelm small spaces, so opt for targeted solutions.
- Wall-mounted retractable awning extends only when needed
- Slim cantilever umbrella with offset base saves floor space
- Shade sail attached to house and single post
- Pergola with narrow beam profile (2×6 instead of 4×4 posts)
Create Multi-Function Surfaces
Every element should serve at least two purposes in small-space design.
Save this efficiency principle! 📌
- Grill surround shelf for prep, then serving, then drink station
- Storage bench provides seating plus hidden storage
- Planter boxes double as visual barriers and table risers
- Cooler on casters serves as extra seating when topped with cushion
Manage Heat and Clearances
Small spaces make safety clearances even more critical.
- Minimum 3 feet from grill to any combustible surface
- Heat shield board behind grill if near fence or wall
- Non-combustible flooring material directly under grill
- Check manufacturer requirements; they vary by model
Keep Decor Minimal and Purposeful
Visual clutter makes small spaces feel cramped and dirty.
- Limit decorative items to 3-5 carefully chosen pieces
- Choose items that serve function: attractive planters, stylish lighting
- Avoid small tchotchkes that collect grime and need constant cleaning
- Single color family for cushions and accessories
Small BBQ areas feel spacious when they function smoothly. Perfect the workflow and the space expands psychologically.
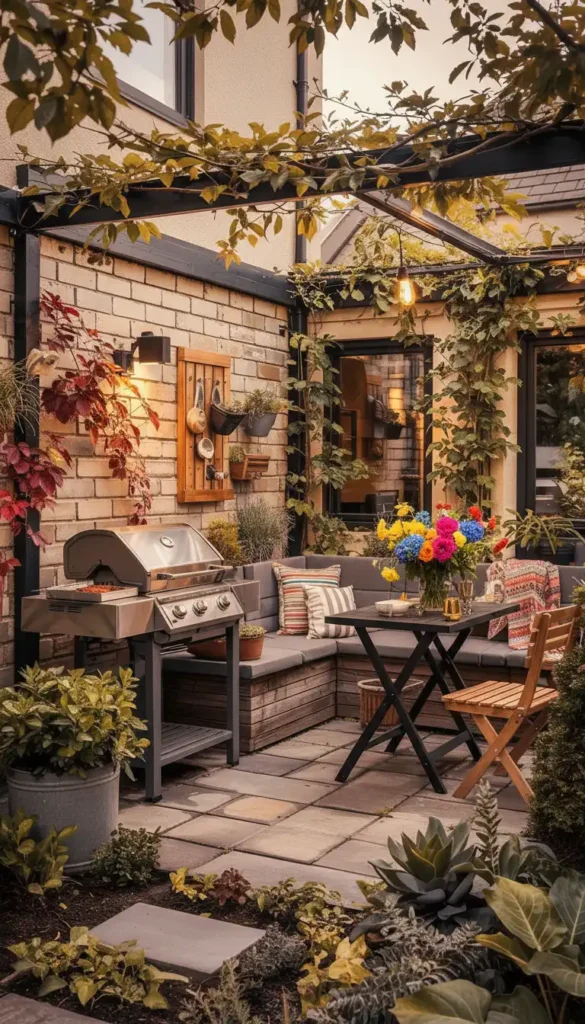
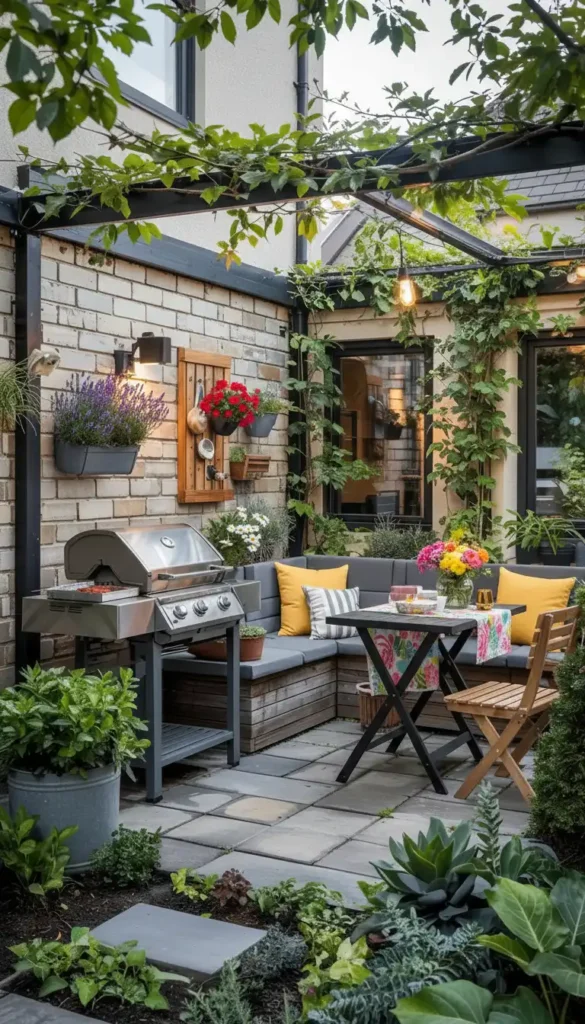
Outdoor BBQ Area Ideas For Small Garden Layouts
Garden BBQ areas blend cooking practicality with landscape beauty. The goal is integration, not invasion.
Define the Hardscape Footprint
Your paved area needs to be large enough for safe cooking and comfortable serving, but not so large it dominates the garden.
- Minimum 10×12 feet for grill, small prep area, and compact dining
- Irregular shapes feel more garden-integrated than rigid rectangles
- Leave sight lines to best garden views from seating position
- Consider partial paving with permeable gaps for plants
Use Permeable Paving Materials
Garden health depends on water absorption and root breathing space.
- Pavers with 1-2 inch gaps filled with gravel or low groundcover
- Permeable concrete or porous asphalt that allows drainage
- Decomposed granite compacted for stable surface with permeability
- Avoid solid concrete slabs that create runoff and heat islands
Frame with Layered Planting
Soft edges make BBQ areas feel like intentional garden rooms rather than utilitarian patches.
Pin this garden integration approach! 📌
- Tall shrubs (4-6 feet) at back edge for privacy and backdrop
- Medium perennials (2-3 feet) along sides for seasonal interest
- Low herbs and groundcovers at front edge for easy access
- Planters on patio itself to blend hard and soft surfaces
Position an Herb Garden in Reach
Fresh herbs during cooking elevate the meal and create a living connection to your food.
- Raised planter at prep counter height eliminates bending
- Choose frequently used varieties: basil, rosemary, thyme, parsley
- Position where splashes won’t harm plants (2+ feet from grill)
- Use attractive containers that complement your design style
Choose Smoke-Tolerant Plants
Some plants thrive despite occasional smoke exposure; others suffer visibly.
- Tolerant choices: Lavender, rosemary, ornamental grasses, succulents
- Avoid: Delicate ferns, hostas, and thin-leaved annuals
- Position sensitive plants upwind or 10+ feet from grill
- Monitor regularly and relocate if you notice stress
Create a Tucked Corner Setting
Garden BBQ areas feel special when nestled into a deliberate nook.
- Back corner positioning makes space feel discovered, not imposed
- Partial enclosure with hedge or fence on two sides
- Open side faces best view or most pleasant direction
- Creates microclimate protection from wind
Build in Subtle Lighting at Plant Level
Uplighting makes gardens magical at night without harsh overhead glare.
Save this lighting technique! 📌
- Small LED spotlights at base of feature plants or trees
- Warm white (2700K) to bring out natural colors
- Pathway lights set back in planting beds, not on path edge
- Solar options for easy installation in planting areas
Hide Utility Storage Behind Greenery
Storage is necessary but doesn’t need to be visible.
- Small cabinet or bench box placed behind taller plants
- Lattice or trellis panel with climbing vine screens storage
- Match storage unit color to fence or house for visual recession
- Access from side rather than front for better concealment
Add Low-Maintenance Ground Layers
If you grill often, garden upkeep competes with cooking time. Choose plants that mostly care for themselves.
- Native perennials adapted to your climate need minimal intervention
- Mulch beds (2-3 inches) suppress weeds and retain moisture
- Drip irrigation on timer eliminates hand watering
- Avoid high-maintenance annuals that need constant deadheading
Connect Materials to House Exterior
Repeating materials creates cohesion between garden, BBQ area, and home.
- Match paver color to house brick or stone
- Use same wood stain as deck or fence
- Echo shutter or door color in planter or furniture choices
- Repeat metal finish from house fixtures in outdoor lights
Garden BBQ areas become routine gathering spots when they feel like complete rooms. Blend cooking function with landscape beauty and both elements improve.
Conclusion
Creating the perfect BBQ area isn’t about buying the most expensive grill or copying a magazine spread—it’s about designing a space that fits your real life. The best outdoor kitchens I’ve seen are the ones that get used constantly, not the ones that look impressive but feel awkward to actually cook in. Whether you’re building a sleek modern setup or tucking a compact grill into a garden corner, the same principles apply: clear workflow, comfortable gathering spots, and thoughtful details that make cooking outside genuinely enjoyable.
Start with the basics—safe clearances, proper lighting, and adequate prep space—then layer in the elements that reflect your style. Your BBQ area will evolve as you use it, and that’s exactly how it should be. The goal is creating a space that draws people in, makes cooking feel effortless, and turns ordinary weeknight dinners into moments worth savoring. Now grab your tools, measure your space, and start building something you’ll use for years to come.

“I share simple, beautiful and affordable home decor ideas to help you style every corner of your home with ease.