
There is something quietly powerful about stepping into cold water at the end of a long day, right in your own backyard. You do not need a sprawling estate or a luxury resort to feel that reset. A plunge pool, even a small one tucked into a tight corner of your yard, can completely change how you use your outdoor space and how you feel in your own home. That feeling — calm, refreshed, and proud of your space — is exactly what drives so many homeowners to make this move in 2026.
If you have been scrolling through inspiration photos and wondering whether a plunge pool could actually work in your space, the answer is almost always yes. This guide is built for real homes with real budgets and real constraints. Whether you have a narrow backyard, a modest patio, or an indoor nook you have never known what to do with, these five ideas will show you what is possible, what to prioritize, and how to make every square foot count.
Smart Plunge Pool Ideas For Small Spaces In 2026
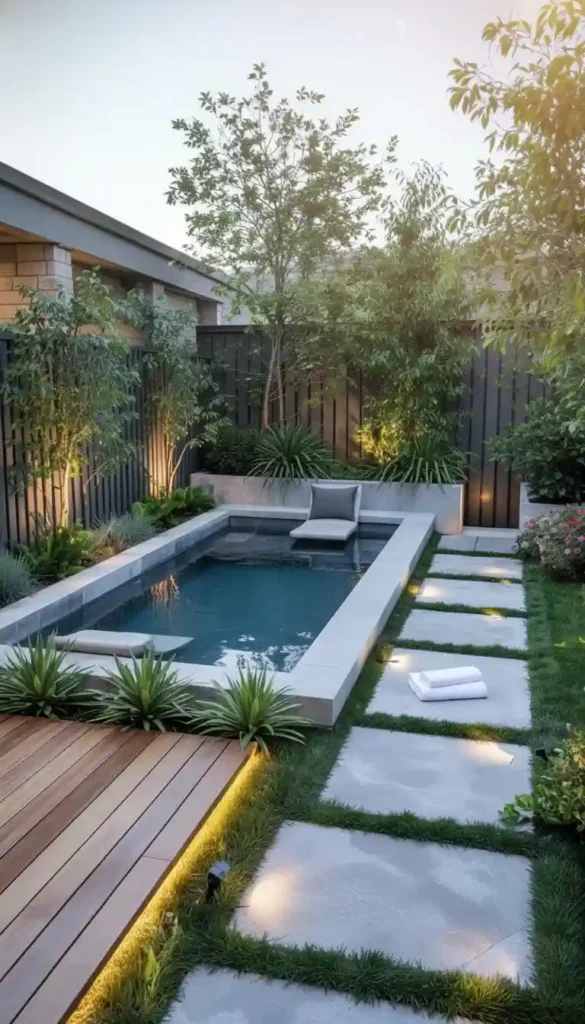
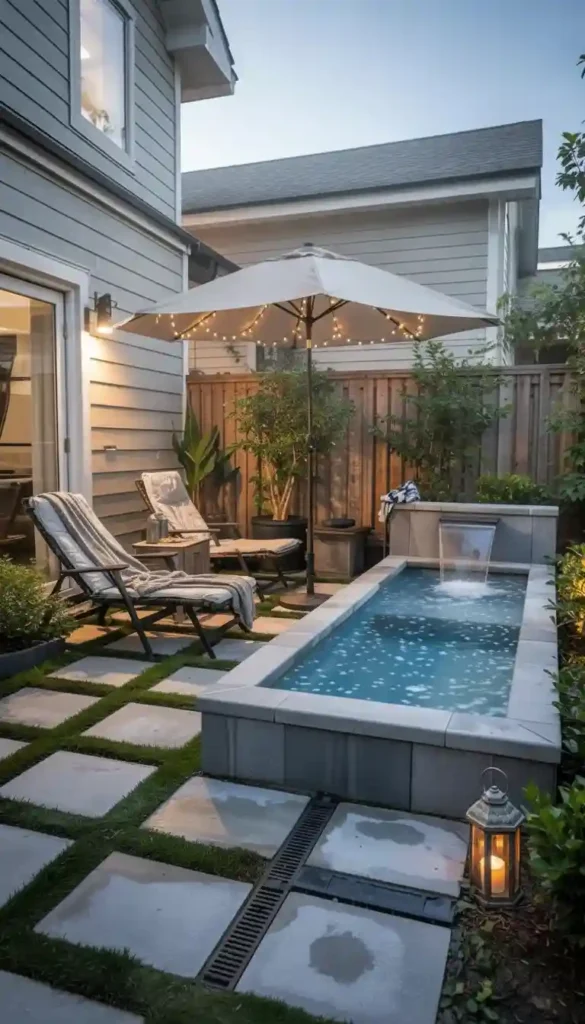
A small plunge pool done right does not look like a compromise. It looks intentional. The key is treating the pool like a piece of outdoor architecture rather than just a water feature dropped into whatever space is left.
Start With Geometry That Fits Your Footprint
The shape you choose sets the tone for everything else. In tight spaces, simple always wins.
- Narrow rectangle: Works brilliantly in long, slim backyards. It draws the eye forward and creates a sense of depth.
- Compact round basin: Ideal for corner spaces or patios where angles feel awkward.
- Square plunge pool: A clean, modern choice that fits symmetrical layouts perfectly.
Align the pool with the main sightline from your home. When you look out your back door or window, the water should be the first thing you see. That single design decision makes the pool feel like a destination, not an afterthought.
Keep The Surround Visually Calm
In small spaces, the surround does as much work as the pool itself. A busy, cluttered deck undermines even the most beautiful pool.
- Choose one primary material for paving — large-format porcelain, textured stone-look tile, or sealed concrete all work well.
- Keep the color palette neutral and consistent. Light tones expand the perceived space. Dark tones add drama but can make a small area feel smaller.
- Use slip-resistant finishes for any surface within two feet of the water edge. Safety is non-negotiable, especially in small spaces where there is less room to recover from a misstep.
The goal is for the eye to move smoothly from the home to the deck to the water without being interrupted.
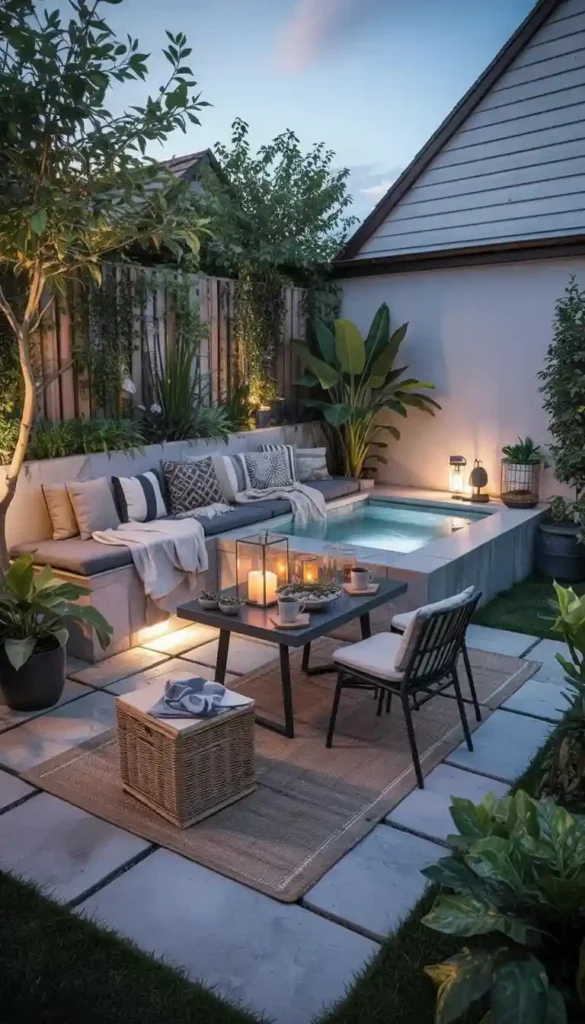
Build In A Comfortable Sitting Ledge
A bench ledge along one interior wall of the pool is one of the best investments you can make in a small plunge pool.
- It gives you somewhere to sit while in the water, which makes the experience feel more relaxing and less utilitarian.
- It saves exterior space because guests can gather at the pool edge without needing extra patio chairs.
- A ledge 10 to 14 inches wide and 18 inches below the waterline is comfortable for most adults.
In small spaces, every element should serve at least two purposes. A sitting ledge does exactly that.
📌 Pin this small space plunge pool design guide! 📌
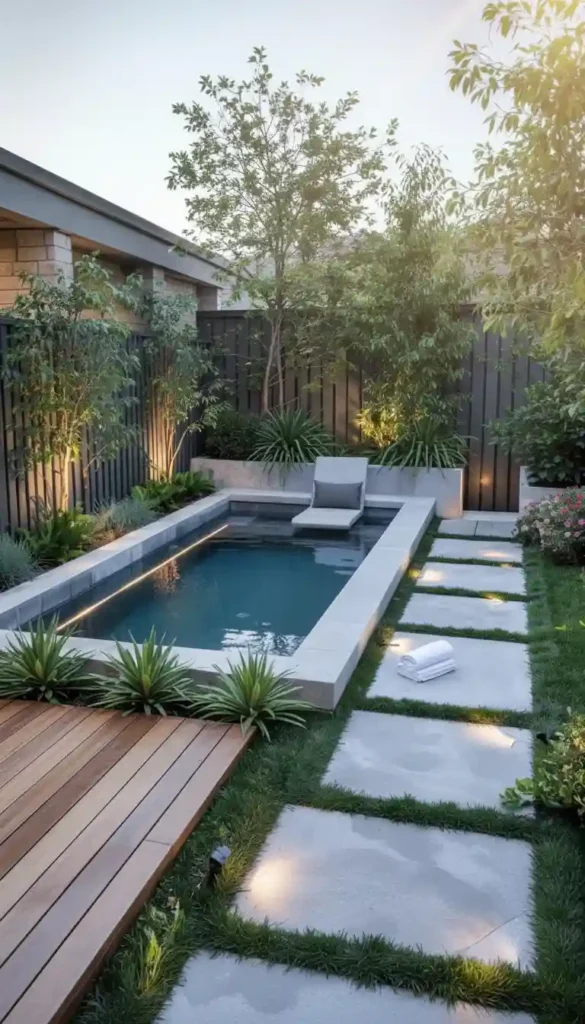
Add A Slim Deck Strip For Warmth And Transition
A narrow strip of timber or composite decking alongside the pool edge makes a big difference in how the space feels. It introduces a warm material tone that contrasts with stone or tile, and it gives your feet a comfortable surface when you step out of the water.
- Keep the deck strip 18 to 24 inches wide — enough to feel intentional without eating into circulation space.
- Choose a composite material if maintenance is a concern. It handles moisture without warping or splintering.
- Position the deck on the side closest to your home or main seating area for the most natural flow.
This transition detail is small on the floor plan, but it feels significant in real life.
Layer Your Lighting For Evening Use
Lighting is the detail most people underestimate when planning a small plunge pool. Done well, it extends the usable hours of your pool and makes the space feel larger at night.
- Underwater LED: One soft light pointing upward through the water creates a beautiful glow that is visible from inside the home.
- Wall wash lights: Mounted low on surrounding walls, these create depth and drama without overhead clutter.
- Spike lights in planters: Positioned at the perimeter, they define the boundary of the space and add warmth.
In a small yard, layered lighting essentially doubles the perceived size of the area after dark. That alone justifies the investment.
Create One Defined Dry Lounging Spot
A common mistake in small pool spaces is designing the wet zone perfectly and ignoring everything around it. The pool should feel like a destination, not just a rectangle of water.
- Place one comfortable lounge chair or a compact built-in bench within three to four feet of the pool edge.
- Add a small side table for drinks, a book, or a towel.
- If space is very tight, a single low stool with a weatherproof cushion is enough. The point is to signal that this is a place to stay, not just pass through.
The clearer the routine the pool supports, the more it gets used. Decide early whether this is a cold plunge station, a relaxation zone, or both. That decision shapes every other choice.
Choose One Strong Material Story
When the space is tight, restraint is your best design tool. Mixing too many materials, colors, and textures creates visual noise that makes a small area feel chaotic.
- Pick one hero material — a beautiful tile at the waterline, a warm deck tone, a striking coping edge — and let everything else support it.
- Limit your palette to two or three materials maximum in the immediate pool zone.
- Repeat those materials in the surrounding planting containers or seating for a cohesive look.
📌 Save this plunge pool material strategy! 📌
A restrained, consistent material story is almost always more timeless than a heavily decorated space. And in 2026, timeless is exactly the aesthetic most homeowners are chasing.
Budget-Friendly Plunge Pool Ideas For Small Spaces
Creating a beautiful plunge pool on a budget is absolutely possible. The secret is not finding the cheapest materials — it is reducing complexity so that every dollar goes toward what people actually see and touch.
Simplify The Shape To Cut Costs
The geometry of your pool directly affects the cost of building it. Complex curves and irregular shapes require more labor and custom formwork.
- A basic rectangle is the most cost-efficient shape to build and almost always looks modern.
- Avoid adding unnecessary steps, ledges, or depth changes unless they serve a clear functional purpose.
- A simple shape also means simpler waterproofing, which reduces long-term maintenance costs.
Choosing simplicity is not a budget compromise. It is a design decision that happens to also save money.
Consider A Fiberglass Shell
When the site conditions support it, a fiberglass pool shell can significantly reduce labor costs compared to a fully custom concrete build.
- Fiberglass shells arrive pre-formed and can be installed faster, cutting excavation and construction time.
- They have a smooth interior surface that is gentler on feet and easier to clean.
- The range of sizes available in 2026 means there is likely a fiberglass option that fits your footprint without modification.
Get at least two quotes — one for fiberglass and one for concrete — before committing. The right choice depends on your specific site, soil conditions, and access.
Invest In The Deck, Not The Extras
On a tight budget, the surround is where smart spending makes the biggest visual impact. The pool surface is mostly underwater. The deck is what guests see and stand on every time they visit.
- Consistently sized pavers with crisp edge restraint look polished and can be repaired in sections if one cracks.
- Avoid overly decorative inlays or mixed patterns — they cost more and date faster.
- A clean, simple paver job in a quality material outperforms a budget tile in a complicated pattern every time.
📌 Pin this budget plunge pool deck strategy! 📌
Choose One Signature Detail
Every successful budget pool project has one moment that feels luxurious. Everything else is simple and clean, but that one element elevates the whole space.
- A beautiful waterline tile in a color or texture that contrasts with the surrounding deck.
- A warm timber deck strip that runs the length of the pool on one side.
- A single sculptural outdoor shower in brushed stainless or matte black.
Pick the one detail that matters most to you, budget for it properly, and keep everything else honest. The result will feel more considered and more timeless than a space where the budget was spread too thin.
Never Cut Corners On Systems
Pumps, filtration, drainage, and electrical are the infrastructure of your pool. Cutting corners here is the most expensive mistake you can make.
- A low-quality pump costs less upfront and significantly more in energy and repairs over five years.
- Poor drainage planning creates water management problems that damage surrounding structures and surfaces.
- Electrical shortcuts create safety hazards that are both dangerous and expensive to fix.
Budget carefully for systems from the start. These are the components that determine your long-term operating cost.
Plan For Phased Upgrades
If the full vision is beyond the current budget, design the base for what you want and build it in stages.
- Start with clean pavers, a good pool shell, and reliable systems.
- Add built-in seating in year two.
- Add a privacy screen or pergola in year three.
This approach keeps the initial investment manageable while ensuring the finished product is exactly what you wanted. Above-ground plunge pool options are also a great bridge strategy when excavation is expensive or the timeline is tight.
Price Out The Hidden Costs Early
Excavation, drainage, and electrical work frequently surprise homeowners who did not plan for them.
- Get a soil report if the site has any drainage concerns or unusual ground conditions.
- Factor in the cost of an electrical subpanel upgrade if your current system cannot support a pool pump and lighting circuit.
- Include drainage in your plans from day one, not as an afterthought.
📌 Save this plunge pool budget checklist! 📌
Knowing the full cost picture upfront is the foundation of a budget project that actually stays on budget.
DIY Plunge Pool Ideas For Compact Homes
A DIY plunge pool is one of the most rewarding outdoor projects a homeowner can take on. But success starts with an honest assessment of what your site can handle and what your skill level can support.
Assess Your Site Before You Commit
In compact homes, the biggest DIY risks are drainage problems, poor circulation, and building a surround that makes the space feel cramped. Before you order materials or start digging, answer these questions honestly.
- How does water currently drain from this area? If it pools after rain, that problem will be dramatically worse with a pool.
- How much clearance is there around the planned pool location? You need at least three feet of clear walking space on the entry side.
- What underground utilities run through this area? Always have the site marked before any excavation.
A strong DIY project starts with clear information, not enthusiasm alone.
Start With Stock Tanks Or Modular Systems
For first-time DIY builders, pre-formed options dramatically reduce complexity and risk.
- Stock tank plunge pools have become a genuine design statement in 2026. Galvanized steel tanks in round or oval shapes look great wrapped in vertical timber slats.
- Modular plunge systems are pre-engineered for easy assembly and come with compatible filtration and heating components.
- Both options allow you to focus your DIY energy on the surround — the deck, the privacy screen, the planting — where craftsmanship is most visible.
📌 Pin this DIY plunge pool starting guide! 📌
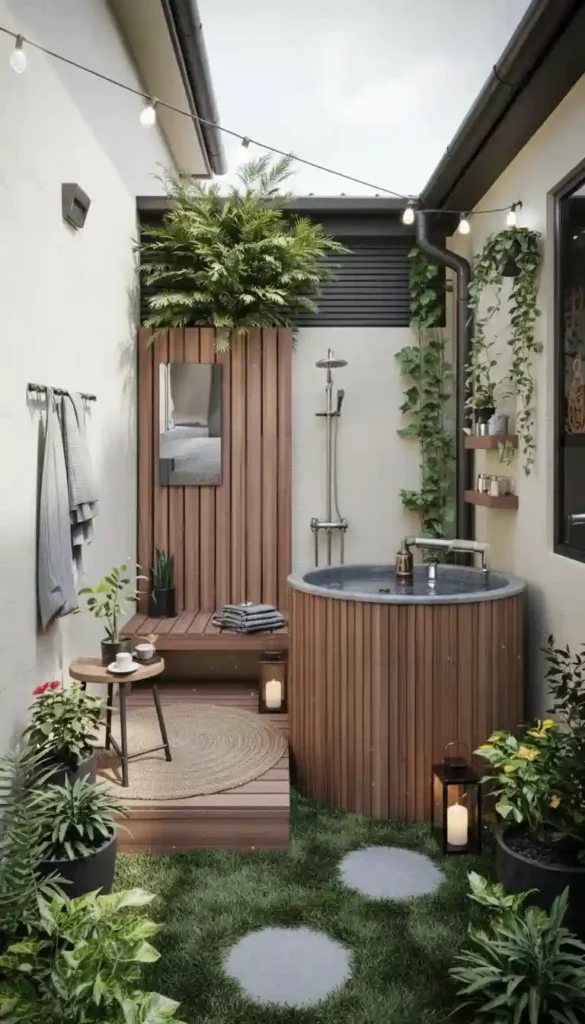
Wrap Above-Ground Structures With Style
If you go above-ground, the structure itself becomes part of the design. How you clad and surround it determines whether it looks intentional or improvised.
- Vertical timber slats create a clean, contemporary screen that also provides privacy.
- Built-in planters along the pool perimeter soften the edges and bring in greenery.
- A bench edge that runs along one or two sides of the pool creates seating and hides the pool wall simultaneously.
The goal is for a guest to look at the finished space and see a thoughtful design decision, not a tank in a yard.
Choose The Right Surface Underfoot
In a DIY context, the flooring choice around the pool is one of the most important safety and aesthetic decisions you will make.
- Textured pavers: Durable, repairable in sections, and available in a wide range of styles. A reliable DIY-friendly choice.
- Composite decking: Handles moisture well, stays comfortable underfoot, and looks polished with minimal maintenance.
- Sealed concrete with a slip-resistant finish: Requires more preparation but delivers a seamless, modern look at a lower material cost.
Whatever you choose, check the slip rating for the product and ensure it meets local safety requirements for wet areas.
Set Clear Standards Before You Build
The best DIY results come from defining your expectations before you start, not adjusting to whatever happens during construction.
- Decide on the target water temperature — cold plunge, ambient, or seasonally heated — because this affects insulation and cover choices.
- Define the maximum number of users so you size the pool and seating correctly.
- Map out the weekly maintenance routine so the design accommodates what that actually requires.
A pool designed around a clear use case is easier to build and more satisfying to own.
Add Practical Cold Plunge Details
If the pool is primarily used for cold plunging, the immediate zone should be simple and functional.
- A sturdy towel hook mounted at arm’s reach from the pool exit.
- A non-slip mat area between the pool step and the dry zone.
- A small bench or stool where you can sit before and after plunging.
📌 Save this DIY cold plunge setup checklist! 📌
Cold plunge users tend to move quickly in and out of the water. The surrounding space should support that rhythm without obstacles.
Plan For Safety And Long-Term Upkeep
Safety and maintenance planning are the two areas most often neglected in DIY pool projects, and they are the two areas most likely to cause problems later.
- Install child safety barriers wherever required by local building codes. These are not optional.
- Use weather-rated electrical components for all lighting and pump connections. Standard household-grade components fail outdoors.
- Create a simple drainage plan so splash water runs away from your home’s foundation.
- Include a small maintenance station — even just a slim bench with hidden storage — for test kits, chemicals, and cleaning tools.
The pools that stay enjoyable year after year are the ones that were designed to be maintained easily.
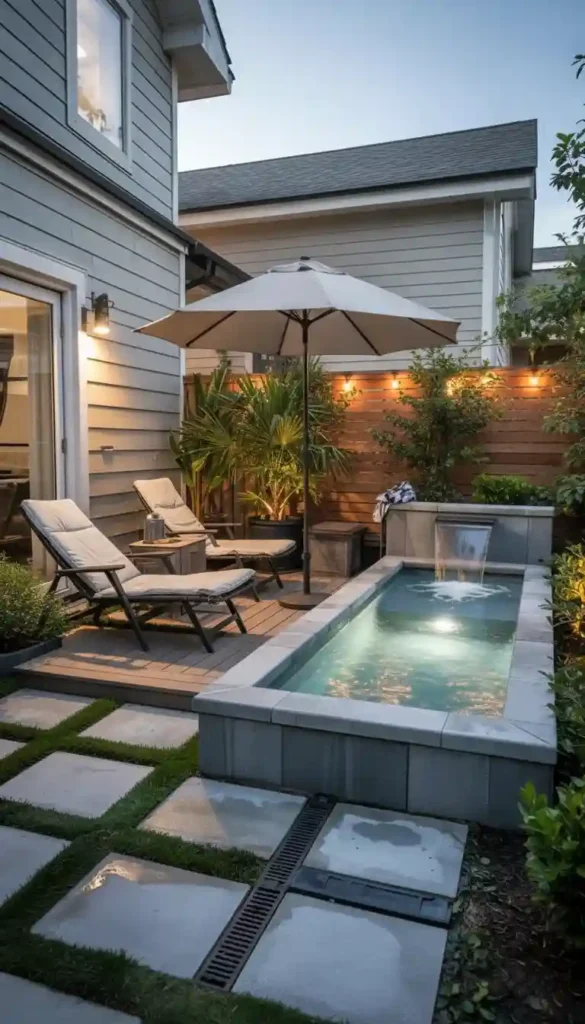
Plunge Pool Ideas For Entertaining In Small Backyards
A small backyard plunge pool can be one of the best entertaining investments you make — but only if the space is designed for hosting from the start. The pool needs to be one part of a broader social layout, not the only thing in the yard.
Define Three Clear Zones
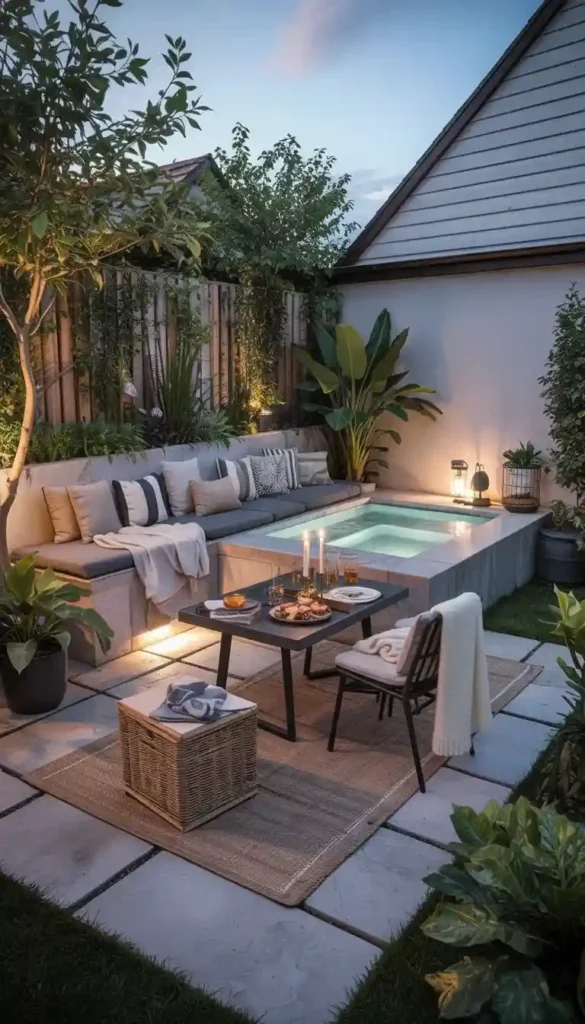
The most successful small entertaining spaces have distinct areas that allow guests to choose their level of involvement with the water.
- Wet zone: The immediate pool area, including the coping edge and a short wet deck strip.
- Dry social zone: A dedicated seating area at least five to six feet from the water’s edge, with comfortable furniture and protection from splashes.
- Food and drink zone: A surface or table positioned away from the splash zone where serving and grazing can happen safely.
You do not need walls to separate these zones. Materials, lighting levels, and flooring changes do the work without reducing the sense of openness.
Choose Furniture That Saves Space And Invites Staying
In a small backyard, furniture selection is where entertaining success or failure is decided. The wrong pieces make guests feel crowded. The right pieces make the space feel generous.
- A built-in bench or banquette with outdoor cushions is the single best space-saver in a small backyard. It maximizes seating without consuming floor space.
- A narrow bar ledge along a fence or wall gives guests a place to set drinks without a full dining table.
- Stackable chairs allow flexibility — use them when needed, store them when not.
📌 Pin this small backyard entertaining layout! 📌
Every piece of furniture should be proportional to the space. Oversized outdoor sofas are a common mistake that instantly makes a small yard feel cramped.
Get Lighting Right For Hosting
Lighting transforms a small backyard from a daytime space into a full evening venue. When you are entertaining, it also sets the mood and signals where guests should gather.
- Warm perimeter glow: String lights or low wall-mounted fixtures that define the boundary of the space and add warmth.
- Task light near the food zone: A functional light source that makes serving and eating comfortable.
- Subtle pool light: A single underwater LED that makes the water look inviting without being distractingly bright.
The combination of these three layers creates depth and atmosphere at a fraction of the cost of a full outdoor lighting installation.
Add Sound Without Clutter
Music elevates almost any gathering, but visible speaker setups and tangled cables undermine the clean aesthetic you have worked to create.
- Discreet outdoor speakers mounted flush with a fence or wall deliver good sound without visual clutter.
- Bluetooth rock speakers disguised as landscape stones are an affordable DIY-friendly option for smaller spaces.
- Keep the volume at a level where guests can still have easy conversation — the pool and the company should be the focus, not the sound system.
Create A Cold-Warm Balance If The Pool Is A Plunge Pool
If the pool runs cold, the entertaining space needs to offer a warm counterpoint. Guests who are not plunging should feel just as comfortable as those who are.
- A compact fire feature — a bioethanol table fire or a small fire bowl — creates a warm focal point that draws guests together.
- A heated outdoor blanket station — a simple basket of wool throws near the seating area — is a practical, cozy detail that guests appreciate.
- Position the warm zone directly opposite or adjacent to the pool so the two experiences feel connected rather than separate.
📌 Save this plunge pool entertaining flow plan! 📌
Plan For Clean, Easy Hosting Flow
The best entertaining spaces are ones where guests can move naturally without bottlenecks or awkward moments. In a small backyard, flow planning is critical.
- Create a clear dry route from the house to the seating area that does not require guests to pass through the wet zone.
- Include a dedicated landing surface for trays and serving dishes — even a narrow console table against a fence wall works.
- Use a weatherproof storage box to hide pool tools, chemicals, and extra cushions so the space stays tidy when guests arrive.
Hosting feels effortless when the space has been designed to support it. These are small planning decisions with large real-life impact.
Plunge Pool Ideas For Small Yards And Relaxation Spaces
A plunge pool in a small yard should feel like a private retreat, not a feature crammed into leftover space. The difference comes down to how intelligently you use the perimeter and how thoughtfully you design the surrounding experience.
Position The Pool To Create A Clear Path
One of the most effective layout strategies for small yards is pushing the pool toward one edge rather than centering it. This sounds counterintuitive, but it works.
- A pool positioned close to one boundary leaves a generous, usable corridor on the other side.
- One clear, wide path feels significantly more spacious than two narrow paths on either side of a centered pool.
- Position the open corridor on the side that connects your home’s back door to the pool entry point for the most natural flow.
This single layout decision changes how large the yard feels on a daily basis.
Use Long Lines To Stretch The Space
In narrow yards, the direction of your decking or paving lines has a measurable effect on perceived space.
- Horizontal lines running away from the home draw the eye toward the back of the yard and make the space feel longer.
- Large-format pavers or planks with minimal grout or gap lines reduce visual noise and create a sense of calm expanse.
- Avoid small tiles or busy patterns in tight yards — they visually chop the space into fragments.
📌 Pin this small yard plunge pool layout strategy! 📌
Treat Planting As Architecture
Greenery in a small yard does not just soften the space — it structures it. When used deliberately, plants function like walls, ceilings, and partitions without consuming floor space.
- Vertical greenery on fences and walls lifts the eye upward, making the space feel taller rather than just larger.
- Dense planting in tall planters creates privacy screens that feel more alive and welcoming than timber or metal panels.
- A single statement tree or large plant near the pool creates a sense of enclosure and intimacy that expensive built structures sometimes fail to deliver.
Choose plants that suit your climate and require minimal maintenance. The most beautiful planting schemes in small yards are the low-maintenance ones that stay looking good year-round.
Build Elements That Do Double Duty
In a small yard, every built element should serve at least two purposes. This is not a compromise — it is smart, efficient design.
- A raised planter along the pool edge can also serve as a seat edge for guests.
- A privacy screen on the fence boundary can double as a surface for wall-mounted lighting or a small outdoor mirror.
- A storage bench near the pool entry holds towels and test kits while also providing a place to sit when taking off shoes.
Multifunctional elements make small yards work harder without making them feel more crowded.
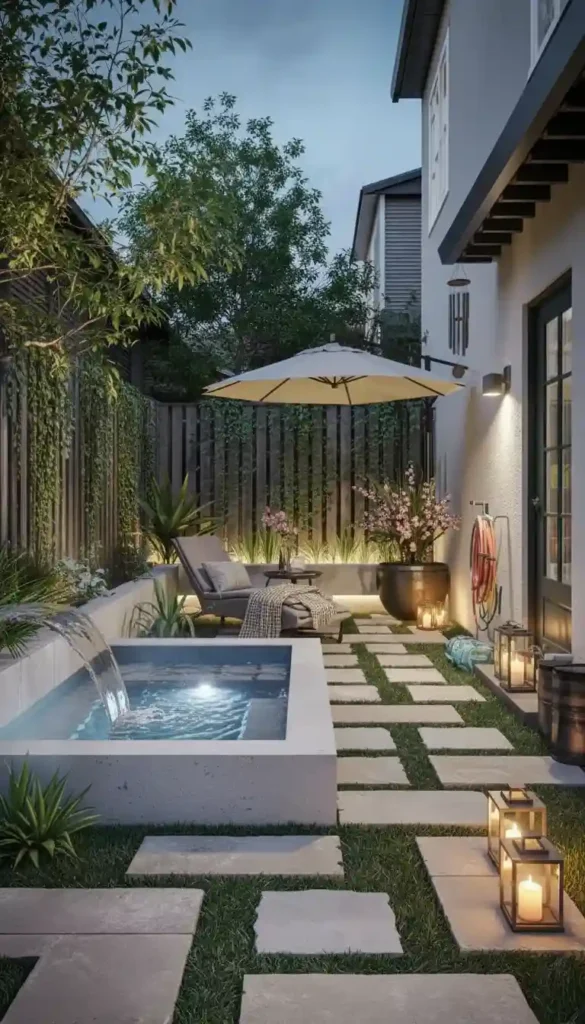
Create A Quiet Corner For Relaxation
Even in the smallest yards, a dedicated relaxation corner transforms how the space feels. A pool without a comfortable place to rest is a fitness feature. A pool with a thoughtful lounge corner is a retreat.
- One low lounge chair or a built-in chaise positioned to look toward the water is enough.
- Add a small side table for a glass of water, a book, or a phone.
- Use a soft outdoor cushion in a color that complements the deck and planting palette.
This corner does not need to be large. It needs to feel considered. Even a single well-chosen chair signals that this is a place designed for staying and resting, not just passing through.
📌 Save this plunge pool relaxation zone design! 📌
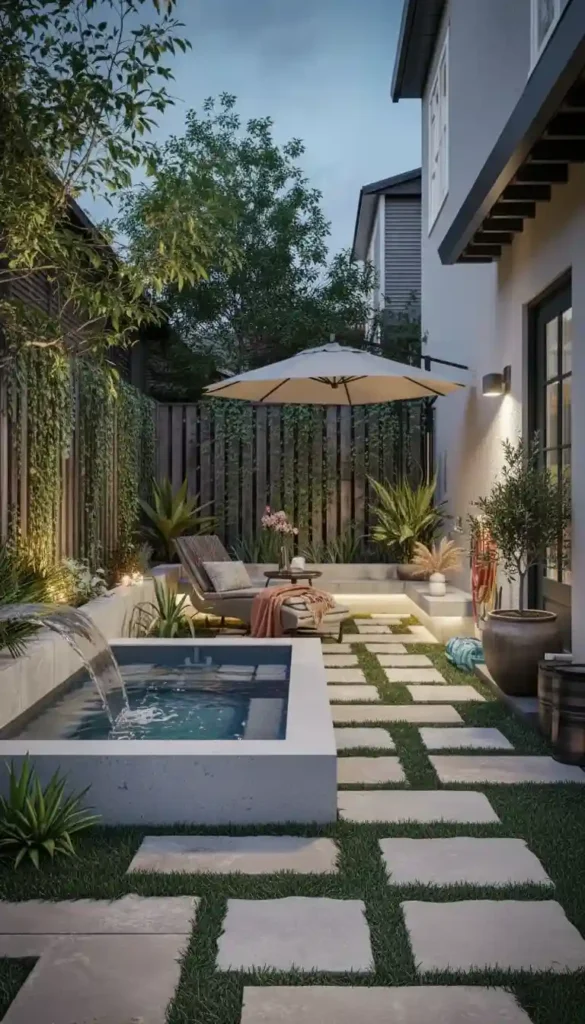
Add A Water Sound Element
Sound is an underrated design tool in small outdoor spaces. A gentle water sound does two things simultaneously — it creates a sense of calm, and it masks noise from neighboring properties or nearby streets.
- A small spillway along one pool wall creates a soft, continuous sound without mechanical complexity.
- A simple bubbler or jet achieves a similar effect with minimal installation requirements.
- Even a small freestanding water feature adjacent to the pool can provide this acoustic benefit if modifying the pool itself is not possible.
The effect on the experience of the space is disproportionate to the cost and complexity of adding it.
Design For Year-Round Use
A small yard plunge pool that only works in summer is a missed opportunity. With a few thoughtful additions, it can be a year-round asset.
- A quality pool cover that supports temperature stability is one of the best investments in any climate. It reduces heating costs, keeps the water clean, and extends the usable season.
- A portable outdoor heater near the dry lounge corner makes the surrounding space comfortable on cooler evenings.
- Choose coping materials that stay comfortable in both summer heat and cooler temperatures. Some stones and composites become uncomfortably hot or cold at temperature extremes — check the specifications before you commit.
A pool that works in every season is a pool that gets used every season. That is the difference between a feature that adds lasting value and one that sits unused for eight months of the year.
Conclusion
A plunge pool in a small space is not a compromise version of something bigger. When it is designed with intention, it is one of the most valuable things you can add to your home — both in terms of daily quality of life and long-term property value. The five ideas in this guide each approach the challenge from a different angle, but they all share the same core principle: small spaces reward clear thinking, restrained design, and honest planning.
Whether you are working with a narrow backyard, a modest budget, a DIY approach, an entertainment focus, or a relaxation goal, the path forward is the same. Start with the layout that makes the space feel generous. Choose materials that are honest and durable. Design for the routine you actually want to build. Add the one or two details that make the space feel genuinely yours. Do all of that, and your plunge pool will not just look good in photos — it will feel good every single day you use it.

“I share simple, beautiful and affordable home decor ideas to help you style every corner of your home with ease.